posted 04 August 2024
I recently purchased a new Dell XPS15-9530 with Windows 11 installed, and I have spent the time since that purchase trying to get Windows 11 to work like I want it to, and Windows 11 has spent that same amount of time trying to get me to work like it wants me to – GRRR!
Here are some of the things I want to change from the basic Win 11 Home package I received.
- Win 11 photo viewer sucks, and the photo viewer from Office 2010 rocks. In the old viewer, I can move from photo to photo with left and right arrows, and I can manipulate the photo multiple photos at the same time.
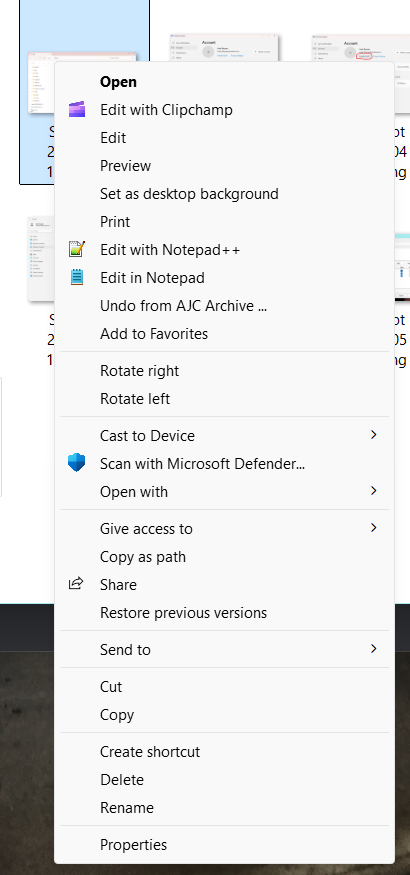
- The right-click context menu in the file explorer view now has multiple pages of context menu items, most of which aren’t useful. The ‘preview’ option, which I use a lot, is buried at the bottom of the second page
- Win 11 insists on storing my files in the ‘OneDrive’ (cloud) folder, and I hate that. Even if I ‘unlink’ my PC from ‘OneDrive’, it still tries to put stuff on the cloud – grr. See this link for information on how to adjust this
- I now have multiple ‘Documents’ folders with multiple icons, and none of them point to my Documents folder.
- Win 11 insists on using the first 5 characters of my email address as the name of the primary user folder (‘C:\users\[primary user name]’) and I want it use my first name for this. See this link for some information on this. Also, this link seems to imply that I might be able to ‘change my primary alias’ in my Microsoft account, (which might then change the default user account?). I was able to create a fake Outlook account (Frankabcede@outlook.com) and (although I didn’t do it this time) make it the primary alias. In theory, if I do this and then start over with Windows 11, I should wind up with ‘Frank’ as my default user account, and C:\users\Frank as my default user folder.
- Win 11 insists on saving screenshots taken with Shift-Windows-S key combination to a screenshots folder in C:\Users\paynt\OneDrive\Pictures\Screenshots, even though I have unlinked my PC from OneDrive.
- The private LAN connection between my old and new PC’s seems to come and go with the wind. At one point I got it working by setting it to ‘not use passwords’ or something like that.
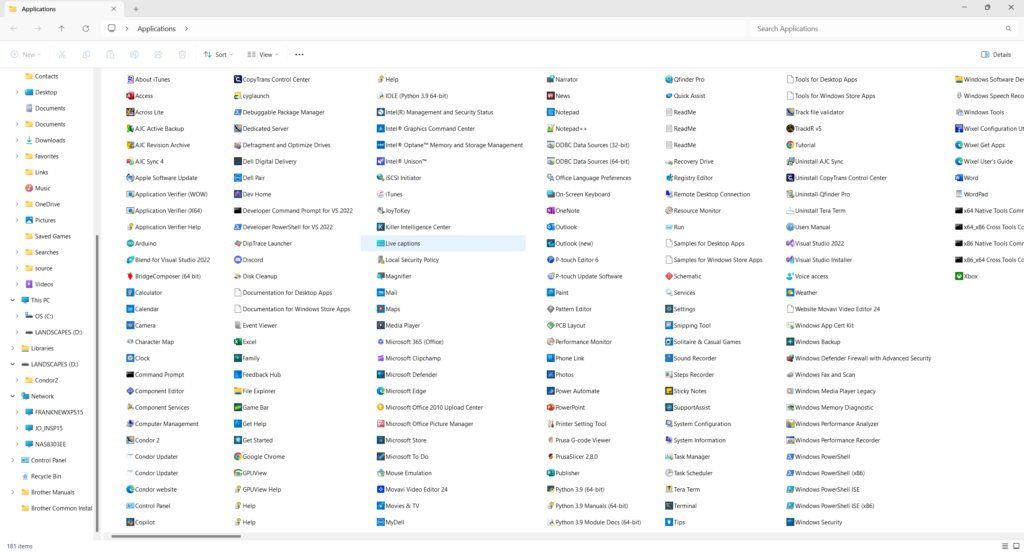
So, for the nth time, I’m starting over, and this time I plan to document all the steps, so when I have to do this again (on the Nth+1 redo), I’ll have a little bit better roadmap. To prepare for the ‘redo’, I printed out the list of apps currently installed on the new PC, as shown in the screenshot below:
When I look at the ‘Home’ file explorer display on my old PC, I see the following:
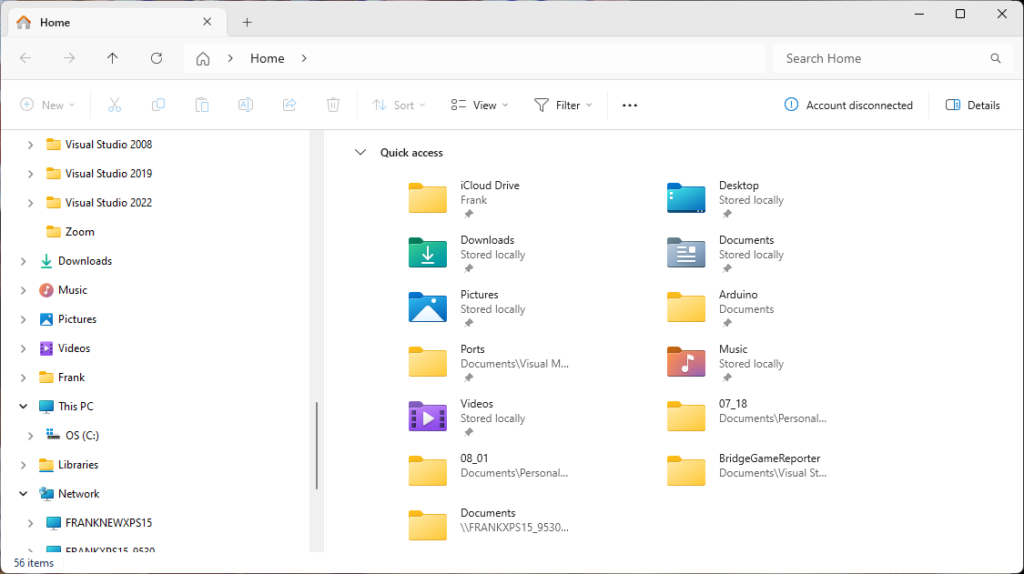
Which shows that Downloads, Pictures, Videos, Desktop, Music and ‘Documents’ have ‘Stored Locally’ shown – so apparently, I got that done correctly on my old PC. When I do the same thing on my new PC, I get the following:
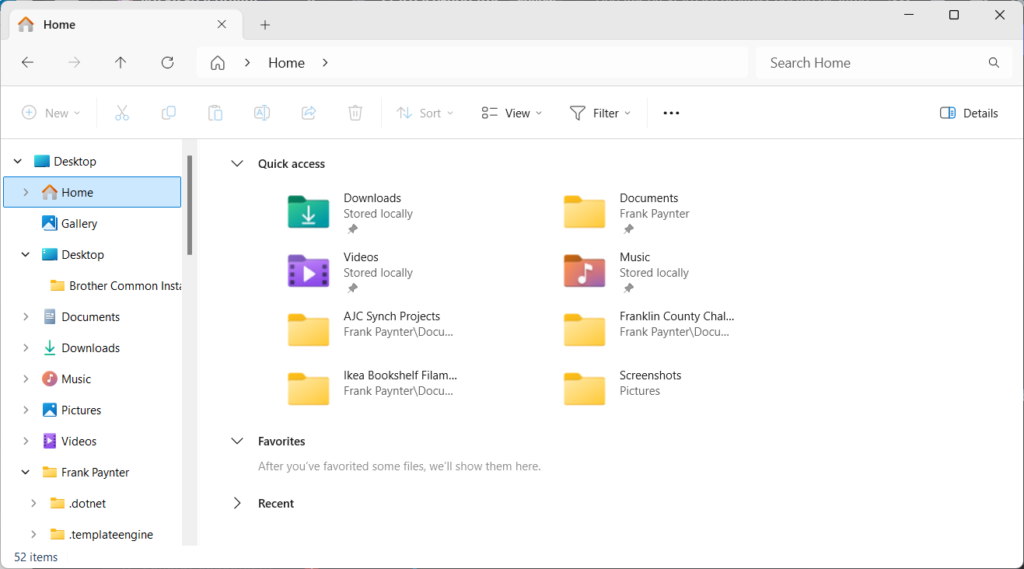
Resetting to factory defaults while keeping personal files:
I followed the steps shown in this link to restore to factory defaults while keeping personal files intact. Unfortunately when it came back up again, it still had ‘C:\users\paynt’ as the default folder, along with another one labelled Frank.Frank_9350, wherever the heck that came from.
Trying again, but this time I chose the option to download the OS from the web rather than restoring from a local copy.
This didn’t work either, so I elected to reset from web download, including ditching all my files and accounts (everything is backed up on my NAS, so shouldn’t be an issue).
On this run-through, I opted to not restore from my previous PC, instead opting to ‘set up as a new PC’. We’ll see how this goes. Also, I used my new ‘Frank_Paynter@outlook.com’ as my email address for my Microsoft account. Hopefully that will result in ‘C:\users\Frank’ (first 5 characters of email address) as my default user folder
Decided to skip ‘Let’s customize your experience’ and ‘Use your phone from your PC’. Accepted ‘Always have access to your recent browsing data’, skipped PC Game Pass, and then it went into updates.
Success! (with a small ‘S’). The default user folder is named ‘Frank’ instead of ‘paynt’, and there is only one of them. Also, Desktop, Downloads, Documents, Music, and Videos are ‘Stored Locally’. Unfortunately, ‘Pictures’ are still stored on OneDrive.
So, I found this:
How do I Unsync a picture folder from OneDrive?
Open OneDrive settings (select the OneDrive cloud icon in your notification area, and then select the OneDrive Help and Settings icon then Settings.) Go to the Account tab. Select Choose folders. In the Choose Folders dialog box, uncheck any folders you don’t want to sync to your computer and select OK.
And UNchecked all the folders. The first time I tried this, I couldn’t UNcheck the pictures folder, and there was a message “we are unable to stop synching some folders” After I searched on this, I found another page that said:
May 11, 2021 — Can’t stop syncing folder · Right-click OneDrive blue cloud icon in the system try, click Settings. · Go to Backup tab and click Manage Backup.
So, I did that and told Windows to stop backing up any folders to OneDrive. Then I was able to UNcheck the pictures folder (and all the other ones too), so hopefully I am almost fully weaned from OneDrive at this point. Curiously, when I went back to the ‘Choose Folders’ page to verify that everything was still UNchecked, it took a while (a minute or two) for the page to come up. When it did, however, everything was still UNchecked – Yay!
And, another success! When I took a screengrab of the ‘Choose Folders’ page, the storage location turned out to be “C:\Users\Frank\Pictures\Screenshots” – Yay Yay! I also confirmed it’s not actually necessary to bring the screengrab up to center screen and select ‘Save’, as screengrabs are automatically saved to the above folder – Yay Yay Yay!
Next, I unlinked this PC from OneDrive, using the procedure below:
To unlink your OneDrive account from a PC, you can do the following:
- Select the OneDrive cloud in your notification area to open the OneDrive pop-up
- Select the OneDrive Help and Settings icon
- Select Settings
- Go to the Account tab
- Select Unlink this PC
This actually worked, and now the OneDrive (cloud) icon has disappeared from the left side of File Explorer entirely – Yay Yay Yay Yay!
Windows 11 Pink Border on File Explorer
Apparently, Windows 11 has a weird sense of humor, as I have found that the border of the file explorer (and maybe others) dialog box is colored pink when it is selected, and gray when it isn’t. I hate the pink color, and naturally (because Windows 11) it can’t be changed! I found this page, where it says:
Windows 11 File Explorer uses Mica effect in the titlebar and toolbar and that’s why we can’t set any color in the titlebar using Personalization settings. In Windows 10, we could set any color in File Explorer’s titlebar by changing the accent color in Personalization settings. So, following the steps on this page, I downloaded ExplorerPatcher and tried to use it to get rid of the pink border around file explorer windows, but either windows 11 or ExplorerPatcher has changed, as this trick didn’t work -Rats!
Among other posts on the i-net, I found this one complaining about ‘pink everywhere’. The response by a ‘Microsoft expert’ contained a link to a ‘known problem in win 11’, bu the link is broken. Otherwise there was a long dissertation about display drivers (which I ignored because I haven’t changed the drivers on my laptop and they worked fine with the original win 11 install).
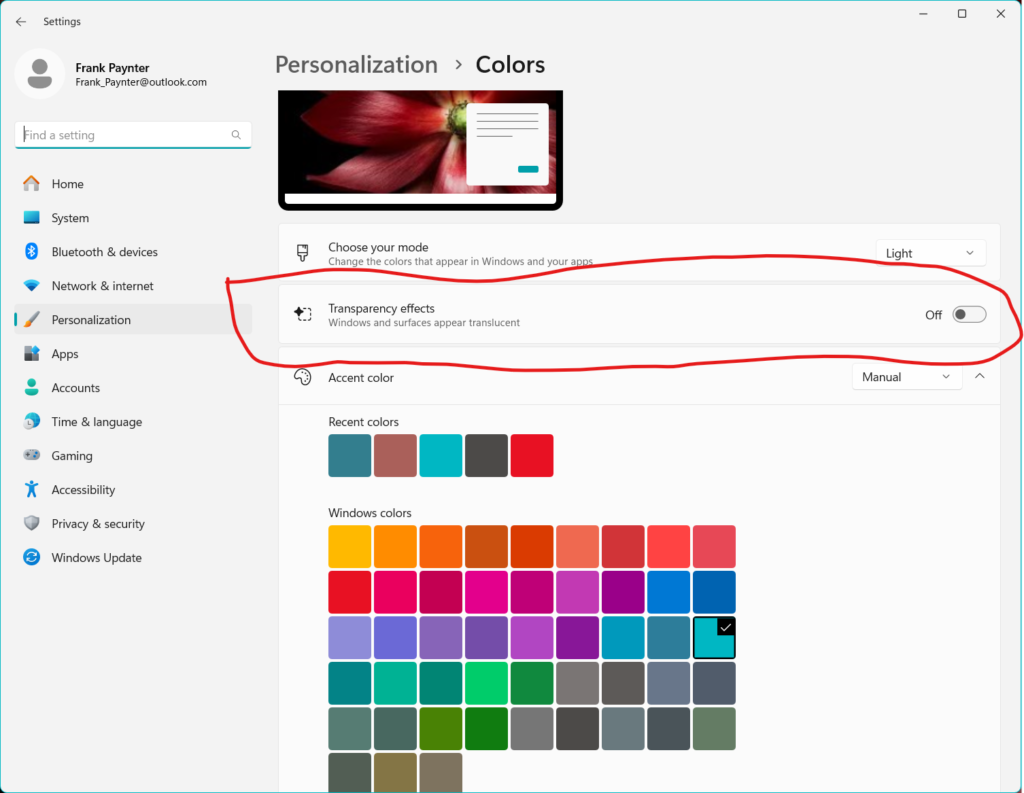
Finally, while just randomly changing things on the color settings dialog, I switched the ‘Transparency effects’ OFF, and voila! The pink border around file explorer windows was removed! Halleluiah! Here’s a screenshot of this particular dialog with the ‘Transparency effects’ switch highlighted:
File Sharing on Local Network:
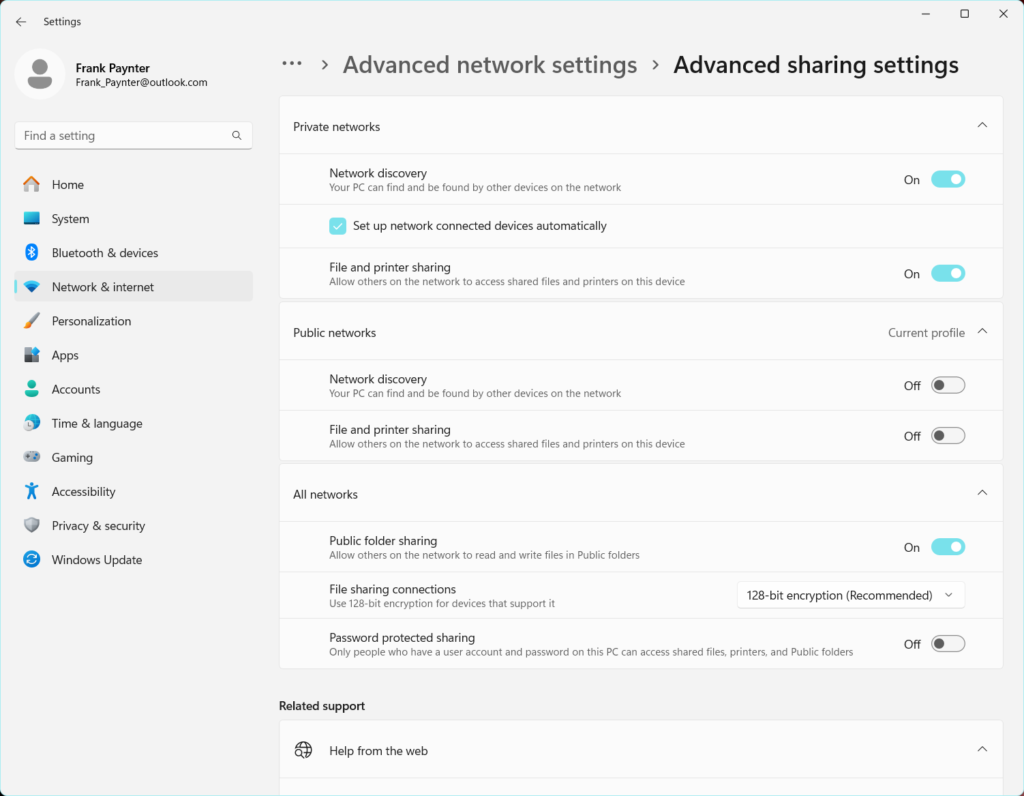
Before I reset my new laptop, I had file sharing (somewhat) working between my new laptop, my old laptop, and my wife’s laptop, so I was hopeful that I could get it working again. In ‘Advanced Network settings’ I enabled ‘Network discovery’ and ‘File and printer sharing’ for private networks (and disabled them for public ones). I also disabled the ‘Password protected sharing’ option and enabled ‘Public folder sharing’. Here’s a screenshot of the setup:
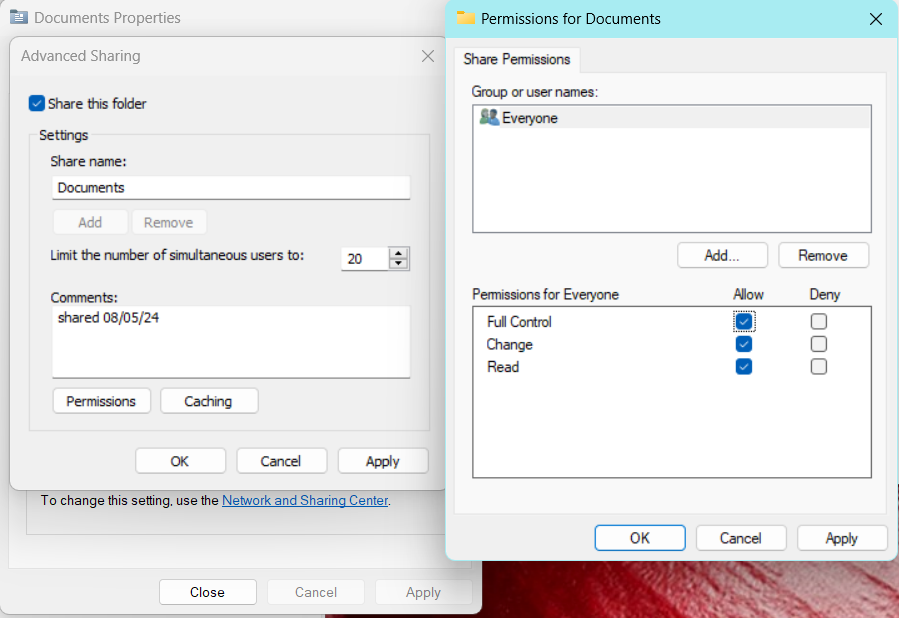
Then I verified the above settings were the same for my old laptop (they were). In File Explorer I navigated to the C:\Users\Frank\Documents folder and in ‘Advanced Network Settings’ set it to share with full control by ‘Everyone’ as shown below:
Then I did the same thing with C:\Users\Public.
When I went back to my old laptop to verify sharing, I noticed that that the ‘Documents’ folder wasn’t shared, but the ‘Public’ folder was properly shared with full control for ‘Everyone’. That might explain why I was having problems with local network sharing before. In any case, I set up sharing for ‘Documents’ and ‘Public’ the same as the new laptop. Then I restarted both laptops.
When the laptops came back up, I double-clicked the network icon on both. On my old laptop I could see the NAS and Jo’s laptop, but not my new one. When I did the same on the new laptop, I couldn’t see any other devices, but there was a popup message at the top of the explorer window to the effect that network discovery had not been turned on, and to ‘click here’ to do so. I clicked, and after that I could see all the devices on my local network. I’m not sure why this happened, as I was sure I had already enabled network sharing, as shown in the ‘Advanced Network Settings – Advanced Sharing Settings’ screenshot above (maybe I didn’t click on OK?).
So, after rebooting both laptops, I can access folders on my new laptop from my old laptop, but not the other way around. I successfully copied a ~2MB folder from old to new Documents folders, but I can’t go the other way – strange. I worked through a ton of potential fixes for this, all without success. So, I’ve decided to bend to the inevitable and just go with the flow here.
Applications:
Windows Office – installed OK
Upgrade to Win 11 Pro – Per advice from CoPilot, navigated to Settings->System->Activation->Change Product Key -> Click on ‘Change’ -> enter generic Windows 11 Pro product key (VK7JG-NPHTM-C97JM-9MPGT-3V66T), and clicked OK. That was all there was to it. First time I’ve actually benefited from AI!
Activate Application Guard: Done
AJC Active Backup & AJCSync4: Done
Arduino & Teensyduino: According to this Teensy page, I Installed Arduino IDE 2.3.2, copied in the URL, and then installed teensy-specific software as described. Everything seemed to go well, with last line of log = ‘Platform teensy:avr@1.59.0 installed‘
Bridge Composer: Downloaded the 30-day trial, Installed and activated using emailed activation key
CopyTransControlCenter/CopyTransPhoto: For uploading videos from wife’s iphone – Done
DipTrace non-professional Standard License: Done
Movavi Video Editor 2024: Installed and activated using emailed activation key, but I don’t like the dark background – fix later
Notepad++: Done
P-touch Editor: Done
Prusa Slicer 2.8.0: Done
TeraTerm: Done
TrackIR5: Tried to install but was stopped by McAfee. Uninstalled McAfee – Done
Visual Studio 2022 Community Edition: Done
Wixel Configuration Utility: Done
Get Legacy Office Photo Viewer Back:
This site has the procedure for getting the old photo viewer back as a stand-alone app. Following the link to this site, I downloaded Microsoft SharePoint 2010 installer and launched it. Then I selected ‘Customize’. Then I set all options to ‘Not available’ except for ‘Microsoft Office Picture Manager’, which I set for ‘Run from My Computer’ (see screengrab below).
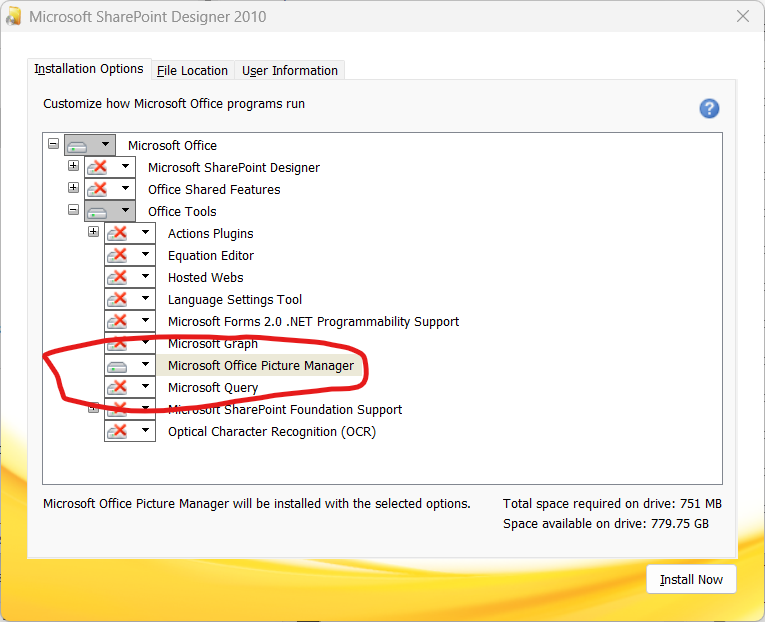
Then I clicked on ‘Install Now’ to install Picture Manager as a stand-alone app.
The next step is to restore the ‘Preview’ context menu option for photos. I found this site:
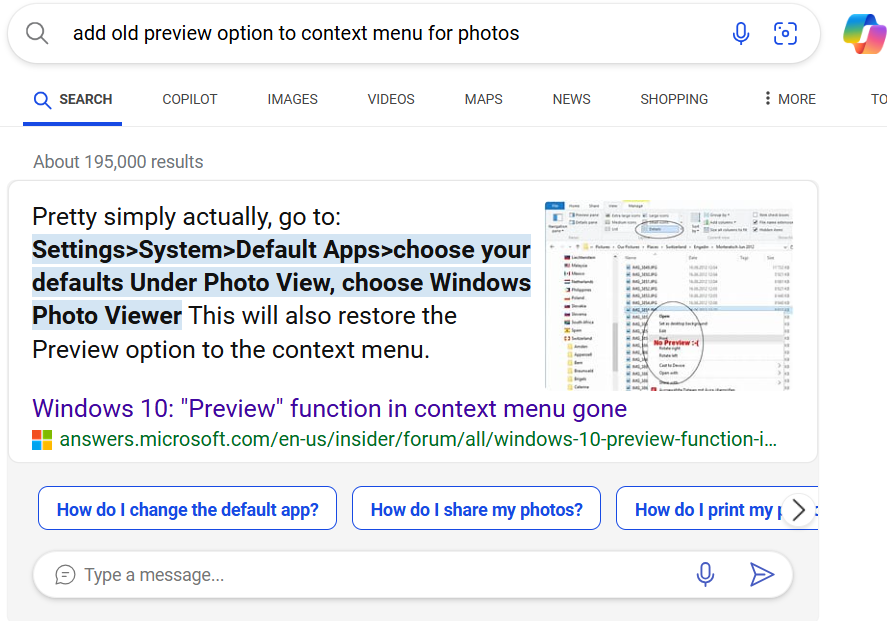
However, I found that ‘Default Apps’ had been moved to Settings -> Apps -> Default apps. From there select ‘Photos’, and then set’ Microsoft Office 2010′ as the default app for each photo extension (.jpeg, .jpg, .png). This worked great – and as promised, the ‘Preview’ option appeared on the context menu (unfortunately it appeared on the ‘second page’ so you have to first select ‘Show more options’ to see it).
Restore Windows 10 context menu with ‘Preview’ item near top:
Now that I have the old Office Photo Manager back, the next trick is to move the ‘Preview’ context menu item to the ‘front’ page of the context menu. After some research, it appears that the easiest way to do this is to simply restore the Windows 10 context menu style. This involves adding a key to the registry. There are a number of ‘HowTo’ videos on this – pick one. After editing the registry, this is my new context menu for photos:
End Game:
At this point I think I have things pretty well recovered, without all the crap about multiple ‘Document’ folders and wrong-named user folders. I’ll let this play out for a while and make any other adjustments as necessary. Hopefully I can now settle into my new laptop without cringing every time it opens a File Explorer window
Stay Tuned,
Frank