Recently I have returned to working with WallE my autonomous wall-following robot, and I started thinking again about the issue it has with reflective surfaces. At the same time I ran across a post about using two ESP32-CAM modules for distance measurements, and I started to wonder if I could do something like that with WallE. I already have a visible red laser on the front, so maybe the two ESP32-CAM’s could use the laser ‘dot’ for distance measurements? Would this technique have the same problem with reflective surfaces?
I just happened to have two ESP32-CAM modules in my parts bin, so I thought I would give this idea a try and see how it goes. I know next to nothing about image processing in general and about the ESP32-CAM in particular, so if nothing else it will be a learning experience!
After a bit of web research, I got my Visual Studio/Visual Micro development environment configured for ESP32-CAM program development and for the ‘AI Thinkier EP32-CAM(esp32_esp32cam)’ target, and found a couple of examples that came with the newly-installed library. The first one I tried was the ‘CameraWebServer’ example (C:\Users\Frank\Documents\Arduino\Libraries\arduino-esp32-master\libraries\ESP32\examples\Camera\CameraWebServer\camera_pins.h), which turns the ESP32-CAM module into a webserver that can be accessed over the local network using any browser. The example provides for still images and real-time streaming – nice! However, I wasn’t interested in this capability, so after looking around a bit more I found an example that just takes still images and writes them to the SD card. I modified the code to convert the captured JPEG into BMP888 format so I could look at the individual color channels in isolation. I set the capture size to 128×128 pixels and capture a JPEG frame. The JPEG frame is just 2352 bytes, but the BMP888 conversion expands to 49206 bytes (128 x 128 x 3 = 49152, plus 48-byte header + 6 bytes at end, I think). Here’s the code at present:
|
1 2 3 4 5 6 7 8 9 10 11 12 13 14 15 16 17 18 19 20 21 22 23 24 25 26 27 28 29 30 31 32 33 34 35 36 37 38 39 40 41 42 43 44 45 46 47 48 49 50 51 52 53 54 55 56 57 58 59 60 61 62 63 64 65 66 67 68 69 70 71 72 73 74 75 76 77 78 79 80 81 82 83 84 85 86 87 88 89 90 91 92 93 94 95 96 97 98 99 100 101 102 103 104 105 106 107 108 109 110 111 112 113 114 115 116 117 118 119 120 121 122 123 124 125 126 127 128 129 130 131 132 133 134 135 136 137 138 139 140 141 142 143 144 145 146 147 148 149 150 151 152 153 154 155 156 157 158 159 160 161 162 163 164 165 166 167 168 169 170 171 172 173 174 175 176 177 178 179 180 181 182 183 184 185 186 187 188 189 190 191 192 193 194 195 196 197 198 199 200 201 202 203 |
// Visual Micro is in vMicro>General>Tutorial Mode // /* Name: ESPCAM_SDCARD.ino Created: 1/30/2025 8:59:52 PM Author: FRANK_XPS_9530\Frank This program captures a JPEG image from the camera and writes it out to the SD card In addition it converts the JPEG image to BMP888 format (3x the size + header) and writes it out to the SD card as well. */ #include "esp_camera.h" #include "Arduino.h" #include "FS.h" // SD Card ESP32 #include "SD_MMC.h" // SD Card ESP32 #include "soc/soc.h" // Disable brownour problems #include "soc/rtc_cntl_reg.h" // Disable brownour problems #include "driver/rtc_io.h" #include <EEPROM.h> // read and write from flash memory // define the number of bytes you want to access #define EEPROM_SIZE 1 // Pin definition for CAMERA_MODEL_AI_THINKER #define PWDN_GPIO_NUM 32 #define RESET_GPIO_NUM -1 #define XCLK_GPIO_NUM 0 #define SIOD_GPIO_NUM 26 #define SIOC_GPIO_NUM 27 #define Y9_GPIO_NUM 35 #define Y8_GPIO_NUM 34 #define Y7_GPIO_NUM 39 #define Y6_GPIO_NUM 36 #define Y5_GPIO_NUM 21 #define Y4_GPIO_NUM 19 #define Y3_GPIO_NUM 18 #define Y2_GPIO_NUM 5 #define VSYNC_GPIO_NUM 25 #define HREF_GPIO_NUM 23 #define PCLK_GPIO_NUM 22 int pictureNumber = 0; void setup() { WRITE_PERI_REG(RTC_CNTL_BROWN_OUT_REG, 0); //disable brownout detector Serial.begin(115200); Serial.println("Starting Setup()"); camera_config_t config; config.ledc_channel = LEDC_CHANNEL_0; config.ledc_timer = LEDC_TIMER_0; config.pin_d0 = Y2_GPIO_NUM; config.pin_d1 = Y3_GPIO_NUM; config.pin_d2 = Y4_GPIO_NUM; config.pin_d3 = Y5_GPIO_NUM; config.pin_d4 = Y6_GPIO_NUM; config.pin_d5 = Y7_GPIO_NUM; config.pin_d6 = Y8_GPIO_NUM; config.pin_d7 = Y9_GPIO_NUM; config.pin_xclk = XCLK_GPIO_NUM; config.pin_pclk = PCLK_GPIO_NUM; config.pin_vsync = VSYNC_GPIO_NUM; config.pin_href = HREF_GPIO_NUM; config.pin_sscb_sda = SIOD_GPIO_NUM; config.pin_sscb_scl = SIOC_GPIO_NUM; config.pin_pwdn = PWDN_GPIO_NUM; config.pin_reset = RESET_GPIO_NUM; config.xclk_freq_hz = 20000000; config.pixel_format = PIXFORMAT_JPEG; if (psramFound()) { config.frame_size = FRAMESIZE_128X128; // FRAMESIZE_ + QVGA|CIF|VGA|SVGA|XGA|SXGA|UXGA config.jpeg_quality = 10; config.fb_count = 2; } else { config.frame_size = FRAMESIZE_SVGA; config.jpeg_quality = 12; config.fb_count = 1; } // Init Camera esp_err_t err = esp_camera_init(&config); if (err != ESP_OK) { Serial.printf("Camera init failed with error 0x%x", err); return; } //Serial.println("Starting SD Card"); if (!SD_MMC.begin()) { Serial.println("SD Card Mount Failed"); return; } uint8_t cardType = SD_MMC.cardType(); if (cardType == CARD_NONE) { Serial.println("No SD Card attached"); return; } camera_fb_t* fb = NULL; // Take Picture with Camera fb = esp_camera_fb_get(); delay(500);//This is key to avoid an issue with the image being very dark and green. If needed adjust total delay time. fb = esp_camera_fb_get(); Serial.printf("Image acquired: fb = %x fb_len = %d\n", fb, fb->len); //02/01/25 per https://www.esp32.com/viewtopic.php?t=17479 can convert JPG to BMP uint8_t* bmp_buf = NULL; //pointer to buffer of uint8_t objects size_t bmp_buf_len = 0; bool converted = frame2bmp(fb, &bmp_buf, &bmp_buf_len); if (!converted) { log_e("BMP Conversion failed"); } else { Serial.printf("BMP Conversion succeeded with buf = %p, bmp_buf_len = %d\n", &bmp_buf, bmp_buf_len); } for (size_t i = 0; i < 10; i++) { Serial.printf("%x\n", bmp_buf[i]); } //decode into r, g, b values //Serial.printf("row\tcol\red\t\blue\t\green"); //for (size_t i = 0; i < fb->height; i++) //{ // for (size_t j = 0; j < fb->width; j++) // { // int16_t pixel = fb->buf[i*fb->width + j]; // int16_t red = ((pixel & 0xF800) >> 11); // int16_t green = ((pixel & 0x07E0) >> 5); // int16_t blue = (pixel & 0x001F); // // Serial.printf("%d\t%d\t%d\t%d\t%d\n", i, j, red, blue, green); // } //} if (!fb) { Serial.println("Camera capture failed"); return; } // initialize EEPROM with predefined size EEPROM.begin(EEPROM_SIZE); pictureNumber = EEPROM.read(0) + 1; // Path where new picture will be saved in SD Card String path = "/picture" + String(pictureNumber) + ".jpg"; //write JPEG file to SD card fs::FS& fs = SD_MMC; Serial.printf("Picture file name: %s\n", path.c_str()); File file = fs.open(path.c_str(), FILE_WRITE); if (!file) { Serial.println("Failed to open file in writing mode"); } else { file.write(fb->buf, fb->len); // payload (image), payload length Serial.printf("Saved file to path: %s\n", path.c_str()); EEPROM.write(0, pictureNumber); EEPROM.commit(); } file.close(); esp_camera_fb_return(fb); //write BMP888 file to SD card path = "/picture" + String(pictureNumber) + ".bmp"; Serial.printf("BMP888 file name: %s\n", path.c_str()); file = fs.open(path.c_str(), FILE_WRITE); if (!file) { Serial.println("Failed to open BMP888 file in writing mode"); } else { file.write(bmp_buf, bmp_buf_len); // payload (image), payload length Serial.printf("Saved file to path: %s\n", path.c_str()); } file.close(); // Turns off the ESP32-CAM white on-board LED (flash) connected to GPIO 4 pinMode(4, OUTPUT); digitalWrite(4, LOW); rtc_gpio_hold_en(GPIO_NUM_4); esp_deep_sleep_start(); } void loop() { } |
and here are the JPEG and BMP888 versions of the 128×128 pixel image captured by the camera:


Then I copied Picture29.bmp to another file byte by byte, zeroing out the Green & Blue bytes so that only the red channel was non-zero. However, when I viewed the resulting file, I got the following image:

This doesn’t make any sense to me, unless the byte ordering in a BMP888 file is BGR or BRG instead of RGB. However, when I researched this on the web, all info I found indicated the byte order in an RGB888 file is indeed R, G, B. It’s a mystery!
Here’s the code that produced the above results:
|
1 2 3 4 5 6 7 8 9 10 11 12 13 14 15 16 17 18 19 20 21 22 23 24 25 26 27 28 29 30 31 32 33 34 35 36 37 38 39 40 41 42 43 44 45 46 47 48 49 50 51 52 53 54 55 56 57 58 59 60 61 62 63 64 65 66 67 68 69 70 71 72 73 74 75 76 77 78 79 80 81 82 83 84 85 86 87 88 89 90 91 92 93 94 95 96 97 98 99 100 101 102 103 104 105 106 107 108 109 110 111 112 113 114 115 116 117 118 119 120 121 122 123 124 125 126 127 128 129 130 131 132 133 134 135 136 137 138 139 140 141 142 143 144 145 146 147 148 149 150 151 152 153 154 155 156 157 158 159 160 161 162 163 164 165 166 167 168 169 170 171 172 173 174 175 176 177 178 179 180 181 182 183 184 185 186 187 188 189 190 191 192 193 194 195 196 197 198 199 200 201 202 203 204 205 206 207 208 209 210 211 212 213 214 215 216 217 218 219 220 221 222 223 224 225 226 227 228 |
// Visual Micro is in vMicro>General>Tutorial Mode // /* Name: ESPCAM_SDCARD.ino Created: 1/30/2025 8:59:52 PM Author: FRANK_XPS_9530\Frank This program captures a JPEG image from the camera and writes it out to the SD card In addition it converts the JPEG image to BMP888 format (3x the size + header) and writes it out to the SD card as well. */ #include "esp_camera.h" #include "Arduino.h" #include "FS.h" // SD Card ESP32 #include "SD_MMC.h" // SD Card ESP32 #include "soc/soc.h" // Disable brownour problems #include "soc/rtc_cntl_reg.h" // Disable brownour problems #include "driver/rtc_io.h" #include <EEPROM.h> // read and write from flash memory // define the number of bytes you want to access #define EEPROM_SIZE 1 // Pin definition for CAMERA_MODEL_AI_THINKER #define PWDN_GPIO_NUM 32 #define RESET_GPIO_NUM -1 #define XCLK_GPIO_NUM 0 #define SIOD_GPIO_NUM 26 #define SIOC_GPIO_NUM 27 #define Y9_GPIO_NUM 35 #define Y8_GPIO_NUM 34 #define Y7_GPIO_NUM 39 #define Y6_GPIO_NUM 36 #define Y5_GPIO_NUM 21 #define Y4_GPIO_NUM 19 #define Y3_GPIO_NUM 18 #define Y2_GPIO_NUM 5 #define VSYNC_GPIO_NUM 25 #define HREF_GPIO_NUM 23 #define PCLK_GPIO_NUM 22 int pictureNumber = 0; void setup() { WRITE_PERI_REG(RTC_CNTL_BROWN_OUT_REG, 0); //disable brownout detector Serial.begin(115200); Serial.println("Starting Setup()"); camera_config_t config; config.ledc_channel = LEDC_CHANNEL_0; config.ledc_timer = LEDC_TIMER_0; config.pin_d0 = Y2_GPIO_NUM; config.pin_d1 = Y3_GPIO_NUM; config.pin_d2 = Y4_GPIO_NUM; config.pin_d3 = Y5_GPIO_NUM; config.pin_d4 = Y6_GPIO_NUM; config.pin_d5 = Y7_GPIO_NUM; config.pin_d6 = Y8_GPIO_NUM; config.pin_d7 = Y9_GPIO_NUM; config.pin_xclk = XCLK_GPIO_NUM; config.pin_pclk = PCLK_GPIO_NUM; config.pin_vsync = VSYNC_GPIO_NUM; config.pin_href = HREF_GPIO_NUM; config.pin_sscb_sda = SIOD_GPIO_NUM; config.pin_sscb_scl = SIOC_GPIO_NUM; config.pin_pwdn = PWDN_GPIO_NUM; config.pin_reset = RESET_GPIO_NUM; config.xclk_freq_hz = 20000000; config.pixel_format = PIXFORMAT_JPEG; if (psramFound()) { config.frame_size = FRAMESIZE_128X128; // FRAMESIZE_ + QVGA|CIF|VGA|SVGA|XGA|SXGA|UXGA config.jpeg_quality = 10; config.fb_count = 2; } else { config.frame_size = FRAMESIZE_SVGA; config.jpeg_quality = 12; config.fb_count = 1; } // Init Camera esp_err_t err = esp_camera_init(&config); if (err != ESP_OK) { Serial.printf("Camera init failed with error 0x%x", err); return; } //Serial.println("Starting SD Card"); if (!SD_MMC.begin()) { Serial.println("SD Card Mount Failed"); return; } uint8_t cardType = SD_MMC.cardType(); if (cardType == CARD_NONE) { Serial.println("No SD Card attached"); return; } camera_fb_t* fb = NULL; // Take Picture with Camera fb = esp_camera_fb_get(); delay(500);//This is key to avoid an issue with the image being very dark and green. If needed adjust total delay time. fb = esp_camera_fb_get(); Serial.printf("Image acquired: fb = %x fb_len = %d\n", fb, fb->len); //02/01/25 per https://www.esp32.com/viewtopic.php?t=17479 can convert JPG to BMP uint8_t* bmp_buf = NULL; //pointer to buffer of uint8_t objects size_t bmp_buf_len = 0; bool converted = frame2bmp(fb, &bmp_buf, &bmp_buf_len); if (!converted) { log_e("BMP Conversion failed"); } else { Serial.printf("BMP Conversion succeeded with buf = %p, bmp_buf_len = %d\n", &bmp_buf, bmp_buf_len); } for (size_t i = 0; i < 100; i++) { Serial.printf("bmp_buf[%d] = %x\n",i, bmp_buf[i]); } if (!fb) { Serial.println("Camera capture failed"); return; } // initialize EEPROM with predefined size EEPROM.begin(EEPROM_SIZE); pictureNumber = EEPROM.read(0) + 1; // Path where new picture will be saved in SD Card String path = "/picture" + String(pictureNumber) + ".jpg"; //write JPEG file to SD card fs::FS& fs = SD_MMC; Serial.printf("Picture file name: %s\n", path.c_str()); File file = fs.open(path.c_str(), FILE_WRITE); if (!file) { Serial.println("Failed to open file in writing mode"); } else { file.write(fb->buf, fb->len); // payload (image), payload length Serial.printf("Saved file to path: %s\n", path.c_str()); EEPROM.write(0, pictureNumber); EEPROM.commit(); } file.close(); esp_camera_fb_return(fb); // //----------------------------------- write BMP888 file to SD card ---------------------- // path = "/picture" + String(pictureNumber) + ".bmp"; Serial.printf("BMP888 file name: %s\n", path.c_str()); file = fs.open(path.c_str(), FILE_WRITE); if (!file) { Serial.println("Failed to open BMP888 file in writing mode"); } else { file.write(bmp_buf, bmp_buf_len); // payload (image), payload length Serial.printf("Saved file to path: %s\n", path.c_str()); } file.close(); // //---------- Write out Red channel (with other bytes = 0) ---------------------- // uint8_t hdr_len = 54; uint16_t image_len = hdr_len + 128 * 128 * 3; //49206 path = "/picture" + String(pictureNumber) + "_red" + ".bmp"; Serial.printf("BMP888 Red channel file name: %s\n", path.c_str()); file = fs.open(path.c_str(), FILE_WRITE); if (!file) { Serial.println("Failed to open BMP888 Red channel file in writing mode"); } else { file.write(bmp_buf, hdr_len); // write out header for (size_t i = hdr_len; i < bmp_buf_len; i+= 3) { file.write(bmp_buf[i]); // red channel file.write(0x0); // blue channel file.write(0x0); // green channel } Serial.printf("Saved BMP888 Red channel file to path: %s\n", path.c_str()); } file.close(); //DEBUG!! Read Red channel data back into RAM and print out first 100 bytes uint8_t* red_buf = NULL; char temp; file = fs.open(path.c_str(), FILE_READ); for (size_t i = 0; i < 100; i++) { temp = file.read(); printf("red[%d] = %x\n",i, temp); } // Turns off the ESP32-CAM white on-board LED (flash) connected to GPIO 4 pinMode(4, OUTPUT); digitalWrite(4, LOW); rtc_gpio_hold_en(GPIO_NUM_4); esp_deep_sleep_start(); } void loop() { } |
I posted the ‘why is my red channel blue?’ question to StackOverflow, and got the following comment back from
I think your problem is with the reference that you found. ISTR the colour order for RGB888 24 bits per pixel BMP is actually Blue, Green, Red. So your all “red” image will indeed appear blue if you have it backwards. See Wiki BMP & DIB 24 bit per pixel. BTW you can get some funny effects converting all red or all blue images from JPEG to BMP since the effective resolution at source is compromised by the Bayer mask sampling.
Well, at least I’m not crazy – my ‘red’ channel WAS actually the ‘blue’ channel – yay! Per the wikipedia article, the actual byte order is “… blue, green and red (8 bits per each sample)”
17 February 2025 Update:
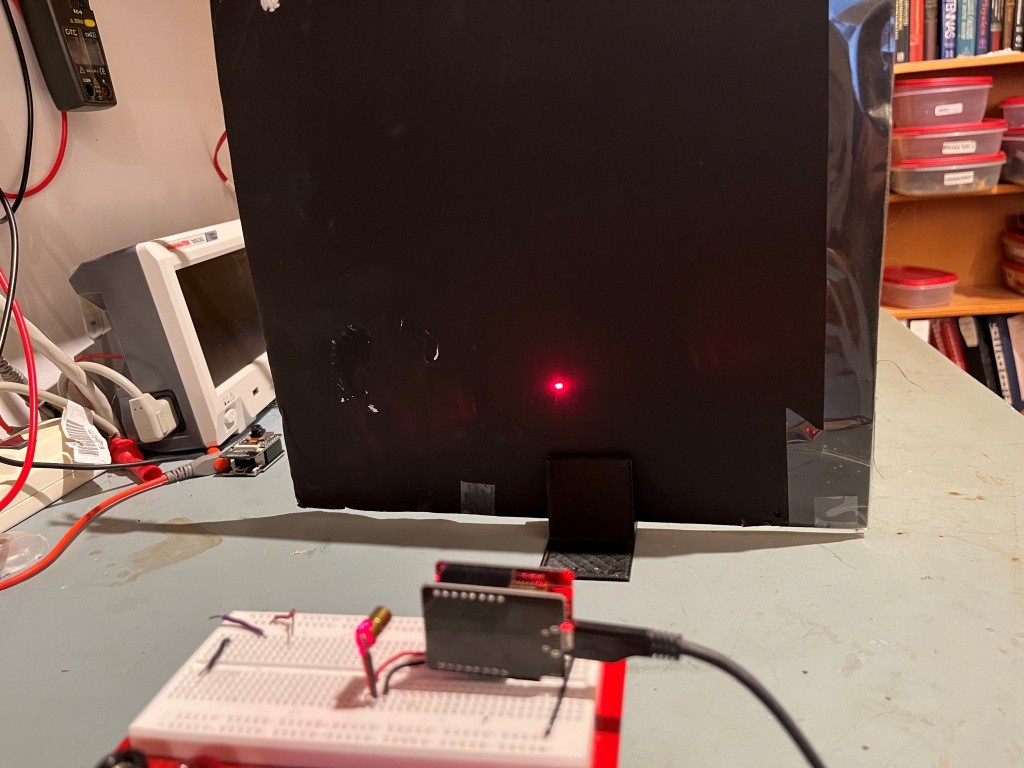
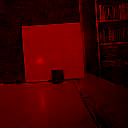
After figuring out the BGR sequence, I moved on to the idea of locating a red laser ‘dot’ on a black background; here’s the experimental setup:
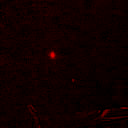
And here is the 128×128 pixel image captured by the ESP32-CAM.

So now I needed to find the coordinates for the red dot in the black field. Rather than deal with the tedium of writing and debugging the search routine in Arduino, I decided to suck the image data into Excel, and write a VBA script to find the ‘dot’, as shown below:
|
1 2 3 4 5 6 7 8 9 10 11 12 13 14 15 16 17 18 19 20 21 22 23 24 25 26 27 28 29 30 31 32 33 34 35 36 37 38 39 40 41 42 43 44 45 46 47 48 49 50 51 52 53 54 55 56 57 58 59 60 61 62 63 64 65 66 67 68 69 70 71 72 73 74 75 76 77 |
Option Explicit Option Base 1 Public Const PixWidth As Integer = 128 Public Const PixHeight As Integer = 128 Public Const HeaderLen As Integer = 54 Sub BinToHex() Dim ColumnNumber As Long, _ RowNumber As Long, _ Ndx As Long, _ handleNumber As Long, _ InBucket As Variant, _ FileToOpen As String, _ FileLen As Long Dim xxxx As Integer 'get the name of the binary file to open FileToOpen = Application.GetOpenFilename("Binary files (*.BMP),*.BMP") ' get the next handle number from windows handleNumber = FreeFile 'open the file, read into a string Open FileToOpen For Binary As handleNumber FileLen = LOF(handleNumber) Debug.Print ("FileLen = " & FileLen) InBucket = input(FileLen, handleNumber) Close handleNumber RowNumber = 1 ColumnNumber = 0 ' for each byte of the string, convert to decimal integer value 0 - 256, ' convert the integer to hex For Ndx = HeaderLen To FileLen Step 3 If Ndx > FileLen Then Stop End If ColumnNumber = ColumnNumber + 1 Cells(RowNumber, ColumnNumber) = Val("&H" & Asc(Mid(InBucket, Ndx, 1))) If (ColumnNumber Mod PixWidth) = 0 Then RowNumber = RowNumber + 1 ColumnNumber = 0 End If Next Ndx 'Set search range to cover entire 128x128 image space, and clear 'out any color settings from previous runs Dim SrchRng As Range, mx As Double, rge As Range, fnd As Range, ColorRange As Range Set SrchRng = Range(Cells(1, 1), Cells(128, 128)) SrchRng.Interior.Color = xlNone Debug.Print ("Search Range = " & SrchRng.Address(, , xlR1C1)) 'find the max value in the range mx = Application.WorksheetFunction.Max(SrchRng) Debug.Print ("max value = " & mx) 'find the address of the max value Set fnd = SrchRng.Find(mx, LookIn:=xlValues) 'if the max value was found, highlight it and the surrounding cells If Not fnd Is Nothing Then Debug.Print ("address of max value = " & fnd.Address(, , xlR1C1)) Set ColorRange = Range(fnd.Offset(-1, -1), fnd.Offset(1, 1)) Debug.Print ("ColorRange = " & ColorRange.Address(, , xlR1C1)) ColorRange.Interior.Color = RGB(255, 0, 0) End If End Sub |
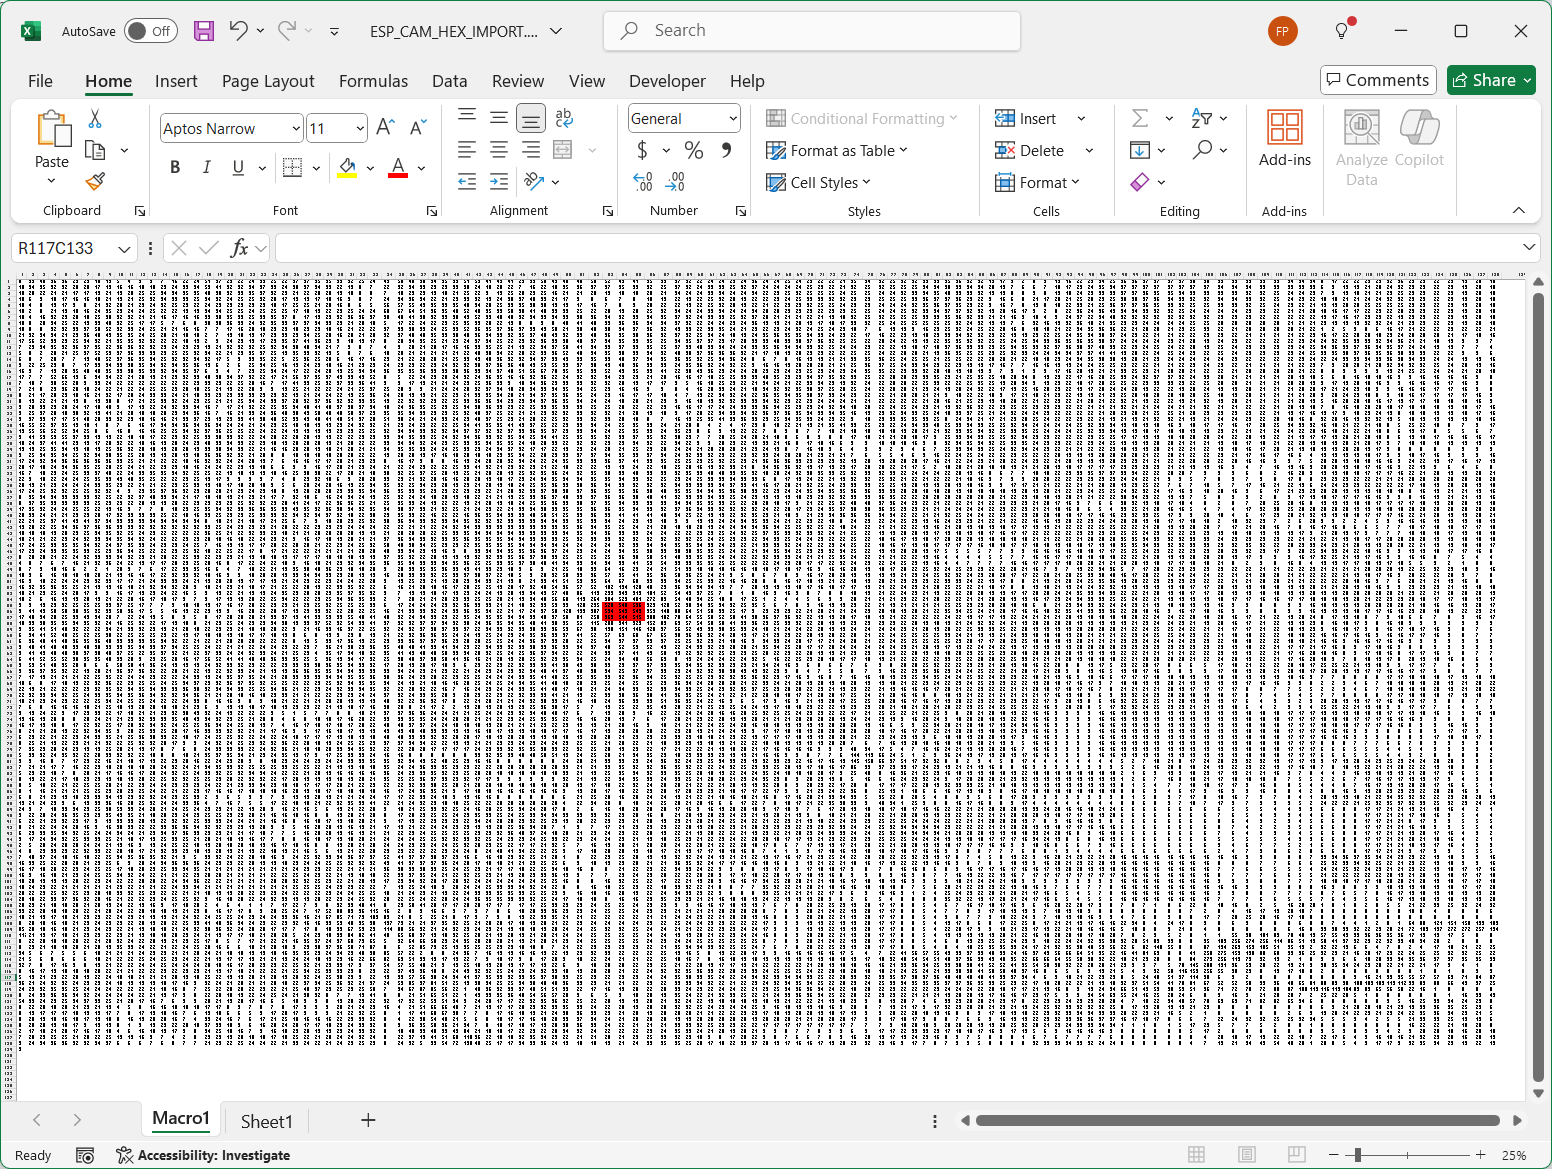
This produced the following Excel spreadsheet (scale adjusted to show entire 128×128 pixel layout):
For comparison purposes, I have repeated the ESP32-CAM image here:
So, it seems pretty clear that I can correctly extract pixel values from the ESP32-CAM image and find the laser dot – at least in this contrived experiment with a non-reflective black background. Also, it appears at first blush like the upper left-hand corner of the ESP32-CAM image corresponds to R1C1 in the Excel spreadsheet.
The next step is to move the ‘dot’ to a significantly different location on the target and see how that effects the location of the max value in the grid – we need this to determine the orientation of the Excel data relative to the image data; maybe I got lucky, and maybe not 😉
02 March 2025 Update:
After setting this project aside for a few weeks, I figured out how to get the ESP32-CAM system to repeatedly grab images, convert them to BMP, and find the maximum red pixel value in the scene. Here’s the code:
|
1 2 3 4 5 6 7 8 9 10 11 12 13 14 15 16 17 18 19 20 21 22 23 24 25 26 27 28 29 30 31 32 33 34 35 36 37 38 39 40 41 42 43 44 45 46 47 48 49 50 51 52 53 54 55 56 57 58 59 60 61 62 63 64 65 66 67 68 69 70 71 72 73 74 75 76 77 78 79 80 81 82 83 84 85 86 87 88 89 90 91 92 93 94 95 96 97 98 99 100 101 102 103 104 105 106 107 108 109 110 111 112 113 114 115 116 117 118 119 120 121 122 123 124 125 126 127 128 129 130 131 132 133 134 135 136 137 138 139 140 141 142 143 144 145 146 147 148 149 150 151 152 153 154 155 156 157 158 159 160 161 162 163 164 165 166 167 168 169 170 171 172 173 174 |
// Visual Micro is in vMicro>General>Tutorial Mode // /* Name: ESPCAM_SDCARD.ino Created: 1/30/2025 8:59:52 PM Author: FRANK_XPS_9530\Frank This program captures a JPEG image from the camera and writes it out to the SD card In addition it converts the JPEG image to BMP888 format (3x the size + header) and writes it out to the SD card as well. */ /*02/19/25 This branch modifies the program to make continuous image captures followed by max intensity spot search. This will be used to find the extents of the image area */ #include "esp_camera.h" #include "Arduino.h" #include "FS.h" // SD Card ESP32 #include "SD_MMC.h" // SD Card ESP32 #include "soc/soc.h" // Disable brownout problems #include "soc/rtc_cntl_reg.h" // Disable brownout problems #include "driver/rtc_io.h" #include <EEPROM.h> // read and write from flash memory #include <elapsedMillis.h> // define the number of bytes you want to access #define EEPROM_SIZE 1 // Pin definition for CAMERA_MODEL_AI_THINKER #define PWDN_GPIO_NUM 32 #define RESET_GPIO_NUM -1 #define XCLK_GPIO_NUM 0 #define SIOD_GPIO_NUM 26 #define SIOC_GPIO_NUM 27 #define Y9_GPIO_NUM 35 #define Y8_GPIO_NUM 34 #define Y7_GPIO_NUM 39 #define Y6_GPIO_NUM 36 #define Y5_GPIO_NUM 21 #define Y4_GPIO_NUM 19 #define Y3_GPIO_NUM 18 #define Y2_GPIO_NUM 5 #define VSYNC_GPIO_NUM 25 #define HREF_GPIO_NUM 23 #define PCLK_GPIO_NUM 22 int pictureNumber = 0; camera_fb_t* fb = NULL; elapsedMillis MsSinceStart; const uint8_t hdr_len = 54; const uint8_t rows = 128; const uint8_t cols = 128; const uint16_t bytes_per_pixel = 3; const uint8_t offset_to_red_byte = 3; const uint16_t bytes_per_row = bytes_per_pixel * cols; const uint16_t image_len = hdr_len + rows * cols * bytes_per_pixel; //49206 void setup() { WRITE_PERI_REG(RTC_CNTL_BROWN_OUT_REG, 0); //disable brownout detector Serial.begin(115200); Serial.println("Starting Setup()"); camera_config_t config; config.ledc_channel = LEDC_CHANNEL_0; config.ledc_timer = LEDC_TIMER_0; config.pin_d0 = Y2_GPIO_NUM; config.pin_d1 = Y3_GPIO_NUM; config.pin_d2 = Y4_GPIO_NUM; config.pin_d3 = Y5_GPIO_NUM; config.pin_d4 = Y6_GPIO_NUM; config.pin_d5 = Y7_GPIO_NUM; config.pin_d6 = Y8_GPIO_NUM; config.pin_d7 = Y9_GPIO_NUM; config.pin_xclk = XCLK_GPIO_NUM; config.pin_pclk = PCLK_GPIO_NUM; config.pin_vsync = VSYNC_GPIO_NUM; config.pin_href = HREF_GPIO_NUM; config.pin_sscb_sda = SIOD_GPIO_NUM; config.pin_sscb_scl = SIOC_GPIO_NUM; config.pin_pwdn = PWDN_GPIO_NUM; config.pin_reset = RESET_GPIO_NUM; config.xclk_freq_hz = 20000000; config.pixel_format = PIXFORMAT_JPEG; if (psramFound()) { config.frame_size = FRAMESIZE_128X128; // FRAMESIZE_ + QVGA|CIF|VGA|SVGA|XGA|SXGA|UXGA config.jpeg_quality = 10; config.fb_count = 2; } else { config.frame_size = FRAMESIZE_SVGA; config.jpeg_quality = 12; config.fb_count = 1; } // Init Camera esp_err_t err = esp_camera_init(&config); if (err != ESP_OK) { Serial.printf("Camera init failed with error 0x%x", err); return; } MsSinceStart = 0; } void loop() { // Take Picture with Camera fb = esp_camera_fb_get(); if (!fb) { Serial.println("Camera capture failed"); return; } //02/01/25 per https://www.esp32.com/viewtopic.php?t=17479 can convert JPG to BMP uint8_t* bmp_buf = NULL; //pointer to buffer of uint8_t objects size_t bmp_buf_len = 0; bool converted = frame2bmp(fb, &bmp_buf, &bmp_buf_len); if (!converted) { log_e("BMP Conversion failed"); } else { // //---------- Find max value in image data ---------------------- // Image data is stored in BGR sequence with a 54-byte header // uint16_t max_val = 0; uint16_t max_row = 0; uint16_t max_col = 0; for (size_t row = 1; row < rows; row++) //for (size_t row = 1; row <= 3; row++) { for (size_t col = 1; col < cols; col++) { uint16_t pix_idx = hdr_len + (row-1)*rows + 3*(col-1) + offset_to_red_byte; char redval = bmp_buf[pix_idx]; if (redval > max_val) { max_val = redval; max_row = row; max_col = col; } } } printf("%lu: max at row[%d], col[%d], max_val = %d\n", (unsigned long)MsSinceStart, max_row, max_col, max_val); } esp_camera_fb_return(fb); fb = NULL; delay(500); } |
When I ran this code in the following experimental setup, I was able to roughly map the row/column layout of the image, as shown:
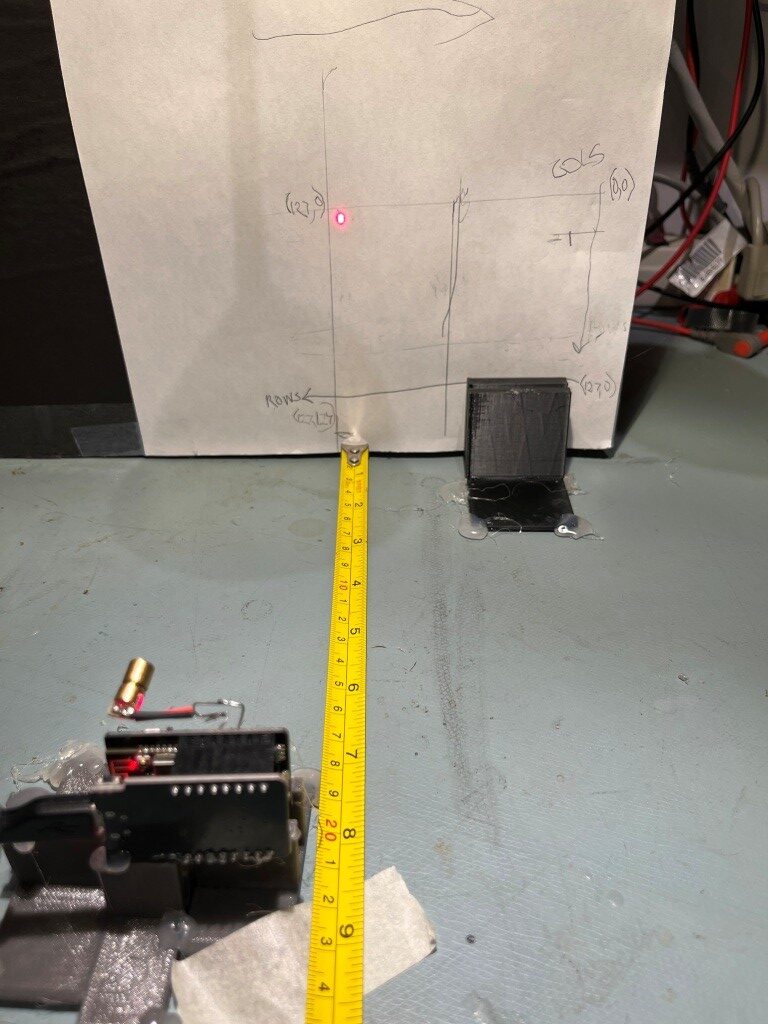
As shown, the (0,0) row/column location is the upper right-hand corner of the image, and (127,127) is located at the bottom left-hand corner. At the 20cm spacing shown, the image boundaries are about 85mm height x 100mm width.
The next step will be to mount two ESP32-CAM modules on some sort of a frame, with the laser mounted halfway between the two.
06 March 2025 Update:
As part of my evil plan to use two ESP32-CAM modules to optically measure the distance to a laser red dot, I needed the two modules to talk to each other. The ESP32-CAM modules don’t really have the same sorts of two-wire communications facilities as do the various Arduino and Teensy modules, but I discovered there is an ‘ESP-NOW’ feature that provides ‘packet’ communications between ESP32 modules using the wireless ethernet channel. I found this tutorial that explains the feature, along with demo code for determining the MAC for each unit and a separate program to demonstrate the technique. I modified the demo code to just repeatedly send a set of fake sensor values back and forth to demonstrate to my satisfaction that this technique would work for my intended application. Here’s the code:
|
1 2 3 4 5 6 7 8 9 10 11 12 13 14 15 16 17 18 19 20 21 22 23 24 25 26 27 28 29 30 31 32 33 34 35 36 37 38 39 40 41 42 43 44 45 46 47 48 49 50 51 52 53 54 55 56 57 58 59 60 61 62 63 64 65 66 67 68 69 70 71 72 73 74 75 76 77 78 79 80 81 82 83 84 85 86 87 88 89 90 91 92 93 94 95 96 97 98 99 100 101 102 103 104 105 106 107 108 109 110 111 112 113 114 115 116 117 118 119 120 121 122 123 124 125 126 127 128 129 130 131 132 133 134 135 136 137 138 139 140 141 142 143 144 145 146 147 148 149 150 151 152 153 154 155 156 157 158 159 160 161 162 163 164 165 166 167 168 169 170 171 172 173 174 |
/* Rui Santos & Sara Santos - Random Nerd Tutorials Complete project details at https://RandomNerdTutorials.com/esp-now-two-way-communication-esp32/ Permission is hereby granted, free of charge, to any person obtaining a copy of this software and associated documentation files. The above copyright notice and this permission notice shall be included in all copies or substantial portions of the Software. */ #include <esp_now.h> #include <WiFi.h> #include <Wire.h> //#include <Adafruit_Sensor.h> //#include <Adafruit_BME280.h> // //#include <Adafruit_GFX.h> //#include <Adafruit_SSD1306.h> #include <elapsedMillis.h> #define SCREEN_WIDTH 128 // OLED display width, in pixels #define SCREEN_HEIGHT 64 // OLED display height, in pixels // Declaration for an SSD1306 display connected to I2C (SDA, SCL pins) //Adafruit_SSD1306 display(SCREEN_WIDTH, SCREEN_HEIGHT, &Wire, -1); // //Adafruit_BME280 bme; // REPLACE WITH THE MAC Address of the *other* device //uint8_t broadcastAddress[] = { 0xFF, 0xFF, 0xFF, 0xFF, 0xFF, 0xFF }; uint8_t broadcastAddress[] = { 0xb4, 0x8a, 0x0a, 0x98, 0xbb, 0xe0 }; //uint8_t broadcastAddress[] = { 0xa8, 0x42, 0xe3, 0x56, 0x9a, 0x8c }; // Define variables to store BME280 readings to be sent float temperature; float humidity; float pressure; // Define variables to store incoming readings float incomingTemp; float incomingHum; float incomingPres; // Variable to store if sending data was successful String success; char char_array[60]; elapsedMillis MsecSinceStart; //Structure example to send data //Must match the receiver structure typedef struct struct_message { float temp; float hum; float pres; } struct_message; // Create a struct_message called BME280Readings to hold sensor readings struct_message BME280Readings; // Create a struct_message to hold incoming sensor readings struct_message incomingReadings; esp_now_peer_info_t peerInfo; // Callback when data is sent void OnDataSent(const uint8_t* mac_addr, esp_now_send_status_t status) { if (status == 0) { success = "Delivery Success :\)"; } else { success = "Delivery Fail :\("; } int len = success.length(); success.toCharArray(char_array, len+1); Serial.printf("\r\n%lu: Last Packet Send Status: %s\n", (unsigned long)MsecSinceStart, char_array); } // Callback when data is received void OnDataRecv(const uint8_t* mac, const uint8_t* incomingData, int len) { memcpy(&incomingReadings, incomingData, sizeof(incomingReadings)); Serial.printf("%lu: Received %d Bytes from remote device\n", (unsigned long)MsecSinceStart, len); incomingTemp = incomingReadings.temp; incomingHum = incomingReadings.hum; incomingPres = incomingReadings.pres; } void setup() { // Init Serial Monitor Serial.begin(115200); // Init BME280 sensor //bool status = bme.begin(0x76); //if (!status) { // Serial.println("Could not find a valid BME280 sensor, check wiring!"); // while (1); //} //// Init OLED display //if (!display.begin(SSD1306_SWITCHCAPVCC, 0x3C)) { // Serial.println(F("SSD1306 allocation failed")); // for (;;); //} // Set device as a Wi-Fi Station WiFi.mode(WIFI_STA); // Init ESP-NOW if (esp_now_init() != ESP_OK) { Serial.println("Error initializing ESP-NOW"); return; } // Once ESPNow is successfully Init, we will register for Send CB to // get the status of Trasnmitted packet esp_now_register_send_cb(OnDataSent); // Register peer memcpy(peerInfo.peer_addr, broadcastAddress, 6); peerInfo.channel = 0; peerInfo.encrypt = false; // Add peer if (esp_now_add_peer(&peerInfo) != ESP_OK) { Serial.println("Failed to add peer"); return; } // Register for a callback function that will be called when data is received esp_now_register_recv_cb(esp_now_recv_cb_t(OnDataRecv)); MsecSinceStart = 0; } void loop() { getReadings(); // Set values to send (fake values, but...) BME280Readings.temp = 40; BME280Readings.hum = 50; BME280Readings.pres = 60; // Send message via ESP-NOW esp_err_t result = esp_now_send(broadcastAddress, (uint8_t*)&BME280Readings, sizeof(BME280Readings)); updateDisplay(); delay(1000); } //unused for my application void getReadings() { //temperature = bme.readTemperature(); //humidity = bme.readHumidity(); //pressure = (bme.readPressure() / 100.0F); } void updateDisplay() { // Display Readings in Serial Monitor Serial.println("INCOMING READINGS"); Serial.print("Temperature: "); Serial.print(incomingReadings.temp); Serial.println(" ºC"); Serial.print("Humidity: "); Serial.print(incomingReadings.hum); Serial.println(" %"); Serial.print("Pressure: "); Serial.print(incomingReadings.pres); Serial.println(" hPa"); Serial.println(); } |
And here’s some typical output from the two ESP32-CAM units:
From one device:
|
1 2 3 4 5 6 7 8 9 10 11 12 13 14 15 16 17 18 19 20 21 22 |
14174003: Last Packet Send Status: Delivery Success :) 14174682: Received 12 Bytes from remote device INCOMING READINGS Temperature: 40.00 �C Humidity: 50.00 % Pressure: 60.00 hPa 14175002: Last Packet Send Status: Delivery Success :) 14175682: Received 12 Bytes from remote device INCOMING READINGS Temperature: 40.00 �C Humidity: 50.00 % Pressure: 60.00 hPa 14176002: Last Packet Send Status: Delivery Success :) 14176685: Received 12 Bytes from remote device INCOMING READINGS Temperature: 40.00 �C Humidity: 50.00 % Pressure: 60.00 hPa |
From the other device:
|
1 2 3 4 5 6 7 8 9 10 11 12 13 14 15 16 17 18 19 20 21 22 |
13692002: Last Packet Send Status: Delivery Success :) 13692322: Received 12 Bytes from remote device INCOMING READINGS Temperature: 10.00 �C Humidity: 20.00 % Pressure: 30.00 hPa 13693005: Last Packet Send Status: Delivery Success :) 13693322: Received 12 Bytes from remote device INCOMING READINGS Temperature: 10.00 �C Humidity: 20.00 % Pressure: 30.00 hPa 13694006: Last Packet Send Status: Delivery Success :) 13694322: Received 12 Bytes from remote device INCOMING READINGS Temperature: 10.00 �C Humidity: 20.00 % Pressure: 30.00 hPa |
A couple of ‘user notes’ about this demo program and it’s application to two different devices:
- The MAC address display program has to be run twice – once for each unit to get that all-important information.
- The demo program also has to be run twice, but the MAC address used for each device is the address for the ‘other’ device.
- As can be seen from the output, I simply used fake sensor data. However, I made sure to use different sets of values (10,20,30 on one and 20,40,60 on the other) so I could verify that the data was actually getting from one to the other.
- The user must be careful to make sure the two devices are programmed correctly. I found it really easy to program the same device twice – once with the MAC & data for the other unit, and again with the MAC and data for the unit being programmed (which will not work). I wound up with clip-on labels on the two cables going to the two different devices, and then making sure the Visual Studio programming port was correct for the device I was programming. Doable, but not trivial.
21 March 2025 Update:
I broke a finger playing b-ball two days ago, so my typing speed and accuracy have suffered terribly; such is life I guess.
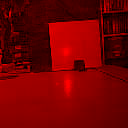
Since my last update I designed and printed a fixture to hold two ESP-CAM modules and a laser diode so I could run some distance experiments. Here’s a photo of the setup:
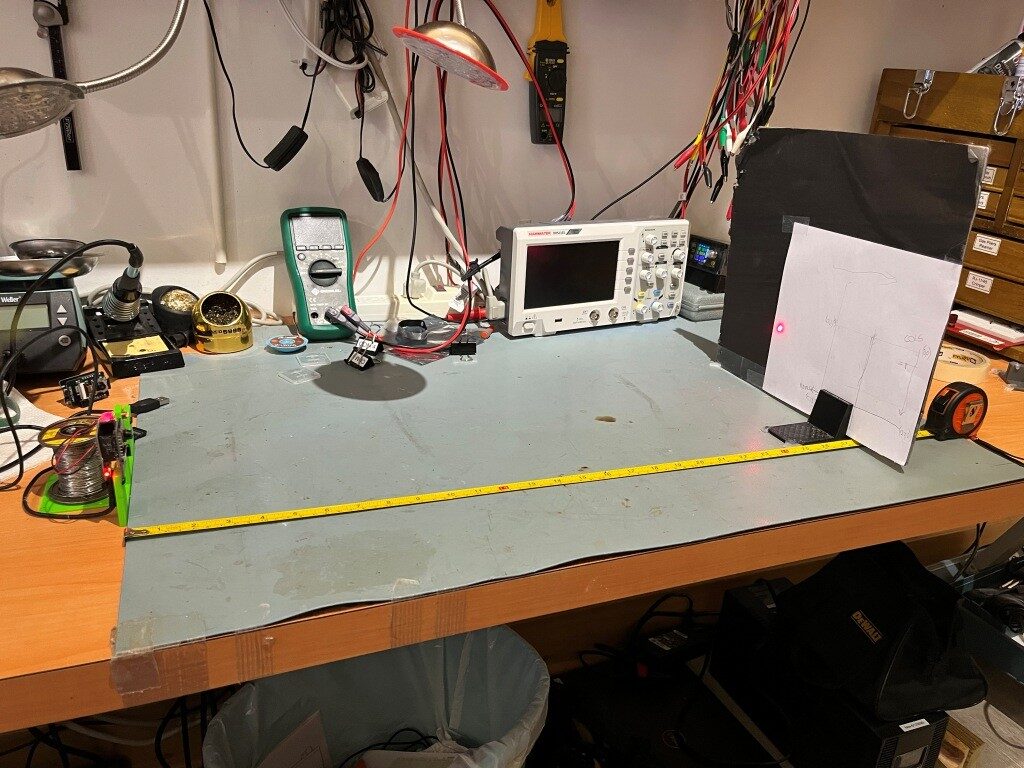
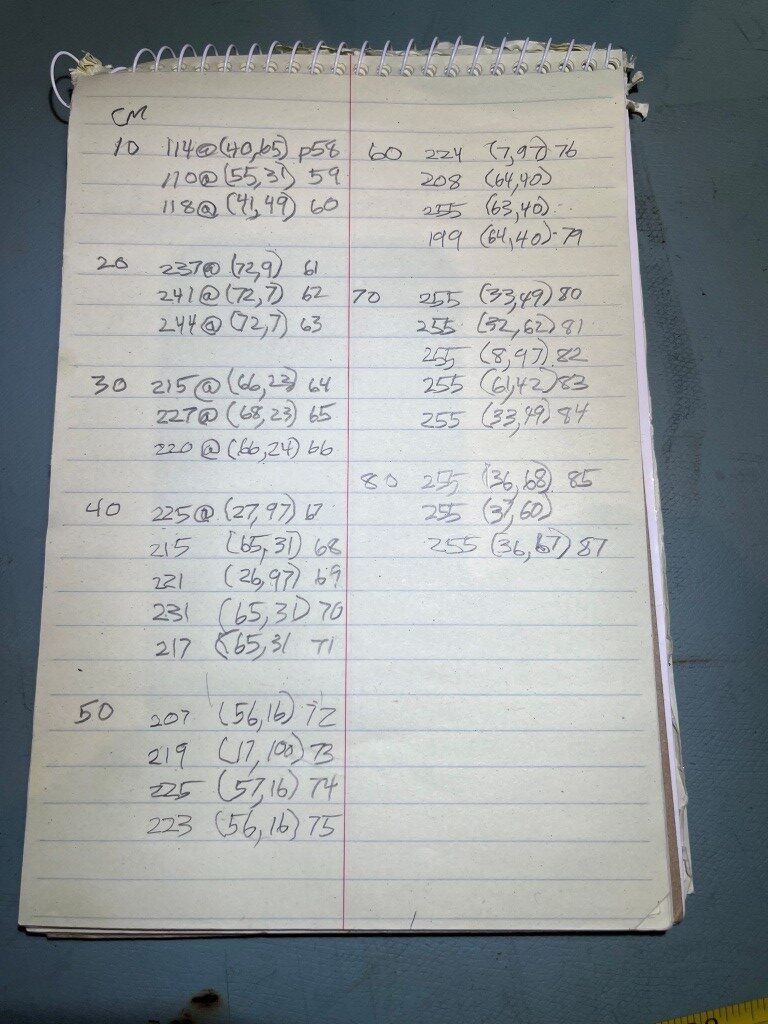
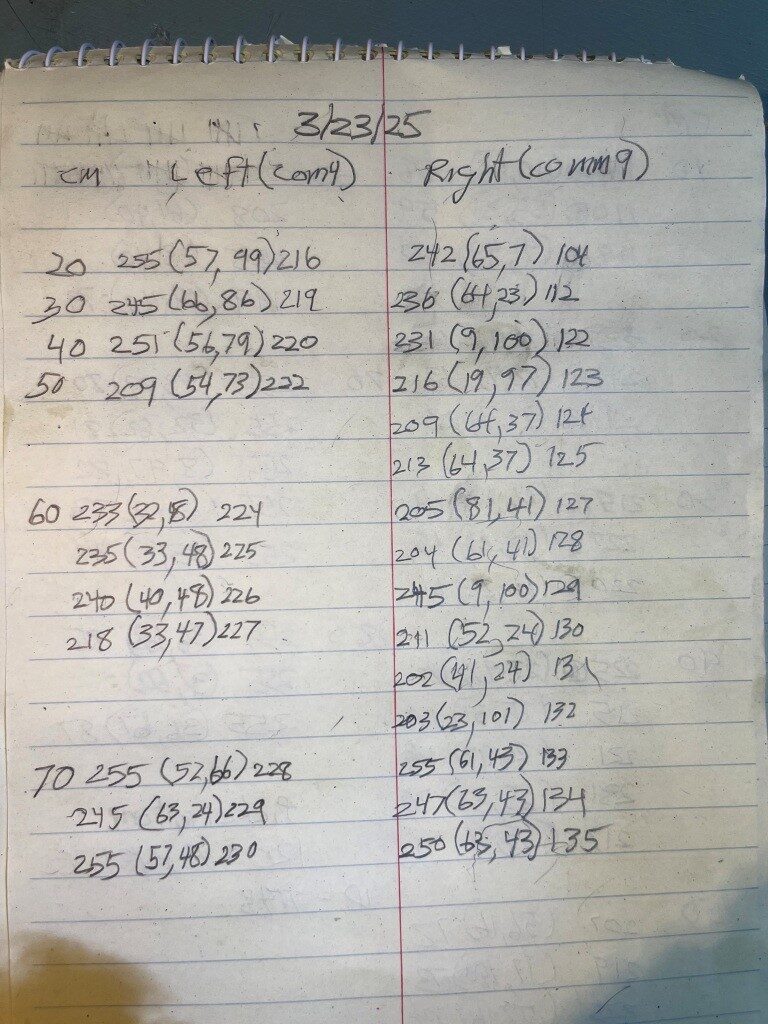
I modified the firmware to simply print out the max value in the scene, along with the row/col coordinates for the max value. The firmware continues to save a red-only image as well. Here’s the hand-written results:
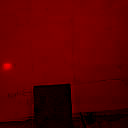
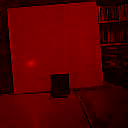
And here are the representative red-only photos (one per distance) for the selected measurement:


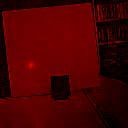


From the data and the photos, it is easy to see that the laser ‘dot’ doesn’t come into the view of the camera until the 20cm distance, and after 60cm the ‘dot’ is washed out by the normal overhead lighting. In between (20 – 60cm) the ‘dot’ can be seen to progress from the far left-hand edge of the scene toward the middle.
26 March 2025 Update:
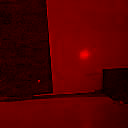
I made another run, this time with two cameras, as shown in the following photos:
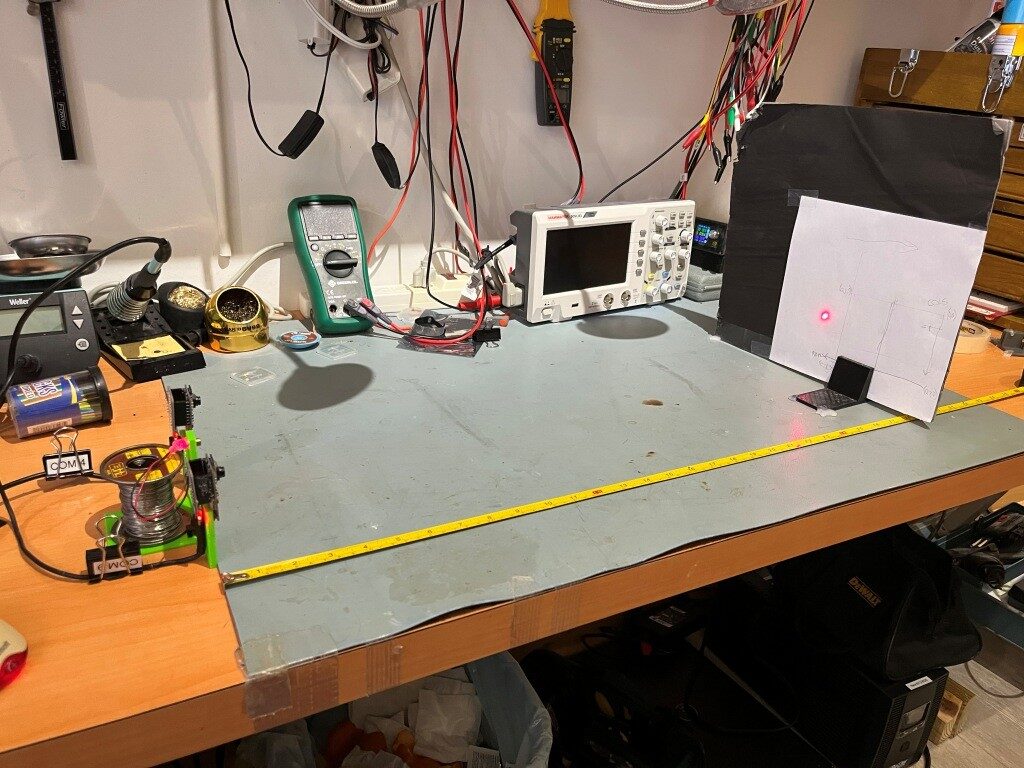
If my theory is correct, I should be able to see the location of the red dot move horizontally across the images, from left to right for the left cam, and right to left on the right cam. Unfortunately this wasn’t evident in the data. I loaded the above data into Excel and plotted it in various ways. The best I could come up with was to plot row & col locations from each camera vs distance, hoping to see a linear change in either the row or column values. The plots are shown below:
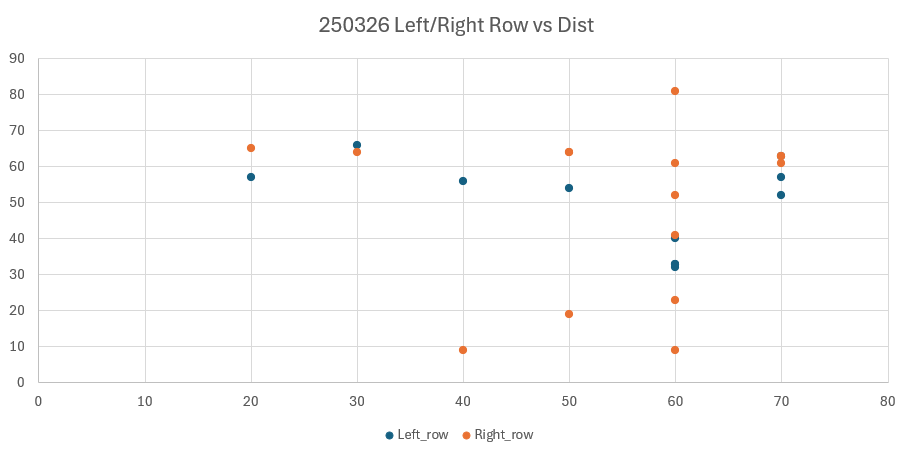
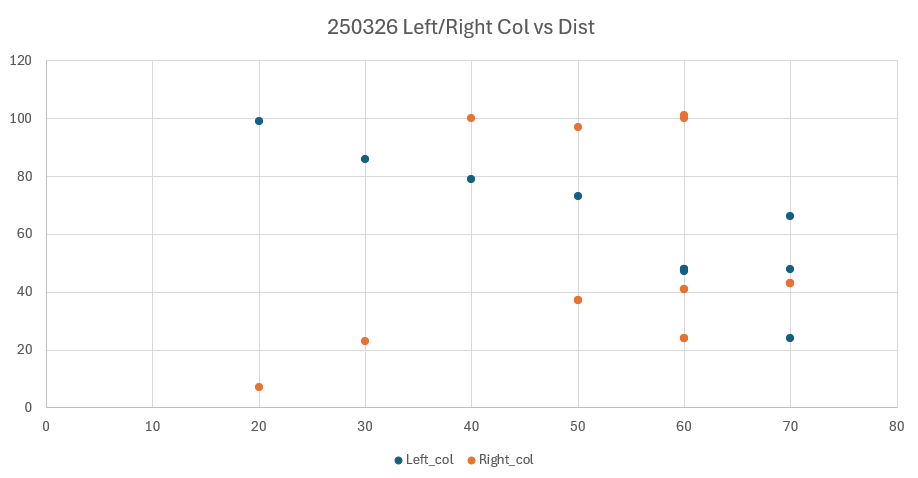
From the above plots, I could see no real progession in the row values, but if I used a lot of imagination I could sort of see a linear decrease in the column values for the left camera and a much less distinct linear increase in the column values for the right camera.
For completeness, I have included the actual camera images used to produce the above data:
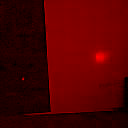
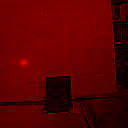
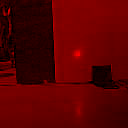
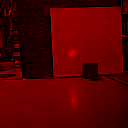
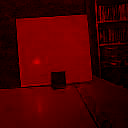
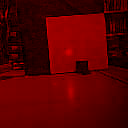
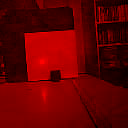
Looking at all the above images, I can’t discern *any* real horizontal shift in the position of the red dot. In addition, at 70cm, the reflection of the laser dot off the table surface is just as bright as the reflection off the target, leading to frequent mis-identification of the maximum location.
Conclusion:
Well, this was a nice try and a fun project, but there’s no escaping the conclusion that this ain’t gonna work!