Posted 14 June 2024
I recently received my new MK4 3D printer kit, and yesterday I started assembling it. I’m taking it slow and easy, as I already have a MK3S 3D printer and a Creator PRO II IDEX in my lab/office. I plan to document the process so that other MK4 builders can benefit.
Prusa goes to great lengths to make assembling one of their kits enjoyable and painless. They provide extremely detailed instructions both in printed form and as a ‘live’ document on their website. The document allows kit builders to comment on each step, so not only do you benefit from Prusa’s detailed instructions and pictures, you get to learn from the mistakes and/or good ideas from other builders. This is a huge advantage of this format, and really makes building the kit a global community endeavor.
I’m old enough to have assembled a number of HeathKit products from the 1960’s, including their 2-meter amateur radio transceiver. Heathkits were famous for their extremely detailed instructions and high completion percentage, and Prusa seems to be the modern-day equivalent of Heathkit in their zeal to make kit assembly easy and enjoyable.
Introduction:
I saw this comment by agemoz in the introduction section:
About to do my 3rd build. One thing that made it much easier to keep track of the fasteners and more convenient than the plastic bags is to get those little clear plastic condiment cups (dont need the cover). Cut out the fastener label from the plastic bag and put it in the cup with the fasteners. Preparing a build step now just means finding the right cup, rather than spilling from the plastic bag and having them roll everywhere–usually under the partially assembled printer.
My wife happened to have a whole stack of these handy, so I decided to follow agemoz‘s advice. However, due to the fact that we are owned by three cats, I needed the lids as well, and the lids made for easy stacking. Also, I fabricated a tray by cutting down the sides of the cardboard frame protector, so I could move the entire set around if needed 23 June 2024 update: it turns out that the cups have a nice smooth curve from the bottom to the side walls, which makes retrieving small parts (like M3nS nuts) a breeze.
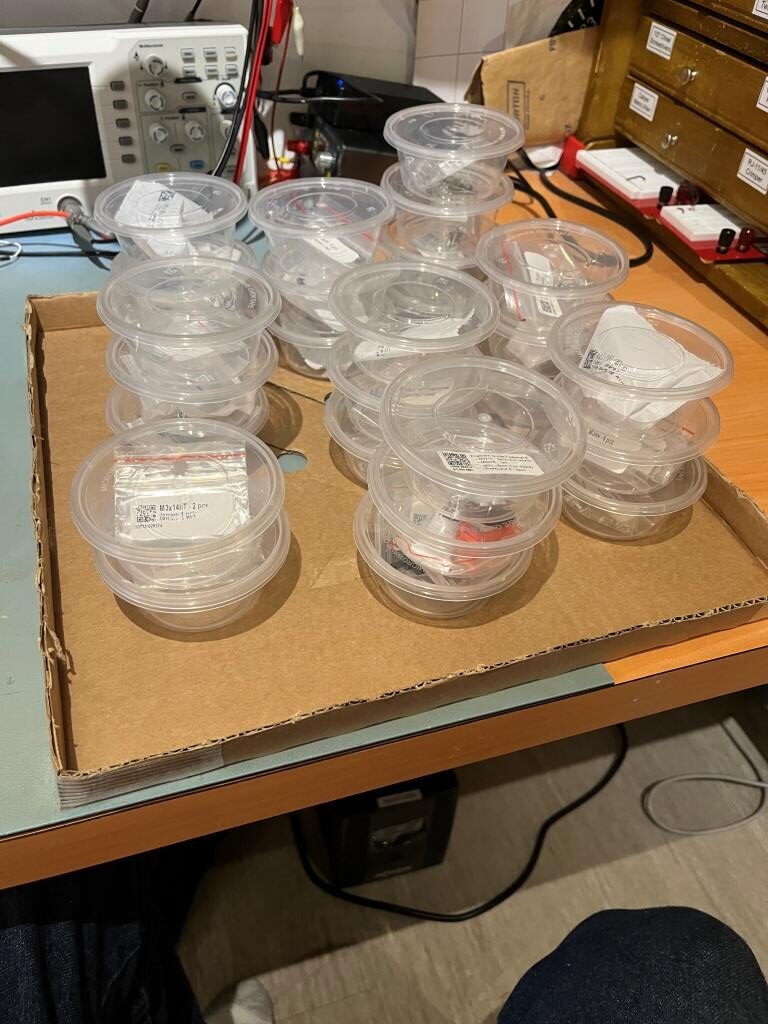
Each time I opened one of the non ziploc bags I dumped all the items into the cup, cut the bag down to just the label, and taped the label to the lid – nice! I also found I could (usually) remove the adhesive label from the small ziploc bags and simply re-adhere them to the lid – nice nice!
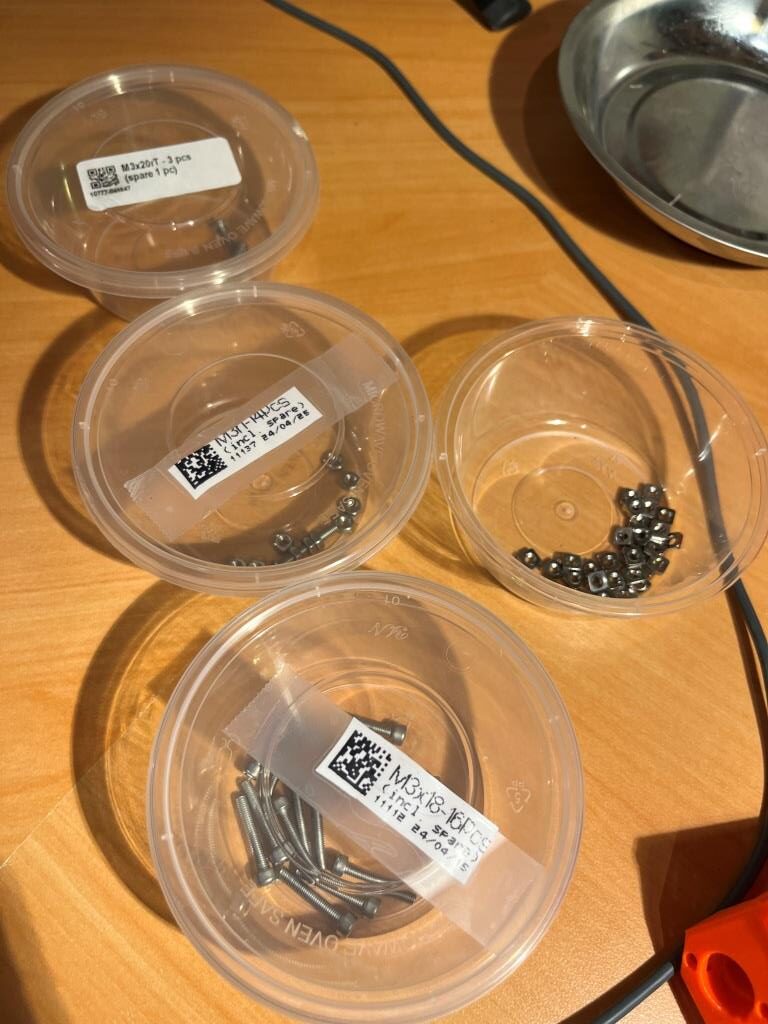
TOOLS YOU REALLY NEED!
The Prusa kit comes with all the basic tools you need to construct this kit, but you REALLY need a more advance set, for two very good reasons:
- You are going to be installing about a zillion or so 3mm screws of all lengths, and doing all these with the ‘L’ shaped Allen wrenches will take forever. You will also on occasion need to install nuts on these screws, and the little sheet steel wrench in the kit, while usable, is just going to make you want to cry.
- You are going to be maintaining/repairing/enhancing this printer for years to come, so you will be undoing and redoing lots of 3mm screws in the future. You might as well get the right tools for the job now, because you WILL need them later on
Here is a photo showing the absolute basic set of tools you will come to love as you go through the kit:
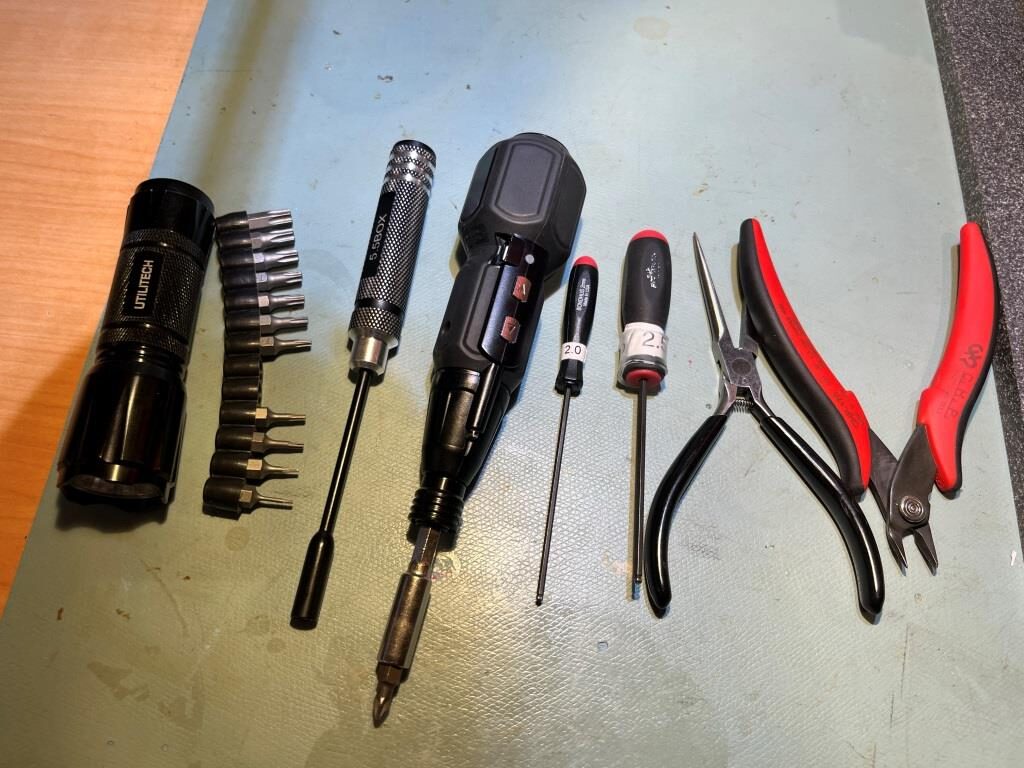
From left to right in the photo above:
- Small LED flashlight: absolutely indispensable. You’ll need it to illuminate the nooks and crannies you otherwise can’t see, and you’ll need it to find screws that you drop on the floor
- Torx wrench bit set: There are several places where Torx screws are used. These bits fit into most screwdrivers, and in particular they fit into the small battery-operated screwdriver in the photo above
- Box-end metric hex driver set. The 5.5mm one is shown above, as it fits 3mm nuts. However, don’t get just that one – get the set as you will use them all.
- Small battery-operated screwdriver. I used this many times with a Torx bit throughout the project, and it is incredibly useful for repair/maintenance as well.
- Hex wrenches. You will use the 2.5mm wrench EVERYWHERE, and the 2mm one in many cases for set-screws on pullies. Again, don’t get just these two – get a whole set
- Needle-nose pliers: A real life-saver on those occasions where you need to install a screw where your fat fingers won’t reach
- Quality pair of side-cutters (also called flush cutters). You’ll need these to clip the ends from zip ties, and there are a LOT of them.
Frame Assembly:
The frame consists of a cast aluminum vertical piece and four horizontal square cross-section pieces that butt into the frame from both sides. The horizontal pieces support the build plate, and the vertical frame supports the Z-axis guide and lead screw rods. If the frame isn’t perfectly orthogonal to the build plate, those rods will undergo side torque/stress as the build plate rises and falls.
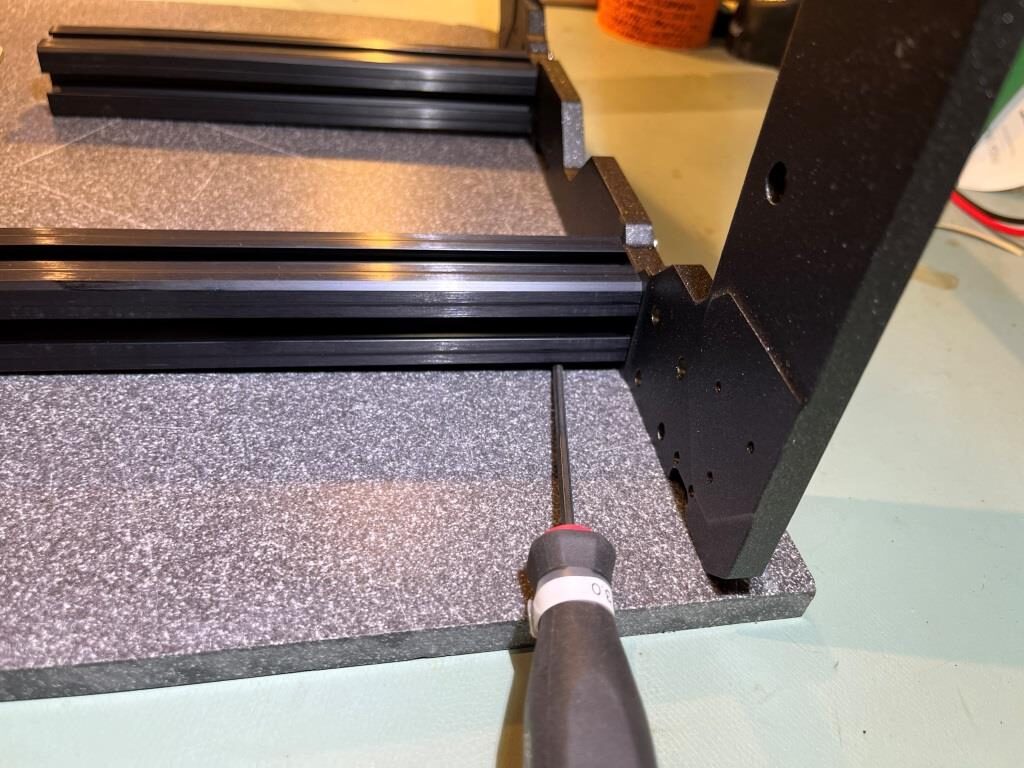
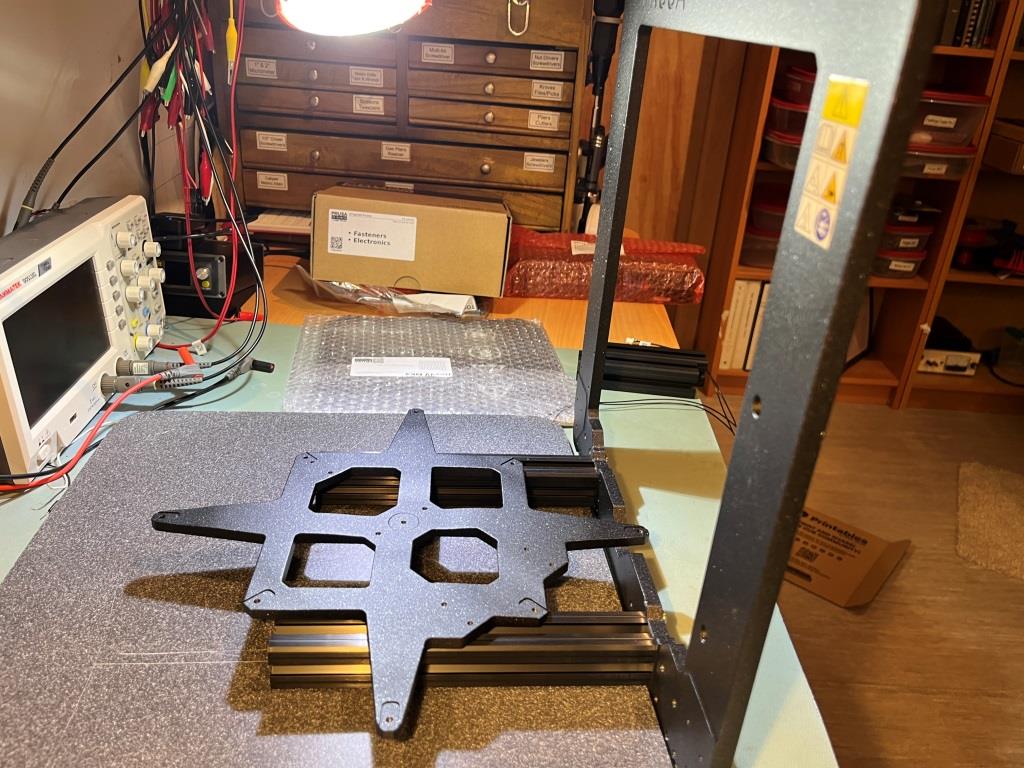
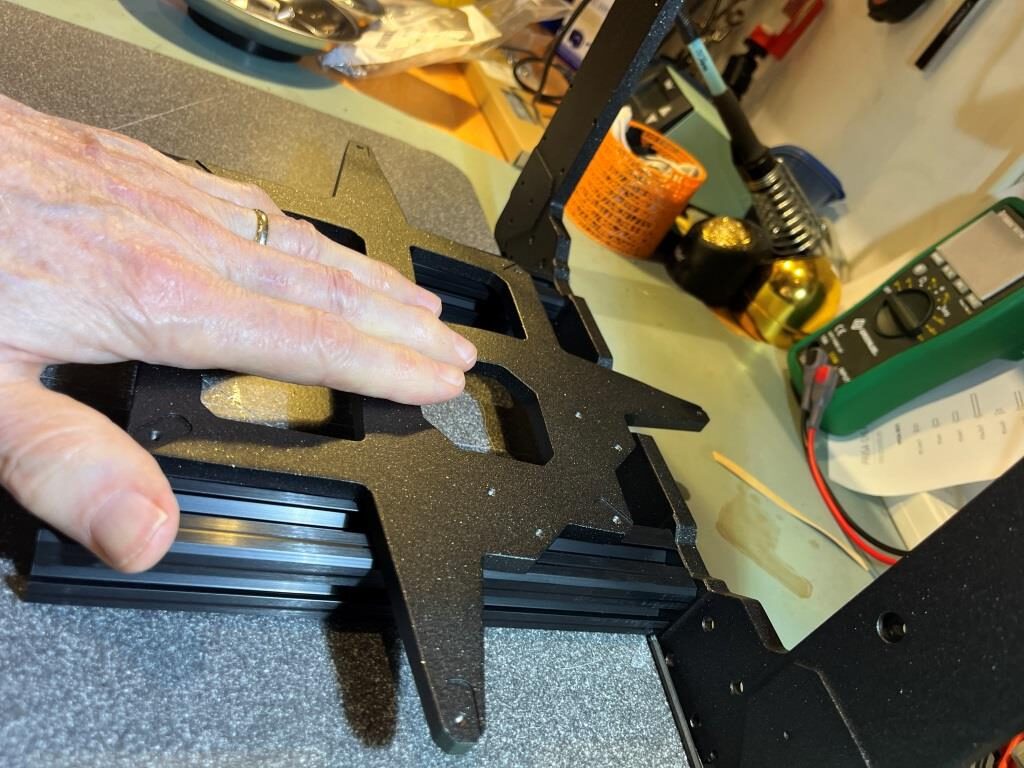
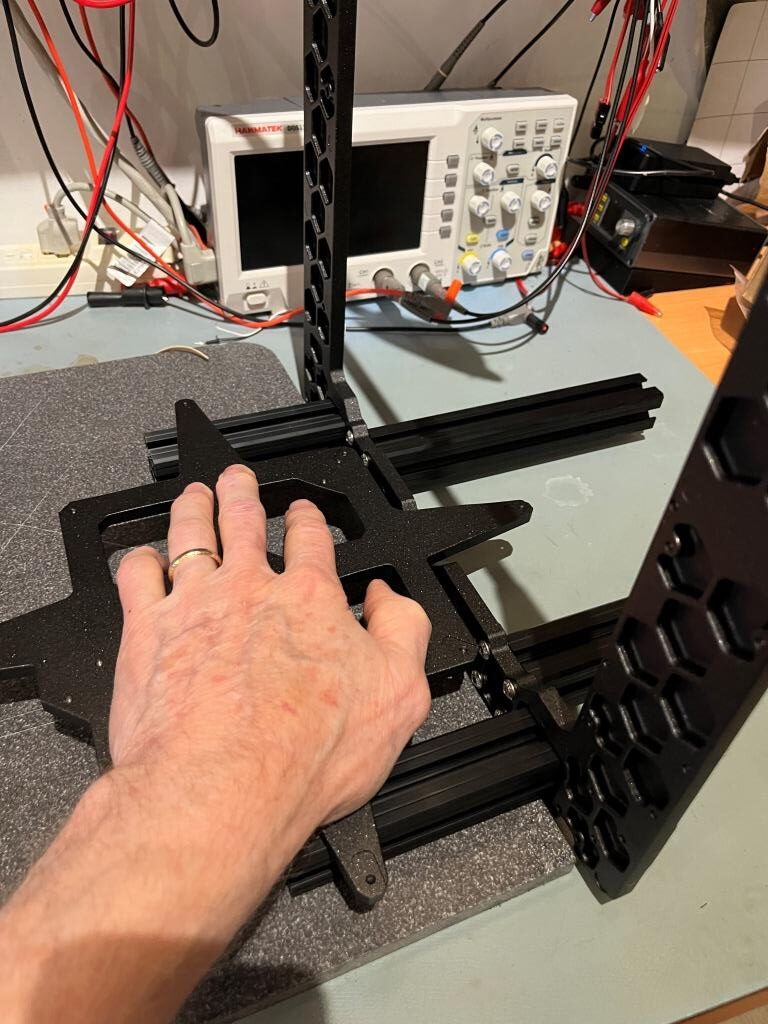
lee.krasnow‘s technique: “The way that I like to do this step is to leave the screws a bit loose and then hang the lower lip of the frame off the edge of my flat (granite) plate so that the big square frame piece is sort of just suspended in the air by the screws. At that point I press down on both extrusions (to clock them) and make sure that they can wiggle around freely (to check that the screws are properly loose) prior to tightening them in the manner specified in the instructions. The important thing here is that the extrusions are touching the flat surface but that the frame is hanging freely in space.“
I used a piece of Corian left over from our kitchen countertop construction as the ‘flat plate’ above, and instead of pushing down on the extrusions with my hand, I used the cast Y-carriage plate as a ‘load spreader’. The following photos show the process for the longer extrusions; the process is similar for the short ones.
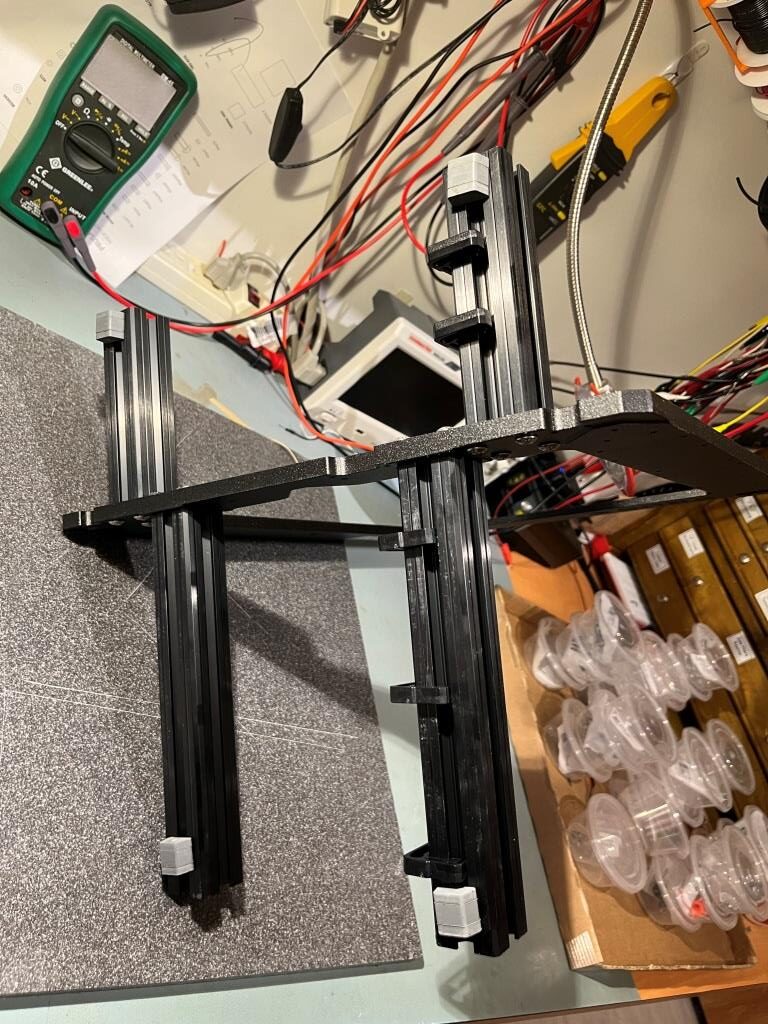
Going on to the front/back plate assembly step, I saw the following comment by beeMom (typos corrected by me): I highly recommend doing Steps 13 and 14 and then Steps 11 and 12 BEFORE front and back plate assembly. The cable clips were impossible for me to put on and I ended up having to take both plates and antivibration feet off. It was a lot easier to pinch the clips into the groves. Another reason to not fully tighten the screws yet
I took (her?) advice and did it this way, as shown below:
The next step was to insert the M3nE nuts in the outside groove of both the short extrusions. I found the following comment very helpful:
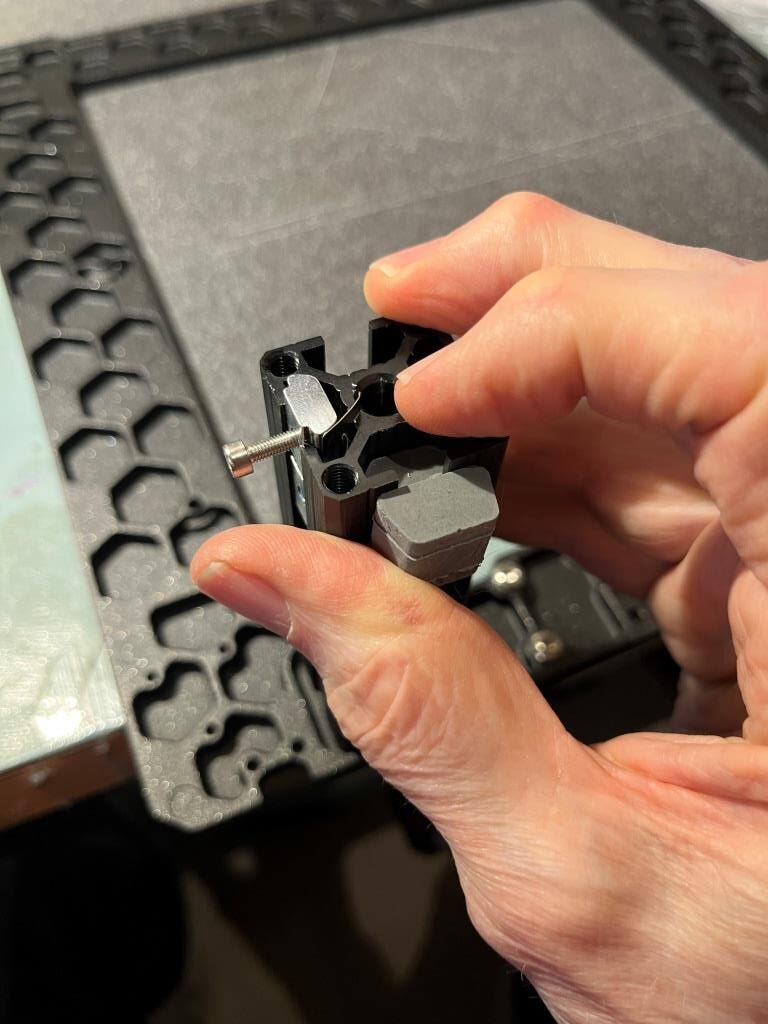
The groove on the nut should be facing outwards, the two pins on the nut should be inwards and pointing down. When inserting the nuts, take one M3x10 screw and screw it in the nut just a bit. Use the screw as a handle for inserting the nut while pushing on the springs one after another with your finger. You can keep the partially screwed-in M3x10 screws in the nuts as you’ll need them exactly this way later in the build. Just don’t lose them.
The following photo shows the second nut on one side partially inserted, with one clip remaining, with my finger ready to compress that clip. Note the M3x10 screw ‘handle’.
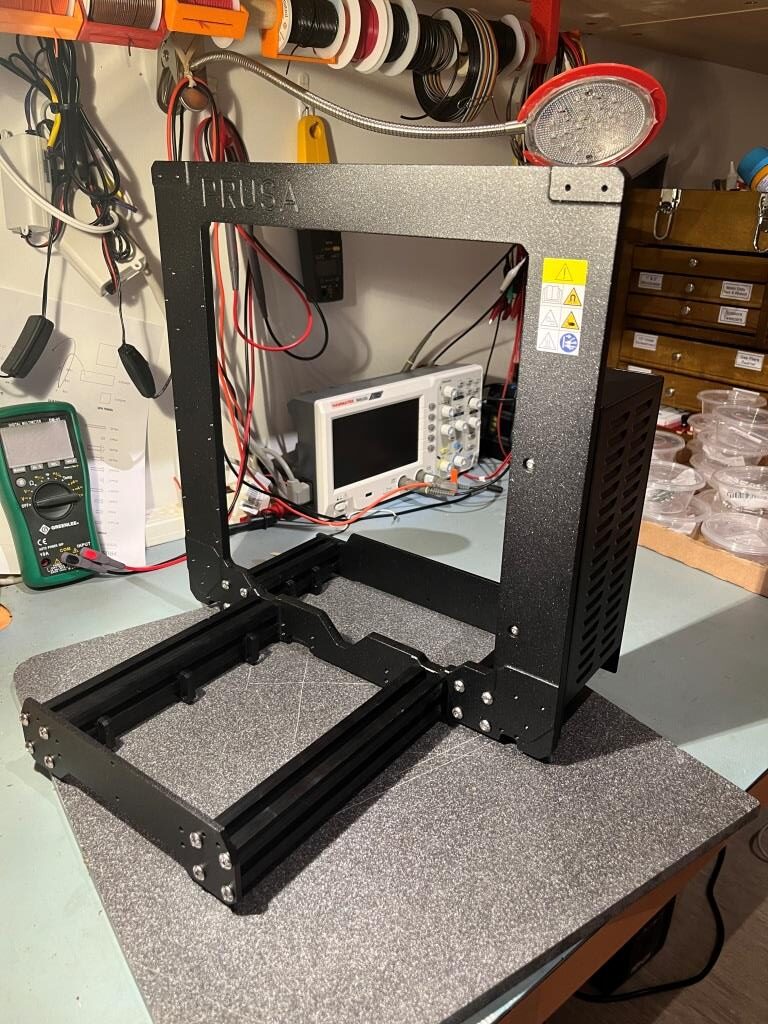
Completed the frame – yay! Time for some gummy bears :).
xBuddy Box:
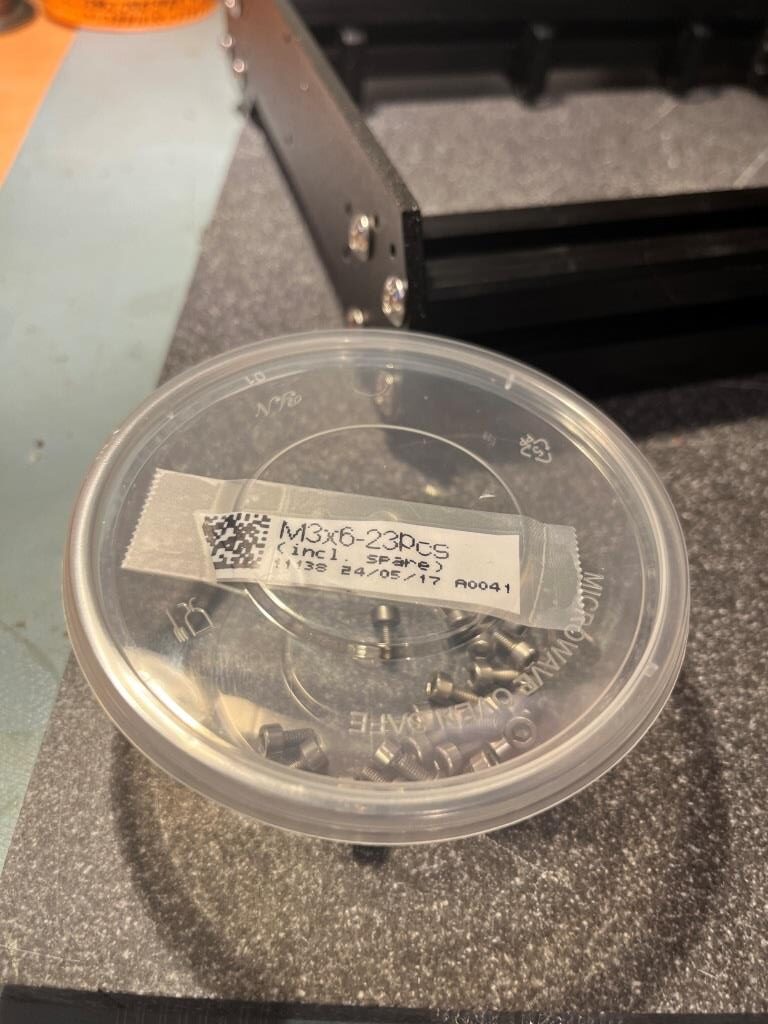
I noted some commenters suggested the M3x6 (and M3x10) screws should have been in ziploc bags rather than a tear bag, and I would agree with this. However, since I am using the agemoz ‘condiment cup’ tip (with covers due to marauding cats), I simply decanted the bag into the cup, cut the bag down to just the label, and taped the label to the cover, as shown:
And thanks to Daperrys32, I didn’t have to waste an hour hunting down all the required parts!
xBuddy box: printed parts & xbuddy box > very bottom left of box
Thermal pads: Fasteners & electric box (filament size box) > big Frame bag
M3x6 & M3x10: Fasteners & electric box (filament size box) > FASTENERS 1/2 bag > both have own bags
xBuddy board: Fasteners & electric box (filament size box) > white bubble wrap labeled xBuddy
Zip ties: Printed parts box
x holder: printed parts box > big frames bag
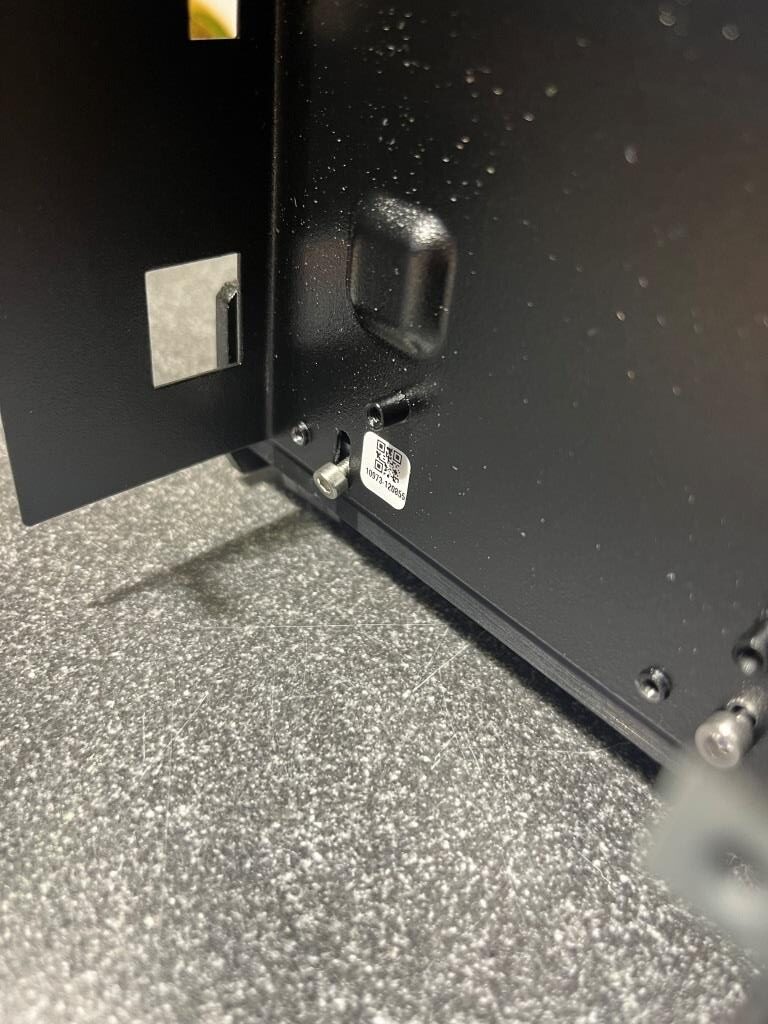
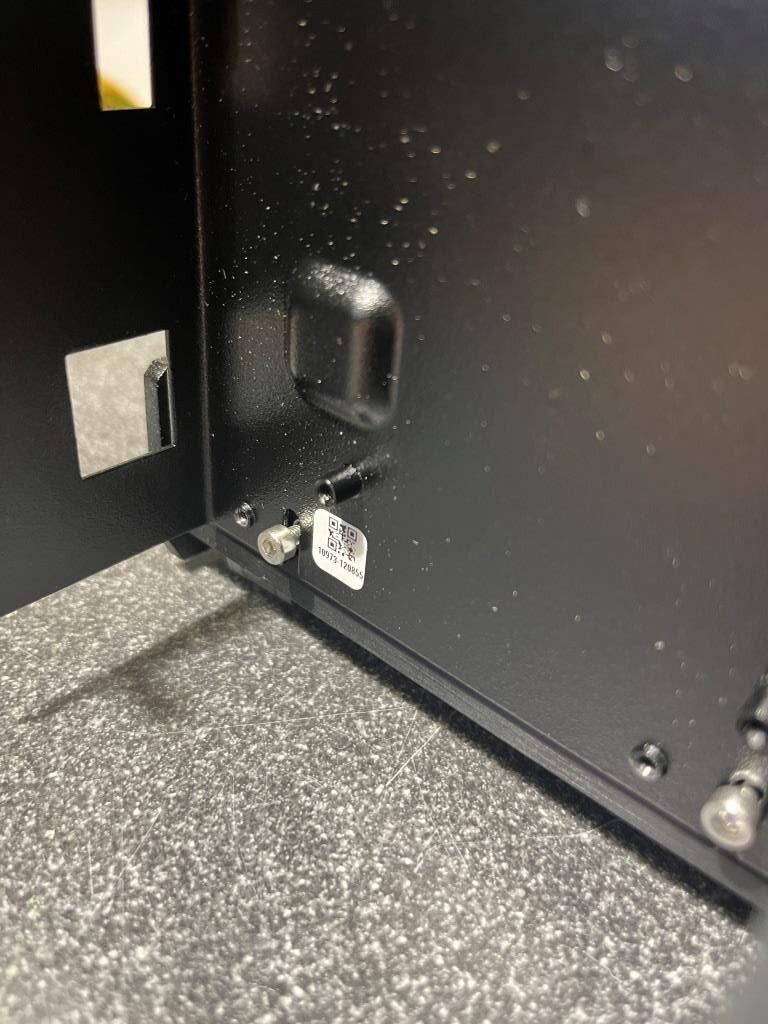
After mounting the xBuddy box onto the frame and the M3x10 screws protruding from the M3nE nuts on the short extrusion, I couldn’t get the box to move freely enough to engage the M3x6 screws on the frame. Looking at the situation, I realized that one of the M3x10 screws had a definite ‘downward’ lean; the M3nE nut had rotated inside the extrusion and was now jammed, and its screw was now jammed against the inside surface of the xBuddy box, preventing free movement. The cure was to insert the hex wrench into the M3x10 head and firmly pull it upward until the M3nE nut ‘popped’ back into place. This won’t require a lot of force, but it will be noticeable. The following two photos show the ‘jammed’ and ‘correct’ positions:
xBuddy Board:
There were a bunch of comments regarding difficulty removing the thermal pad adhesive covers without also removing the adhesive layer. I have done this millions of times over the years and I much prefer using an Exacto knife for this purpose. See the following short video for the technique:
there were a number of comments regarding the process of mounting the xBuddy board into the xBuddy box. I used martinbartin‘s advice and ‘pre-screwed’ the holes before mounting the box. I used a small bit of museum glue (chewing gum or a small piece of double-sided tape also works) to hold the screw on the end of the hex wrench while aligning the screw with the hole. See the following short video for the technique:
To get the best possible starting alignment of the xBuddy board with its mounting holes after removing the thermal pad adhesive cover, I inserted the board at an angle to the bottom of the box, so the ethernet and other connectors mated with their corresponding box cutouts before the thermal pads contacted their respective raised areas, as shown in the following figures.
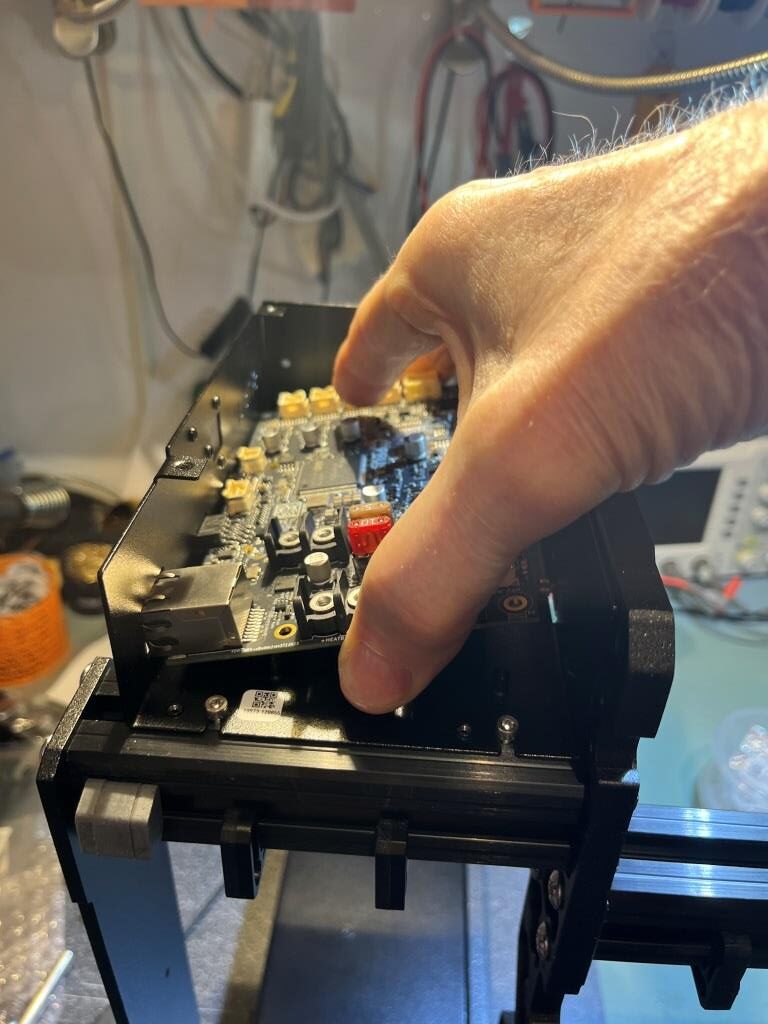
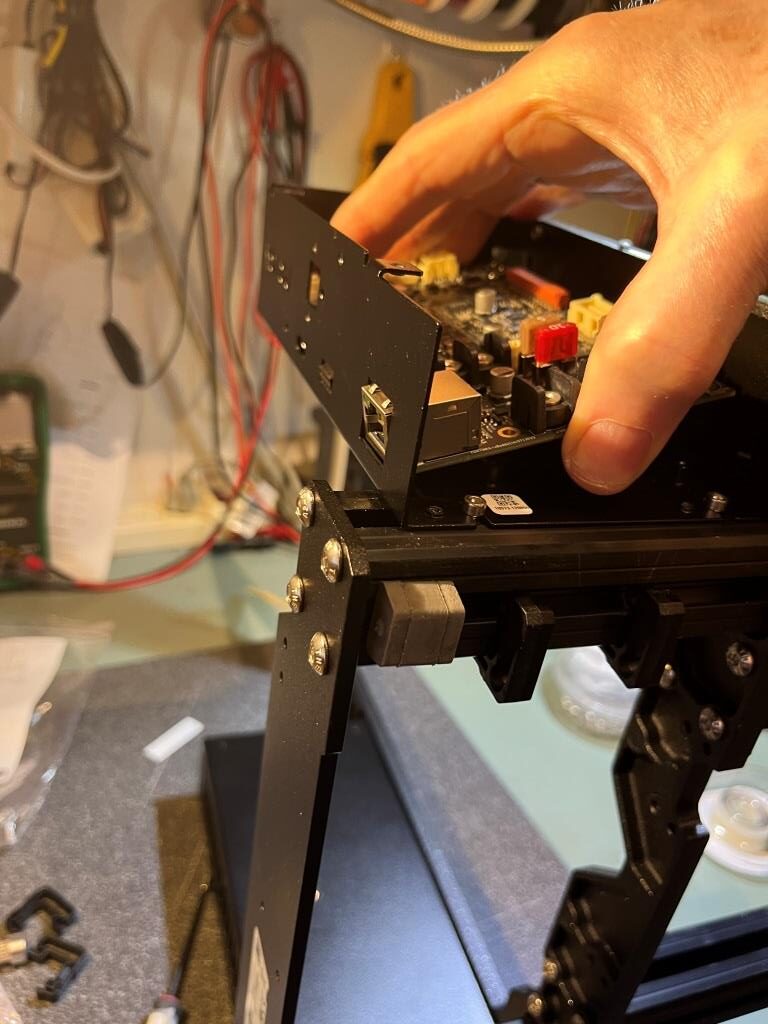
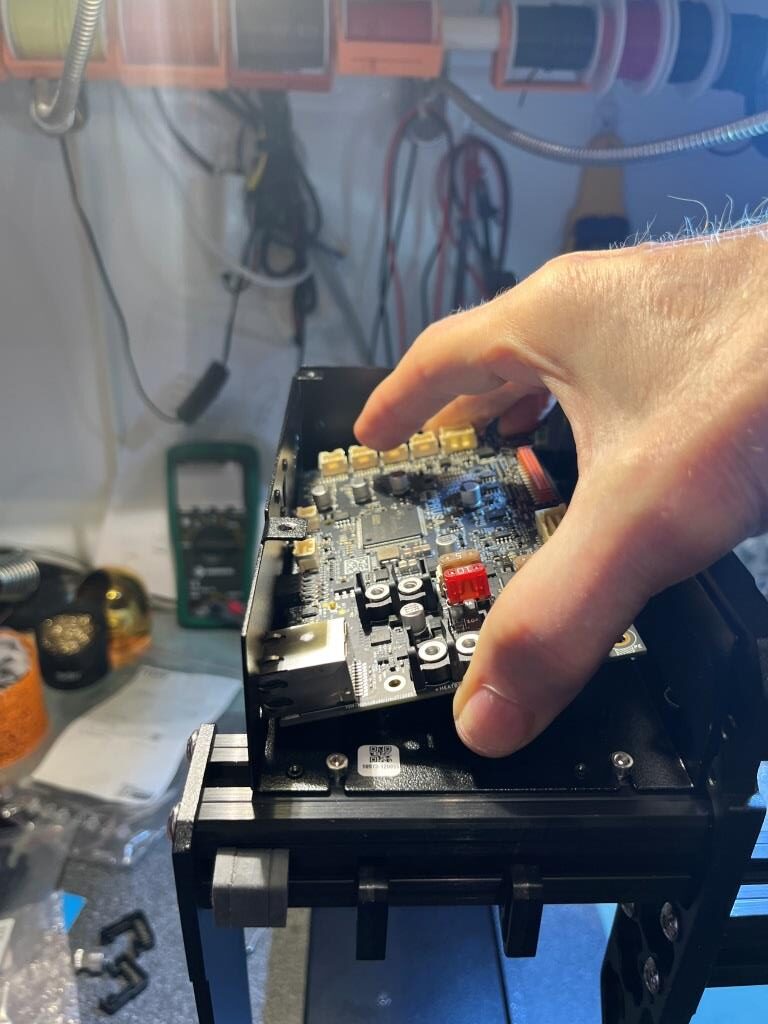
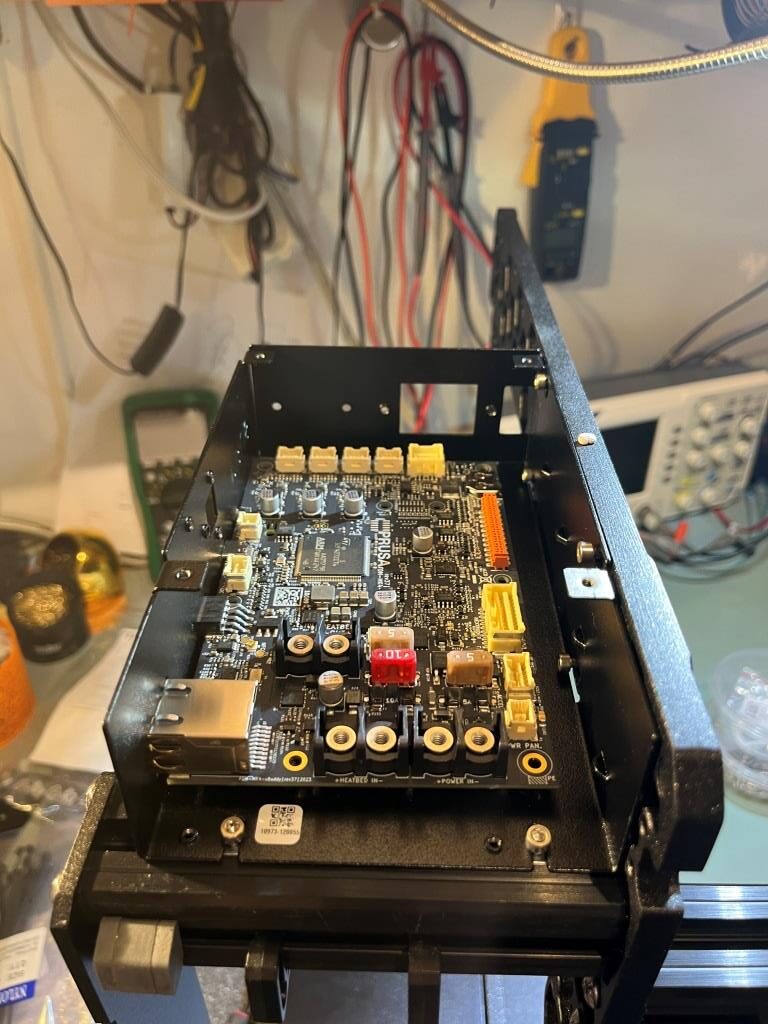
Using this technique, the board holes will be very close to perfect alignment when the thermal pads contact their raised areas, and any the thermal pad material is flexible enough to easily accommodate any required movement.
Y-Axis Motor Mount:
There were a lot of comments about this step. Apparently it is difficult to get the motor body exactly parallel to the frame, as this is critical for proper alignment the Y-axis belt in Chapter 7: Y-carriage and & Heatbed Assembly. There were lots of complaints about the 24×24 thermal conducting pad being too thick to allow for proper motor alignment, which I thought was a bit odd seeing as the heat transfer material is made to ‘flow’ like putty to smooth out irregularities. Then, after reading through the notes here and in Chapter 7 I found this one from paulkudrna67
So some may find this a bit crazy but as a mechanical engineer working in the electronics industry, I feel I have a bit of technical understanding regarding the strength of the steel plates that make up the motor and the function of thermal pads. Short story is that the steel motor plates are very strong. What I did in chapter 3 when originally installing motor is to make sure it was square to front plate. The thermal pads are by design a bit “compressible” and will form into shape. I put my 2 screws thru the holder and tightened snugly with addition of blue loctite. I then took 2 business cards and placed them on the back of the motor and the other on front face of the extrusion plate. Then using a medium c-clamp I gently squeezed (did not take much pressure) the motor by making sure the clamp face was resting on the sandwich of steel motor plates (business card protected finish). Using a steel square and a flashlight to backlight the gap between the square to the motor face, I slightly squeezed the clamp a tiny bit more until the light showed motor was square. At this point I snugged the 2 screws and removed the clamp. Note – the clamp did not apply a lot of pressure, just enough to allow the thermal pad to form and squeeze into size. I am sure some will find this nuts but note that it is only crazy if you clamp too tightly.
This technique seemed like good common sense to me, and since I have a pretty well stocked shop with an assortment of C-clamps I decided to try paulkudrna67‘s technique (C-clamps are pretty durable, and cheap too. A pair of 4″ clamps from Northern Tool company can be had for around $10 USD, and one 4″ clamp costs around $7 USD at Amazon). Likewise, a metal square can be purchased from Amazon for about $10 USD.
As the following photos illustrate, I implemented the above technique.
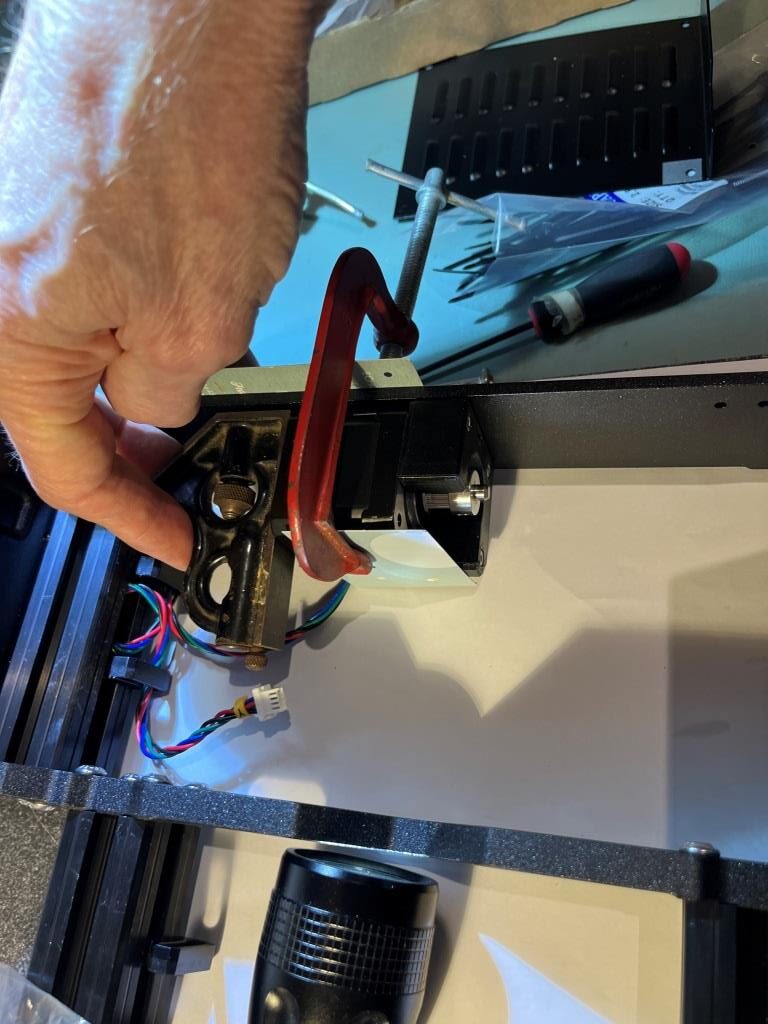
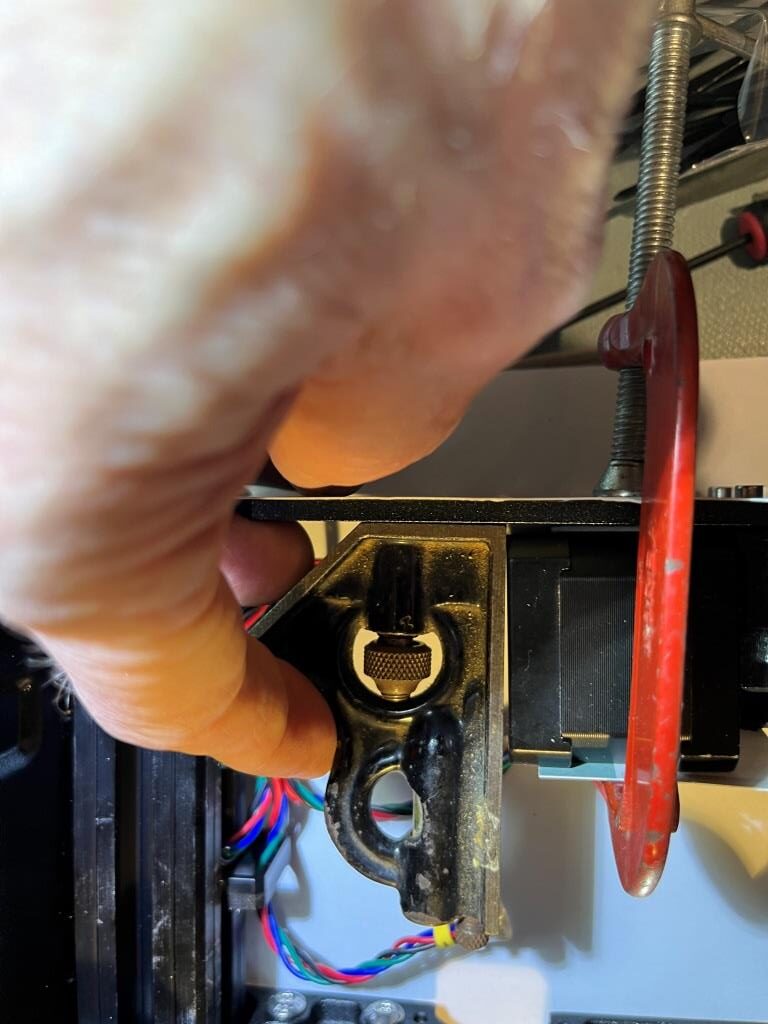
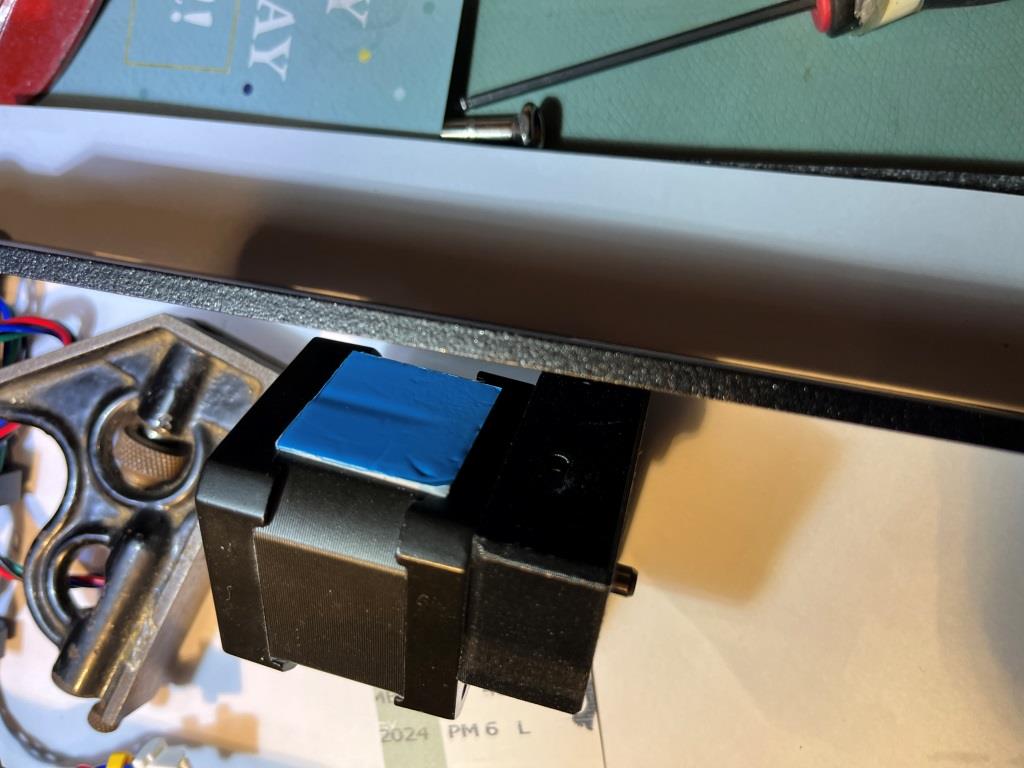
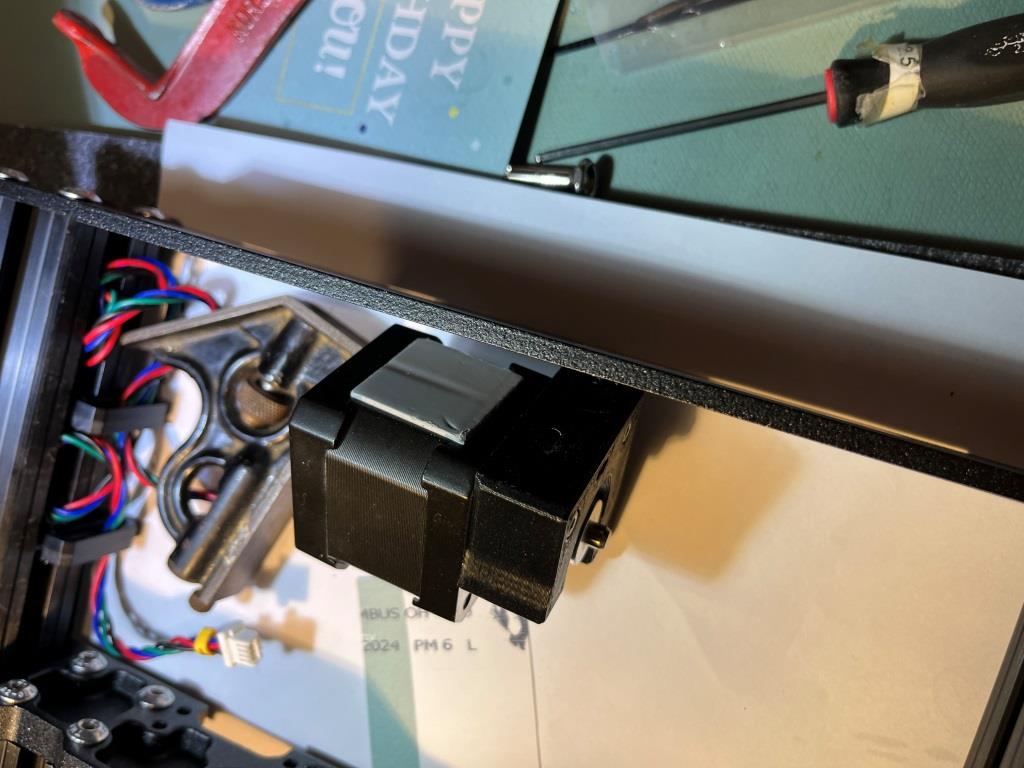
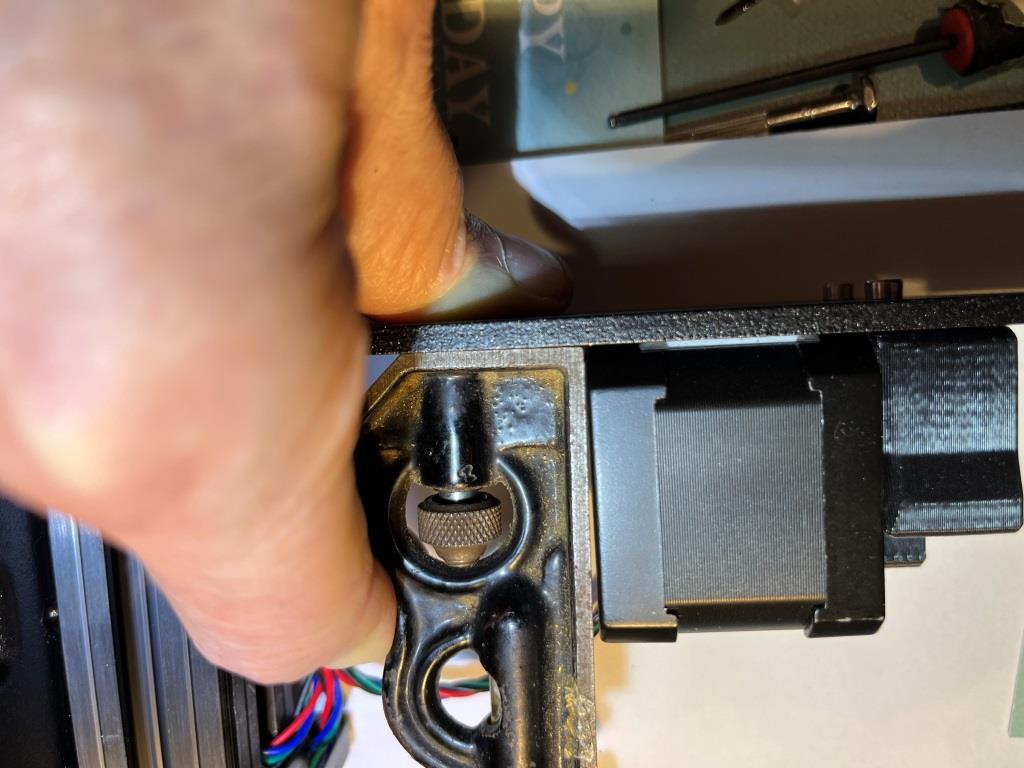
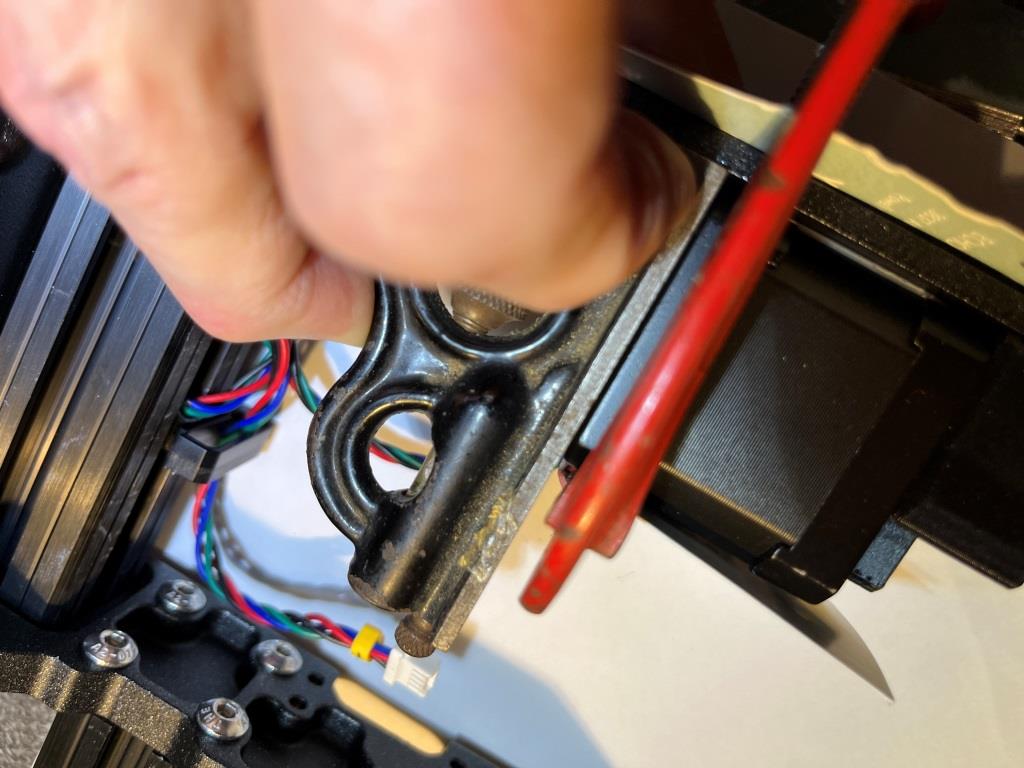
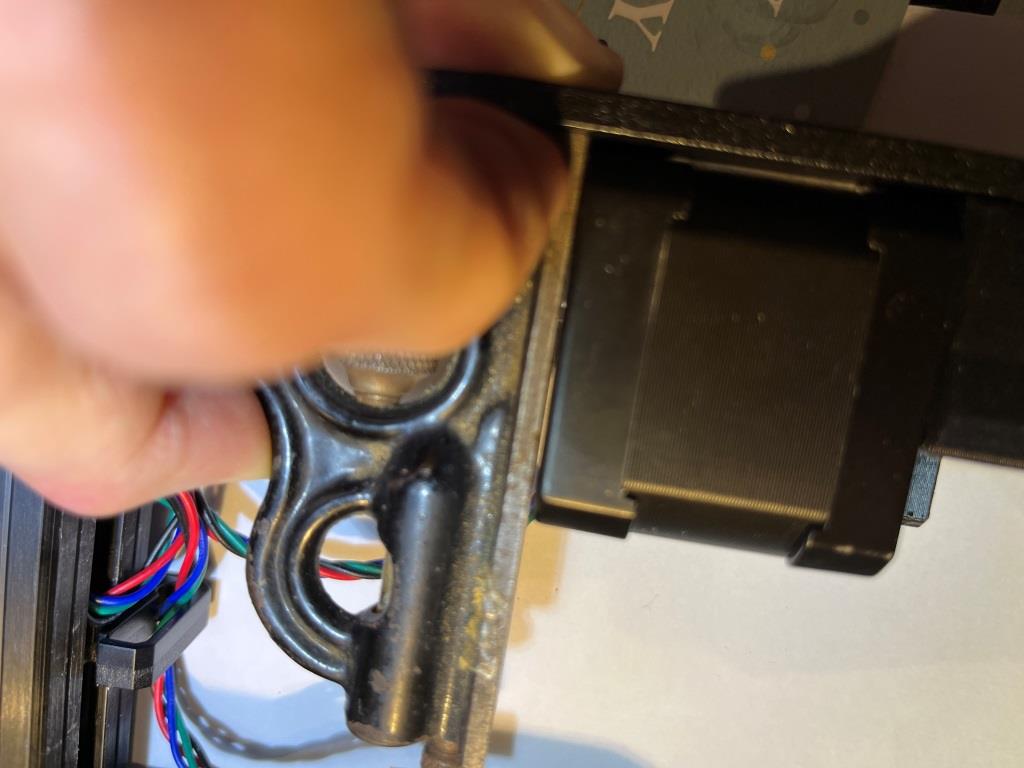
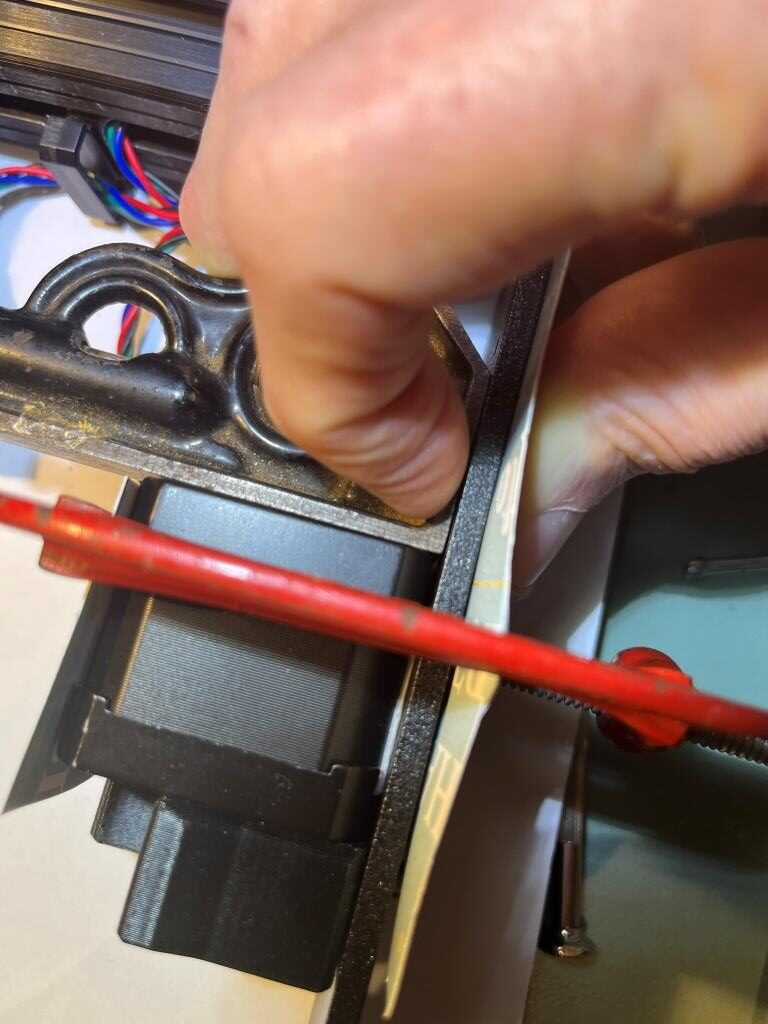
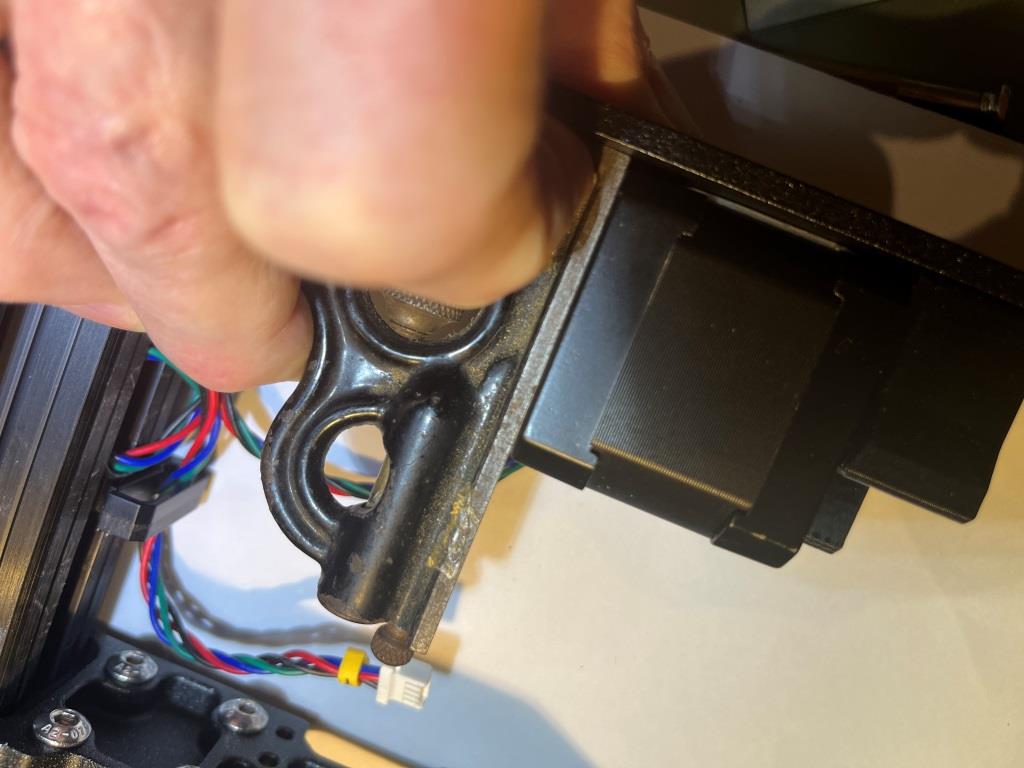
After going through this procedure, I’m not entirely convinced that this technique has permanently fixed the issue. After the first compression cycle, there was still a noticeable misalignment gap. Although no gap was visible after the second cycle, I don’t have a lot of confidence it will stay that way. However, since the mounting screws are essentially directly on the Y-axis centerline, there shouldn’t be much, if any torque on the motor assembly, so no significant pulling force on the thermal pad. We’ll see how this works out later on.
X-axis & X-carriage assembly:
Doug made the following comment:
When I built my first Prusa kit I found the “pull” method very effective for setting nuts. But dang, that’s a lot of screwing and unscrewing. This time around, I took a spare M3x20 and pre-loaded a bunch of M3n’s onto it, right up against each other. When I need to set one, I unscrew the whole stack until the one on the end has about 2 turns left on it. I push to set it in place, unscrew two turns and I’m ready to set the next one. It sounds simple but cumulatively it saves a whole lot of time.
I liked this idea – a lot – so I copied it, as shown in the following photo
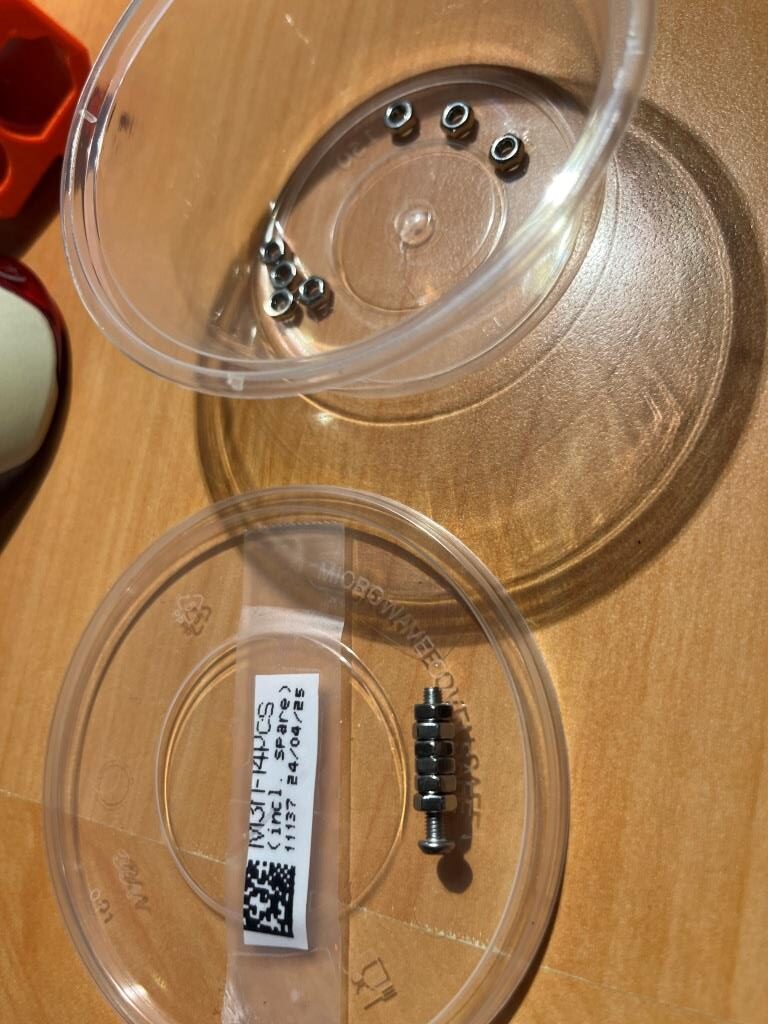
This turned out to work really well – thanks Doug! Here are some photos showing the process.
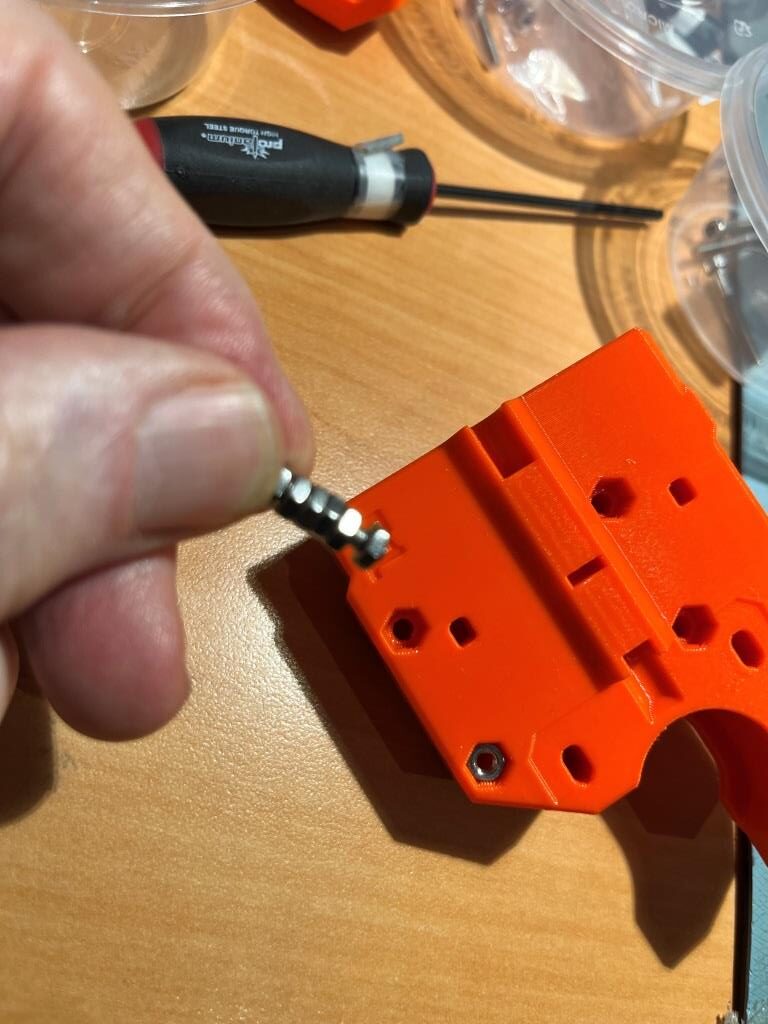
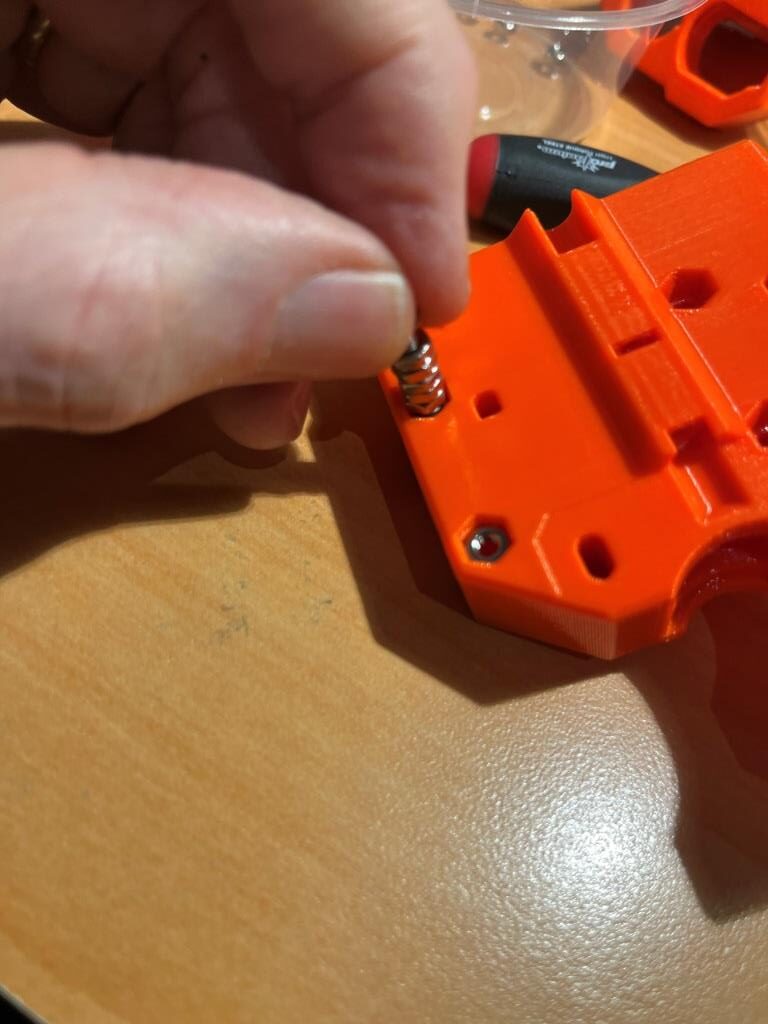
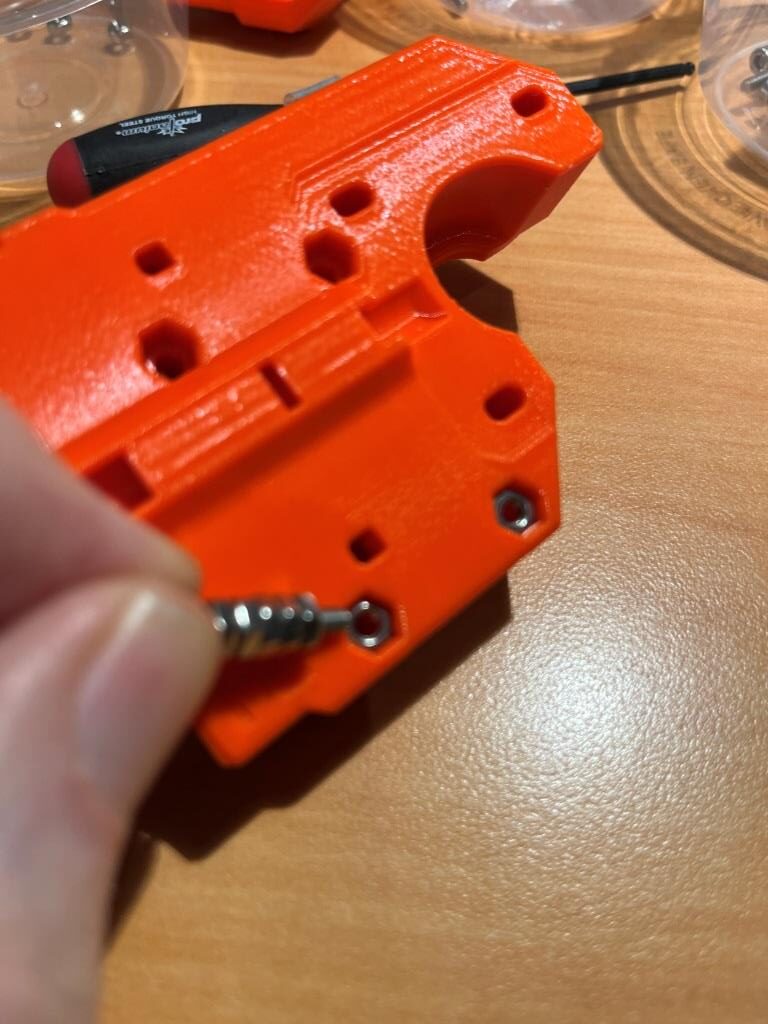
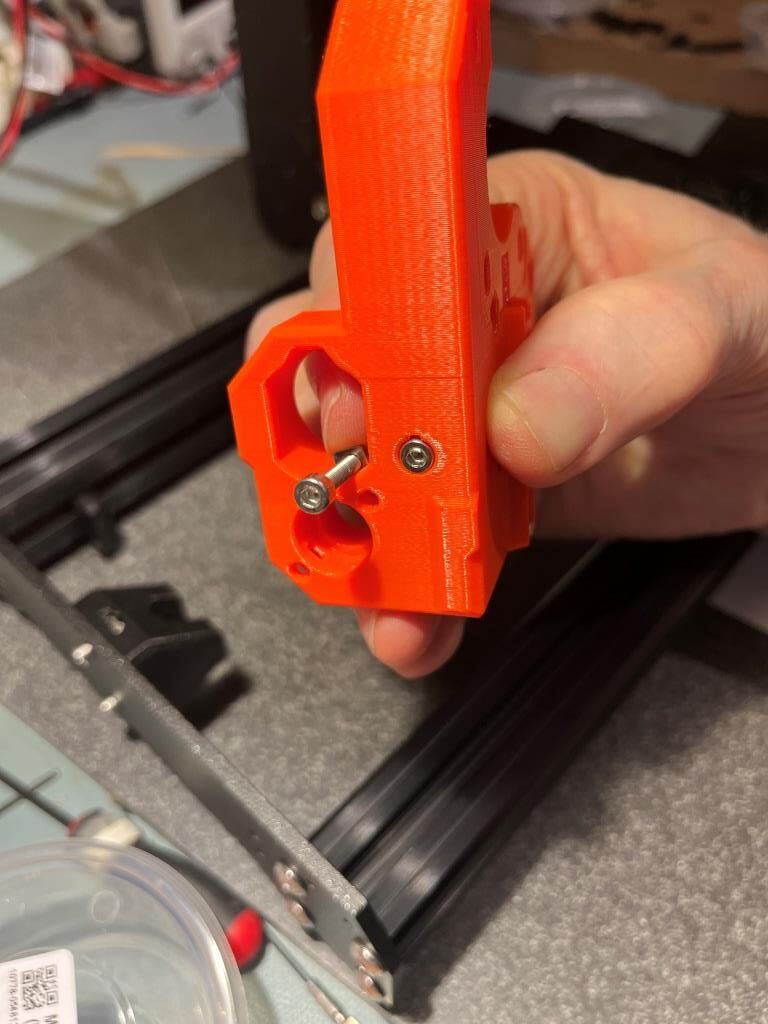
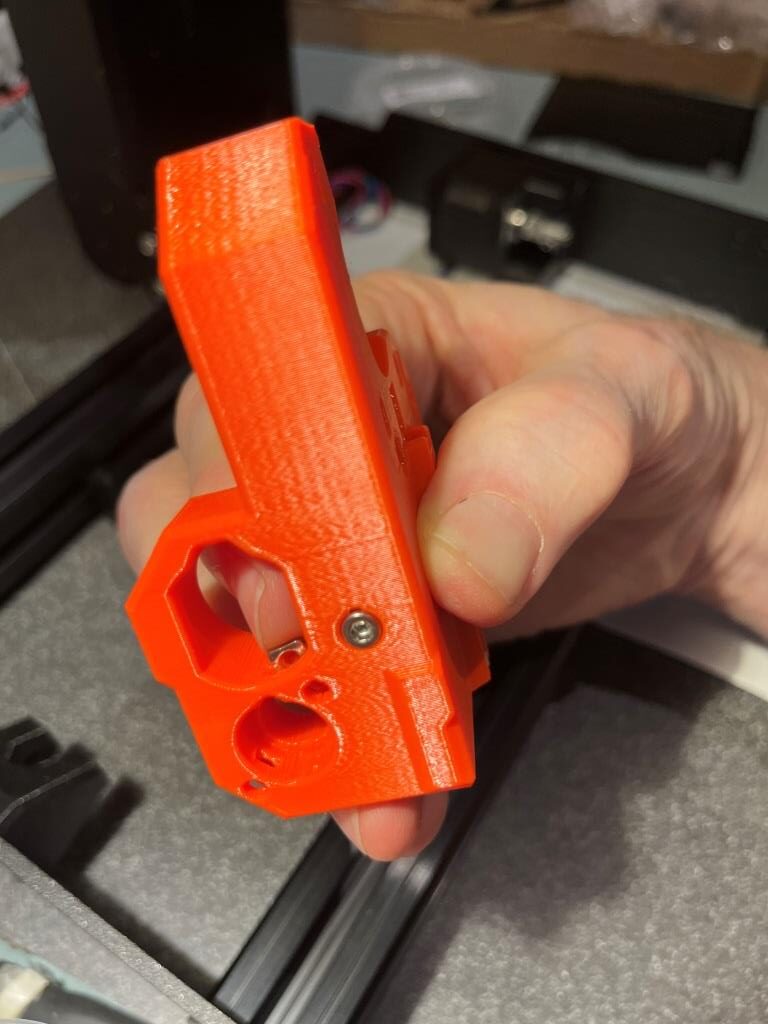
The next step was to insert a M3nS nut into a slot on the inside of the ‘oval’ hole. This looked to be a bit awkward, so I loaded the nut onto a M3x16 screw and used it as a handle to get the nut partially inserted into the slot. Then I held the nut in place with a fingertip and removed the M3x16 screw, as shown in the following pictures – worked great!
X-axis Linear bearings:
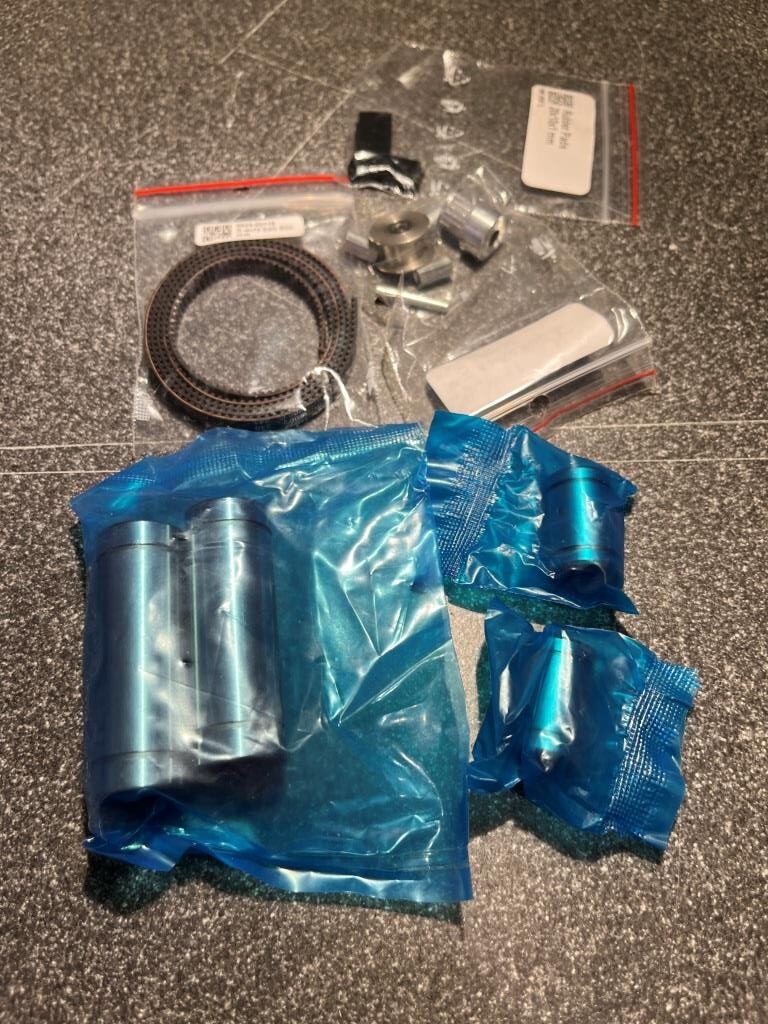
Bearings pre-lubricated by Prusa company are shipped in a blue bag. If you have pre-lubricated bearings, go to Inserting the bearings: X-end-motor.
Looks like I got lucky – all my X-axis bearings are pre-lubricated! When reading this part of the instructions earlier, I wondered why Prusa would ever ship un-lubricated bearings – that’s just asking for trouble. So, props to Prusa for saving me from making a mess and probably screwing up in the process!
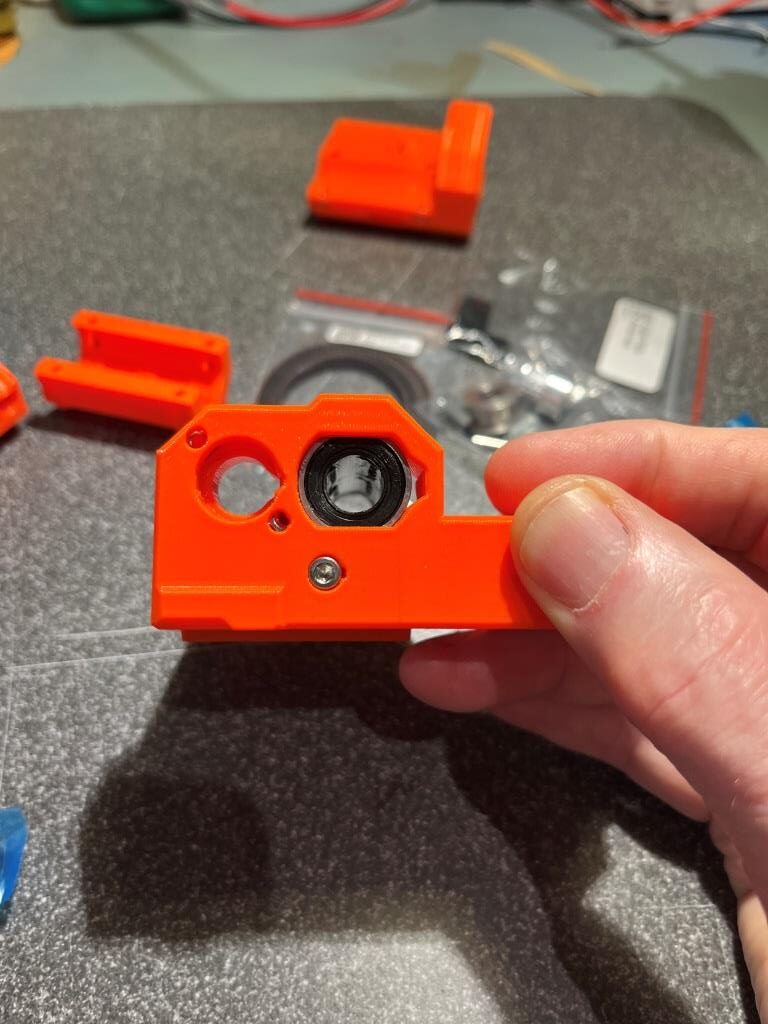
When I mounted one of the long bearings onto the X-axis motor mount, it made a distinct ‘snap’ when it reached the end of travel. Here’s a photo showing the bearing ball lines oriented in an ‘X’ arrangement as described in the assembly instructions
Step 14 Inserting the bearings: bearing pads:
In the notes for this step there were several mentions of problems with inadvertently applying double-thickness pads due to pad parts being stuck together. To address this issue, I lined up all six (four plus two spares) pads on a flat surface, and then ran my finger lightly over all six, feeling for differences in thickness as I went. The following short video shows the process:
Using this technique, I was sure I didn’t have any double-thickness pads, so I could proceed with confidence.
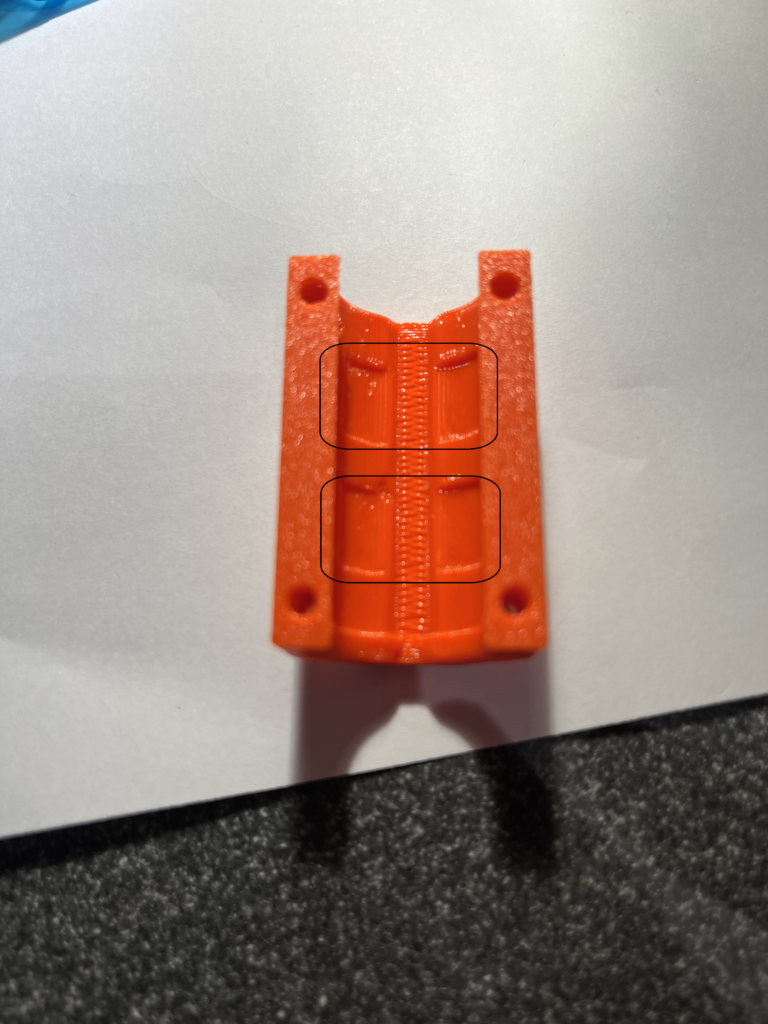
I wasn’t quite sure how to place the rubber pads into the bearing holder, so I had to fool around a little bit. However, after close inspection of the parts, I was able to see the recessed areas that screamed “Put a rubber pad here!”, as shown by the black rectangles in the following photo.
Here’s a short video showing my installing the second rubber pad on one of the bearing holders
Here’s a short video of the process of sliding the bearing holder onto the X-axis motor mount. Note in the video that I used a hex wrench to highlight the ‘protusion’ noted in the instructions. This ledge stops the bearing holder from sliding past the bearing.
Sliding the X-end motor mount onto the two rods already inserted into the X-end idler piece wasn’t hard, but it wasn’t entirely straightforward either. Here’s a short video demonstrating the technique suggested by paulkudrna67:
And, as SLVR Design noted, it is possible to wind up with the two end pieces oriented in opposite directions (ask me how I know), so make sure your completed step matches the illustrations in the assembly manual, or as shown here at 0:56 into the movie
X-Carriage, X-Carriage Clip:
Looking through the notes, it appears that several builders managed to attached the clip to the carriage (Step 31) with the clip rotated 180 degrees with respect to the carriage part. See the following video for the (hopefully) correct way to do this.
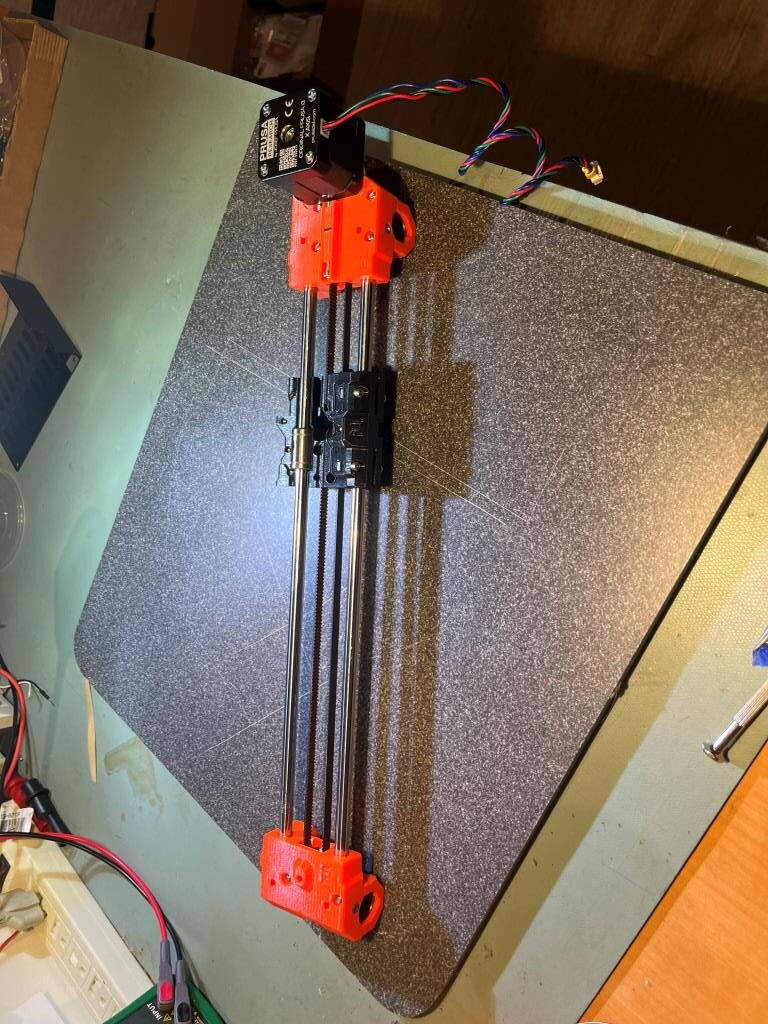
Finally got the X-axis assembly finished – Yay!
4. Z-axis assembly:
Assembling the Z-bottoms:
There were several comments recommending that the 10mm rods should be inserted and removed from each Z-bottom part before mounting them to the frame. So, I did that and found the rods were very hard to insert and even harder to remove, but do-able. The following short video shows the process. Note there is an inspection hole on the side of the hole that accepts the 10mm rod to confirm that the rod is fully seated:
Installing the Z motors:
I didn’t think the Z motor cable routing was very well documented, so I took a photo of my routing mine:
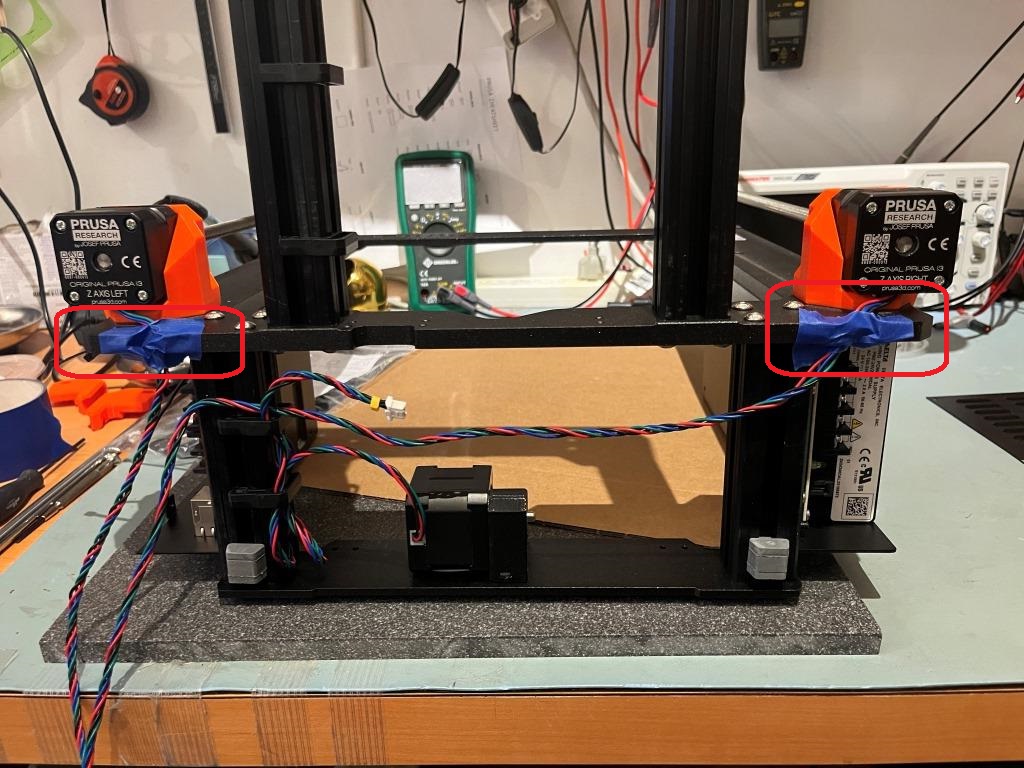
Installing the X-axis assembly:
The photo below shows the printer at the end of the X-carriage assembly integration task. There were some steps in this task where comments made a real difference in the process:
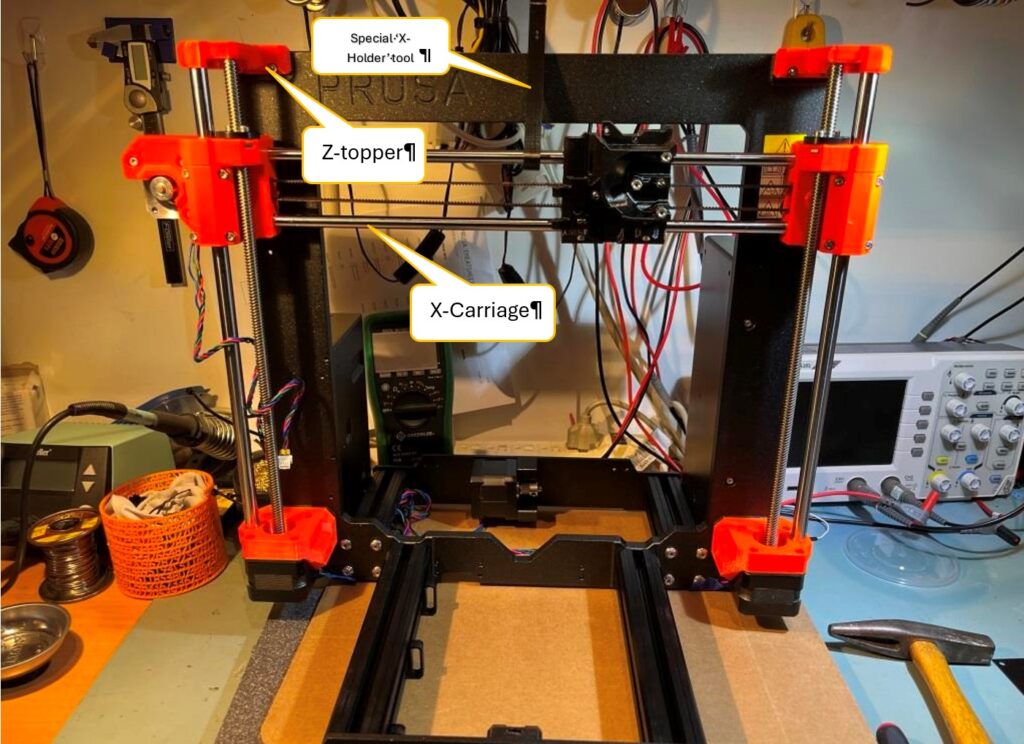
One commenter suggested that the Z-axis rod centering process would go much easier if the Z-topper & ‘trapezoidal nut’ (aka leadscrew follower) were installed first. I did it this way and it seemed to go much easier.
When I started the rod centering process, my common sense told me that to move the rod to the left, I should tighten the screws on the left side of the z-bottom assembly, but in fact the opposite was true – to move the rod to the left, the screws on the right of the z-bottom assembly should be tightened; took me a while to figure that out. I have included a short video showing the centering process. Note that the movement of the z-axis leadscrew rod is very subtle, so pay attention!
Z-axis Assembly:
While working on the Z-axis assembly chapter, I discovered I was missing one of the textile sleeves – specifically the 5x350mm one, the center one in the photo below:
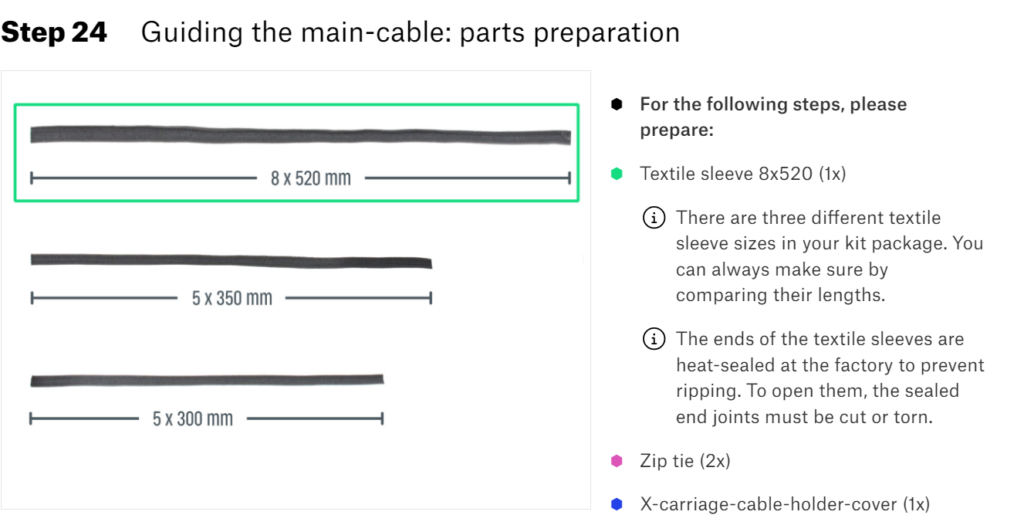
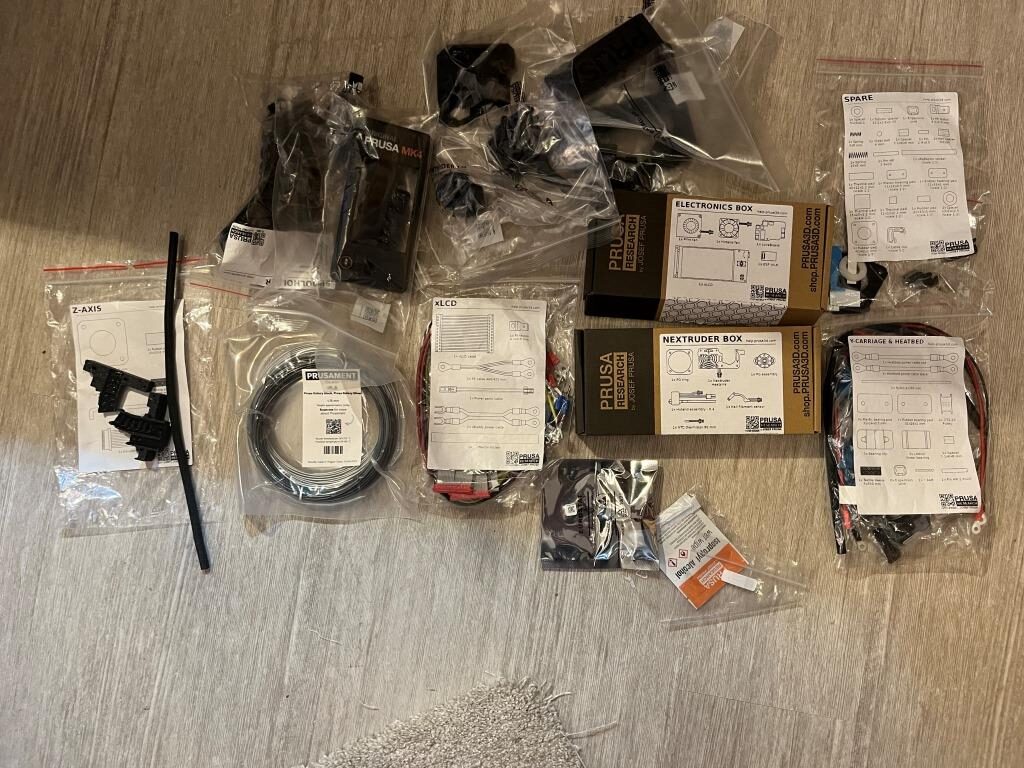
So, I jumped onto the live chat, waited the normal interminable wait (made easier by the fact that I could continue to build while waiting), and explained the situation to the chat technician. This process was made SO much easier by the fact that I could take the pictures he requested, and send them directly to ‘info@prusa3d.com’ from my iPhone – no need to transfer them to my PC first – yay! One of the photos he asked for was a shot of ALL the remaining parts – hmm, not so easy. However I was able to do this by arranging all the remaining small parts bags/boxes on my office floor and taking a photo from above, as shown below:
He also asked for a photo of my work area, which I thought was a little strange, but hey what do I know?
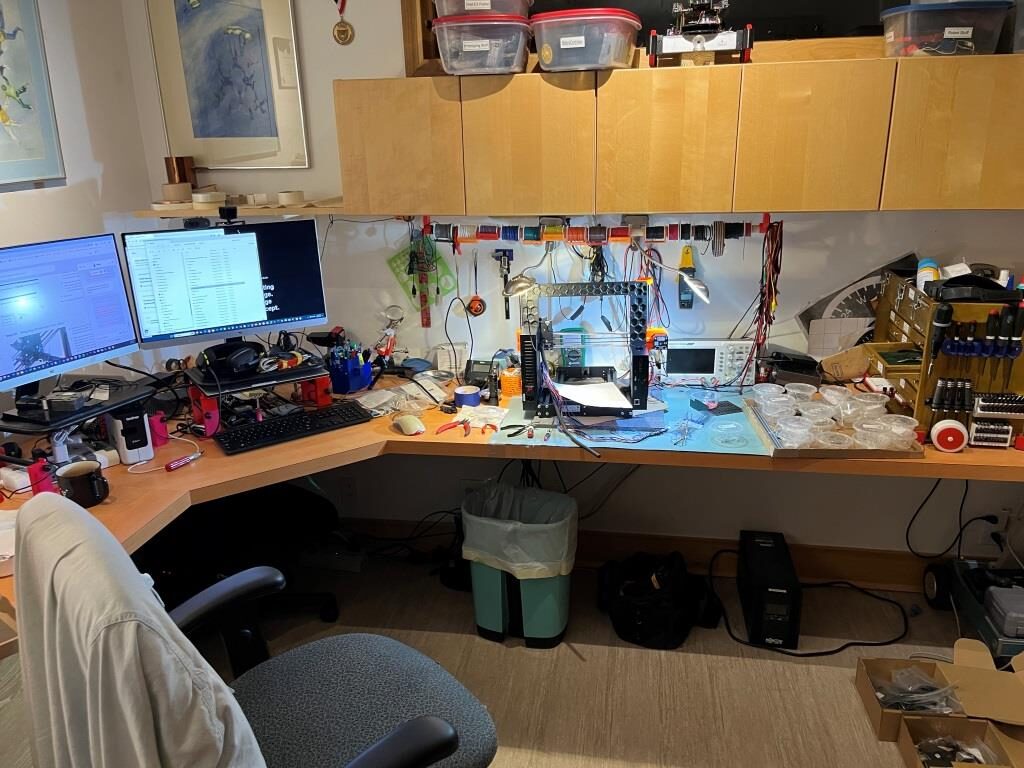
The reason I’m including this session here is because I wanted to highlight the ‘live chat’ feature – a great complement to Prusa’s kits. Chat is available 24×7, and the folks at the other end of the line seem very knowledgeable and helpful – Yay Prusa!
Wrapping the textile sleeve:
The next step in the Z-axis assemble was to feed the rest of the extruder cable into the 8x520mm sleeve, along with the nylon strain-relief filament, as shown here:
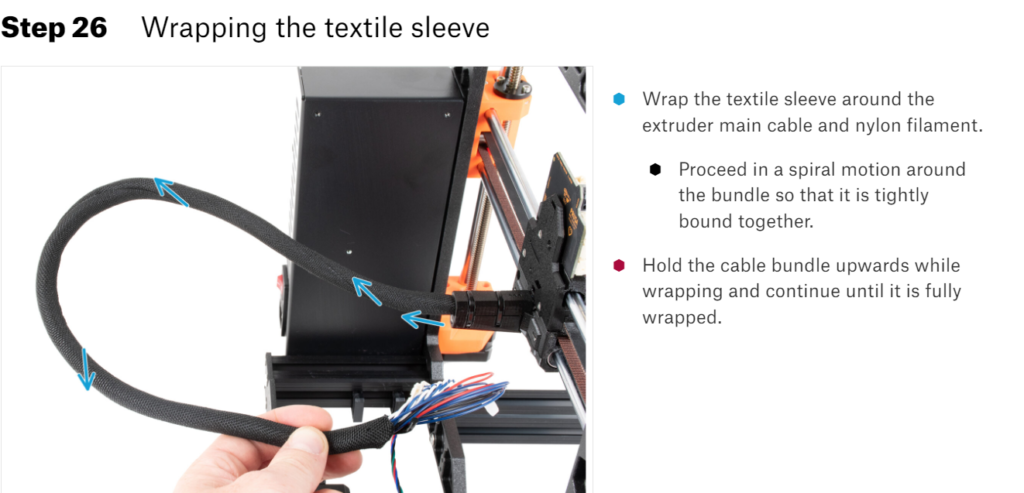
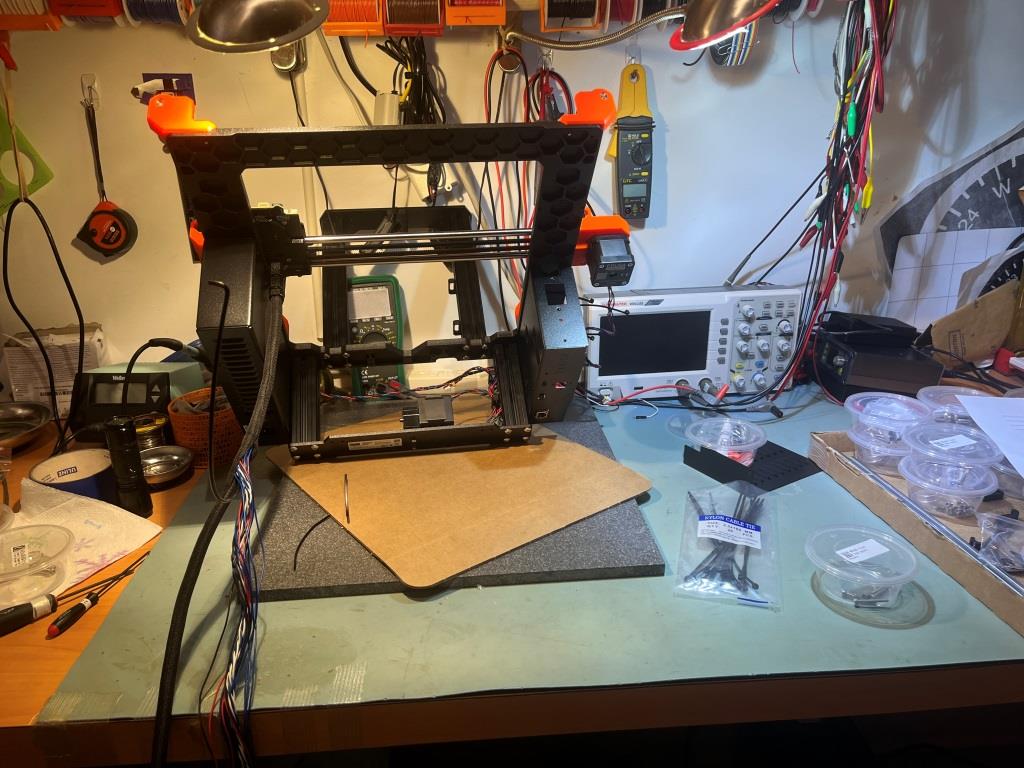
I found this awkward to do because of the upward travel of the filament, so I decided to rotate the entire chassis about 45 degrees toward me so that the upward filament travel was easier to manage:
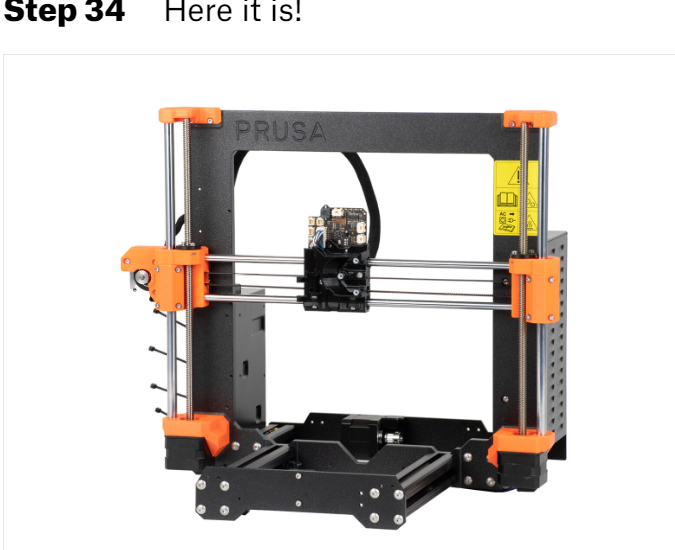
Step 34: Here it is!
At the end of the Z-axis Assembly chapter, the kit assembly instructions provides a ‘Here it is!’ photograph showing the state of the kit at this point. So, I took a photo of my kit at this point for comparison:
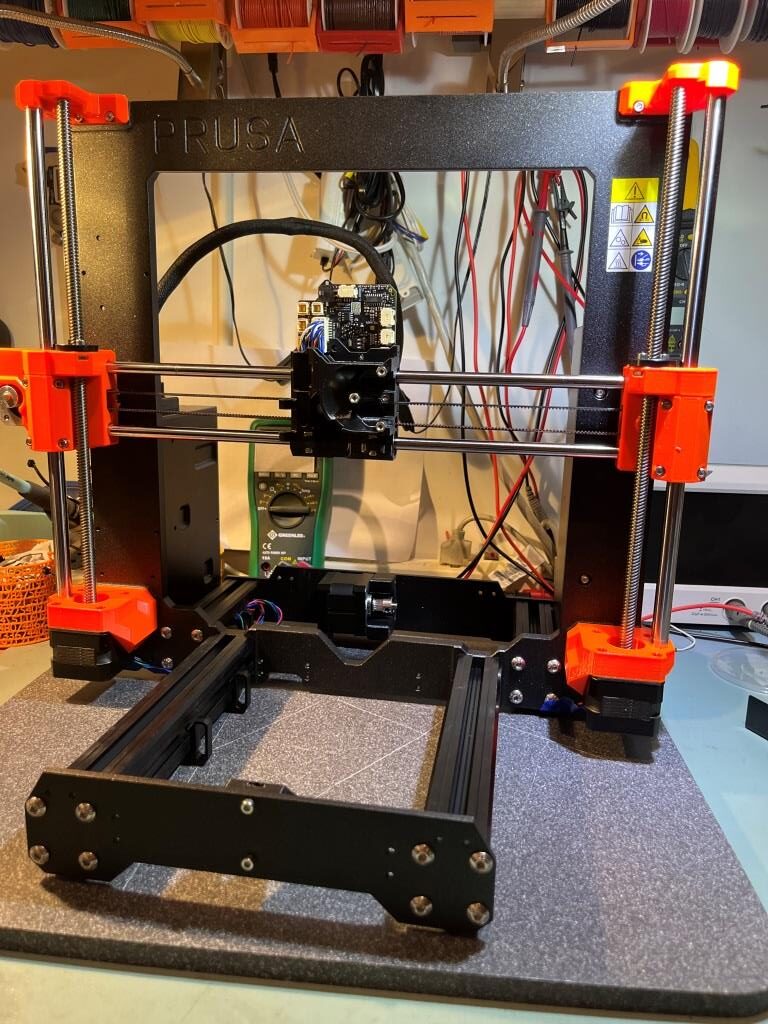
Looks pretty good if I do say so myself! 😉
Chapter 5: Nextruder assembly:
Nice comment from efvee:
You need do not do anything with the printer as built up to now until mounting the Nextrudr in step 22. You will do fine mechanic assembly (sic) work instead.
So: move the printer out of the way and clean your desktop.
So I did 😉
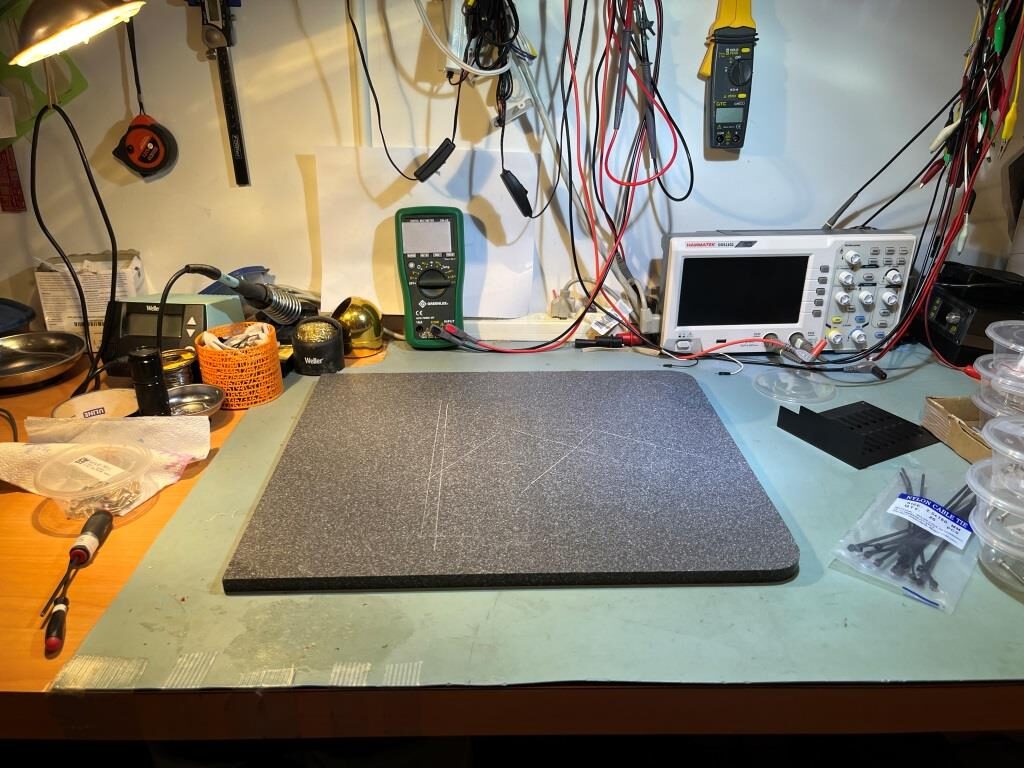
Assembling the extruder idler:
Reading the comments associated with this step, I found a couple of different commenters saying that the two small printed parts comprising the idler assembly can soften and fail to function properly when printing at higher temps, like in an enclosure. When/if they fail, you are out of business until they can be replaced. And, if you only have one printer, you cant print replacements – catch 22! The solution is to print replacement parts before the originals fail – what a concept! That sent me off into google-land trying to find Prusa’s library of printed parts – not an entirely easy thing to do – and finally found them here (click on ‘ALL PRINT FILES (19MB) to get them all). Once on my PC, I transferred them to the USB stick that came with the printer (don’t know why they weren’t on there already, but…).
Then I found the nextruder idler parts (idler-lever-A-R2.stl and idler-lever-B-R2.stl) and printed them in black PETG on my MK3S+, as shown in the following photo.
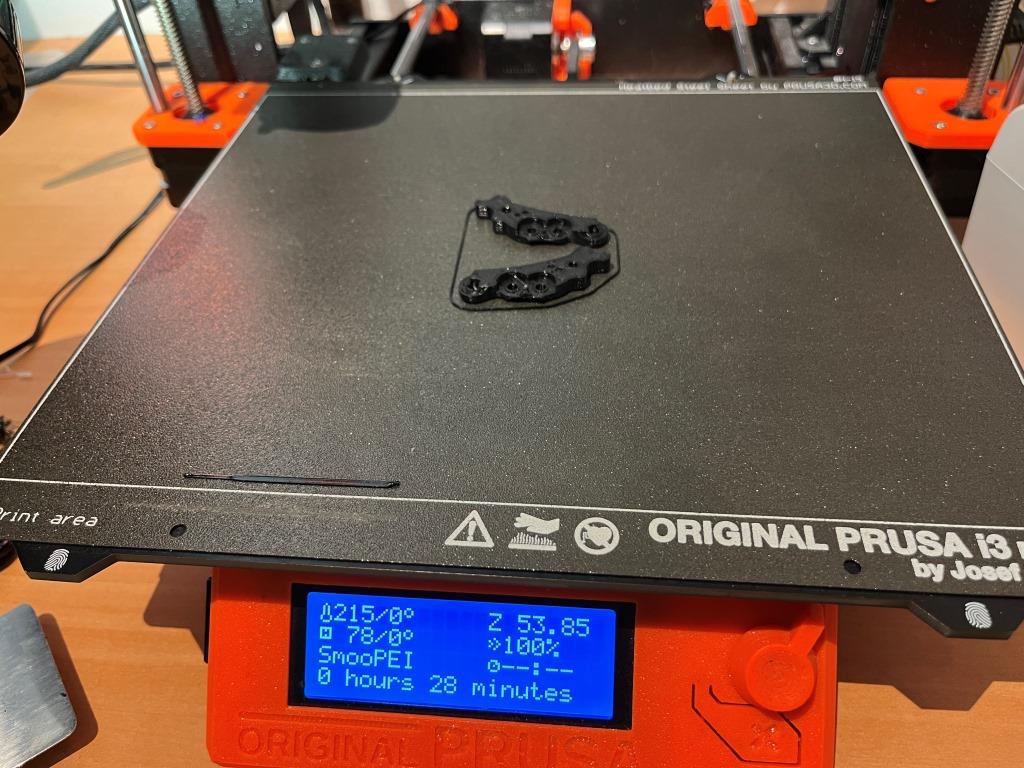
My plan is to throw these into the MK4 SPARES bag and then put the bag in my newly christened ‘Prusa MK4’ RubberMade container. Hopefully, some time in the future when the idler parts fail, I will remember (or re-read) this post, replace the failed parts with these, and then immediately print another set of spares.
Attaching the extruder/Connecting the NTC thermistor:
The last part of Step 21 Assembling the heatsink describes attaching two thumbscrews to the side of the heatsink. Actually, these should be left off until later, as they get in the way of running cables up through the cable guideway to the Love board. They can easily be attached at any point in the assembly of the kit.
Step 22 of the Nextruder chapter describes attaching the extruder body to the X-carriage, and Step 23 describes connecting the NTC thermistor cable (black cable extending from the heatsink) to the Love board. I found that it was MUCH easier to switch these two steps; with the heat sink assembly mounted on the X-carriage, it is very difficult to get the thermistor cable connected to the Love board. Here are a few photos detailing the EASY way to do this:
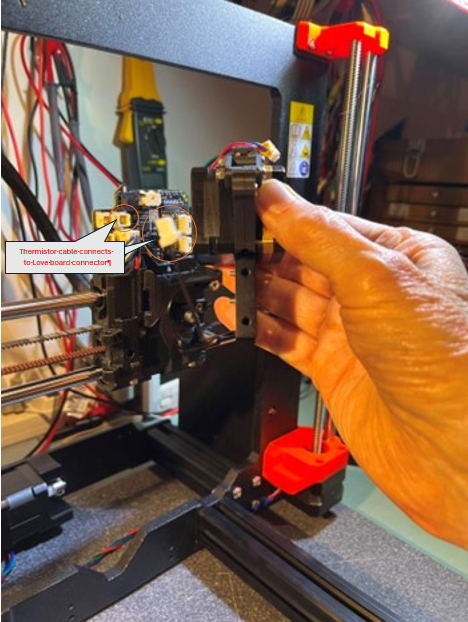
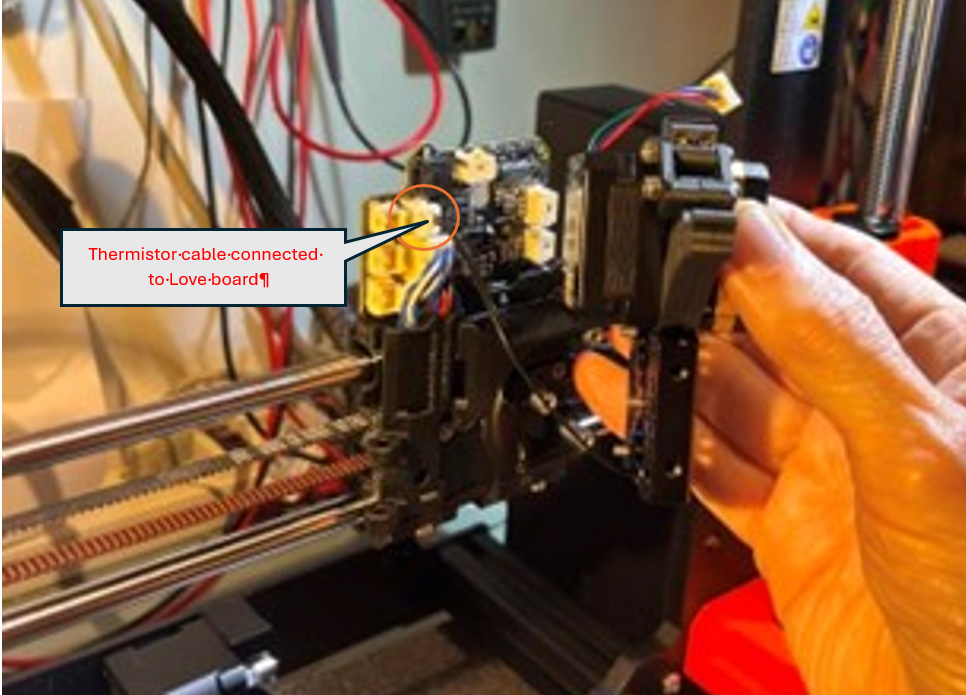
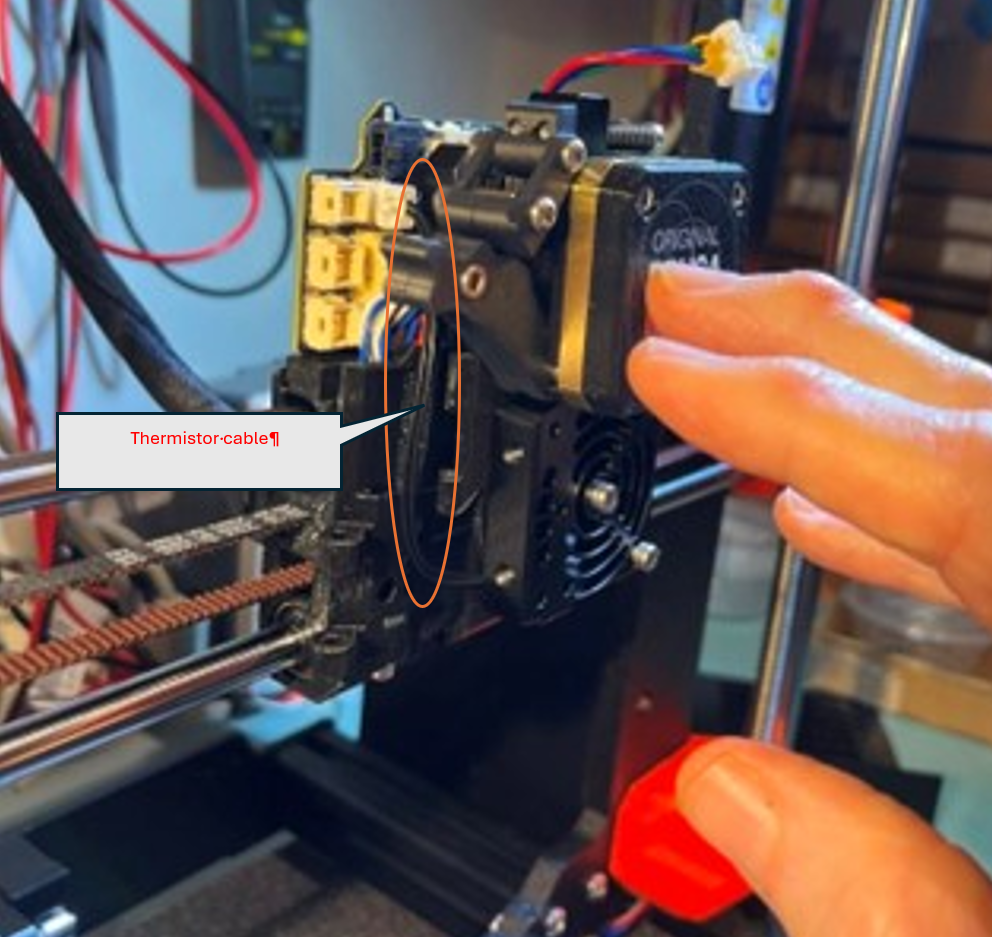
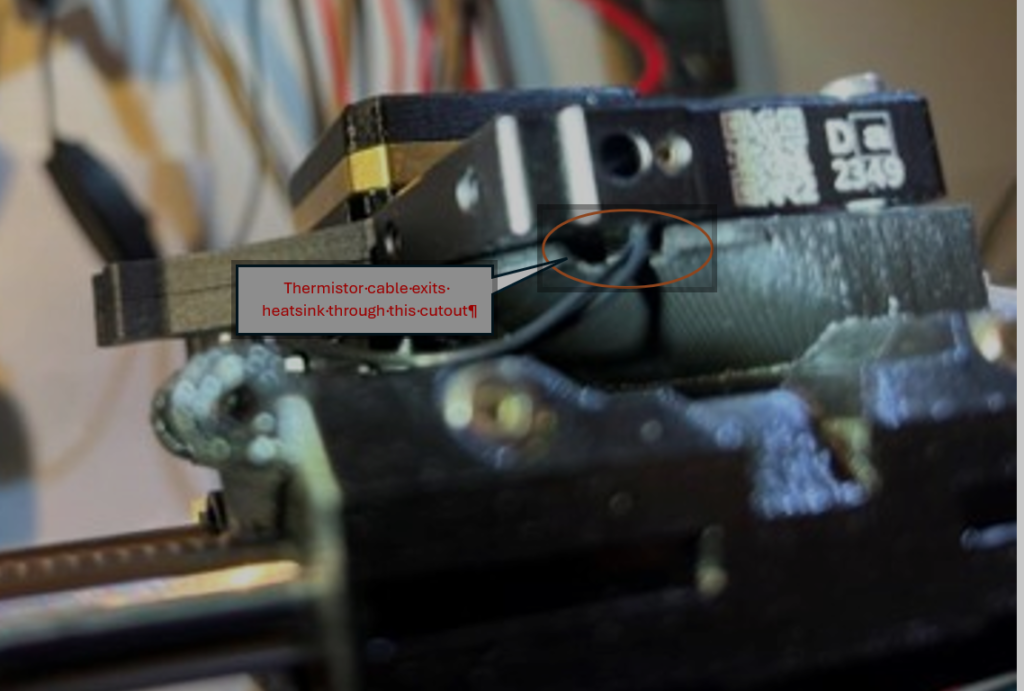
I also did the same thing with the ‘Assembling the hot end fan’ step (Chapter 5,step 25). Plugged the connector into the Love board first, then mounted the fan and dressed the wires into the wire/cable channel – MUCH easier!
Step 27: Inserting the hotend assembly:
The Prusa instruction for part of this step say:
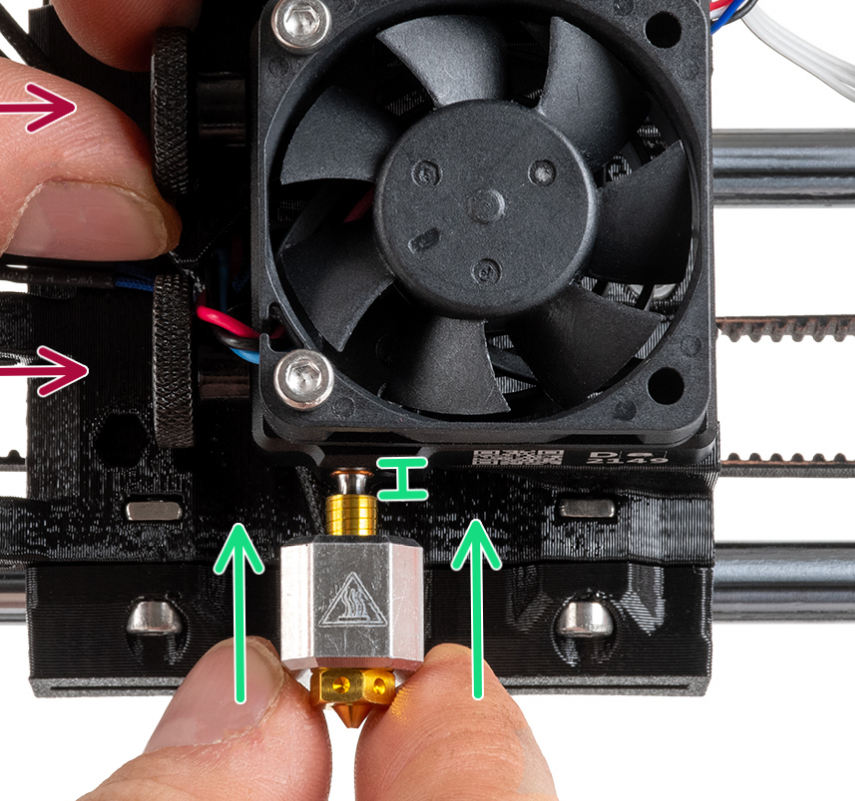
The gap between the top of the extruder ‘tail’ and the bottom of the copper sleeve is almost exactly 2mm. Prusa I recommend you change the wording to
“Push the hotend assembly all the way into the heatsink until the bottom of the copper-colored sleeve is just barely visible, leaving an approximately 2mm gap between the top of the extruder itself and the bottom of the heatsink”
2mm is going to be pretty hard to measure in this situation. Some builders recommend you measure this distance on the hotend assembly before inserting it into the heatsink and then put some kind of mark at the correct point. Looking at the hot end assembly, it appears to me that the distance between the bottom of the copper-colored sleeve and the top of the extruder is almost exactly 2mm, and the Prusa-provided detailed photo shows that the bottom of the copper-colored sleeve is just visible in the hole in the heatsink:
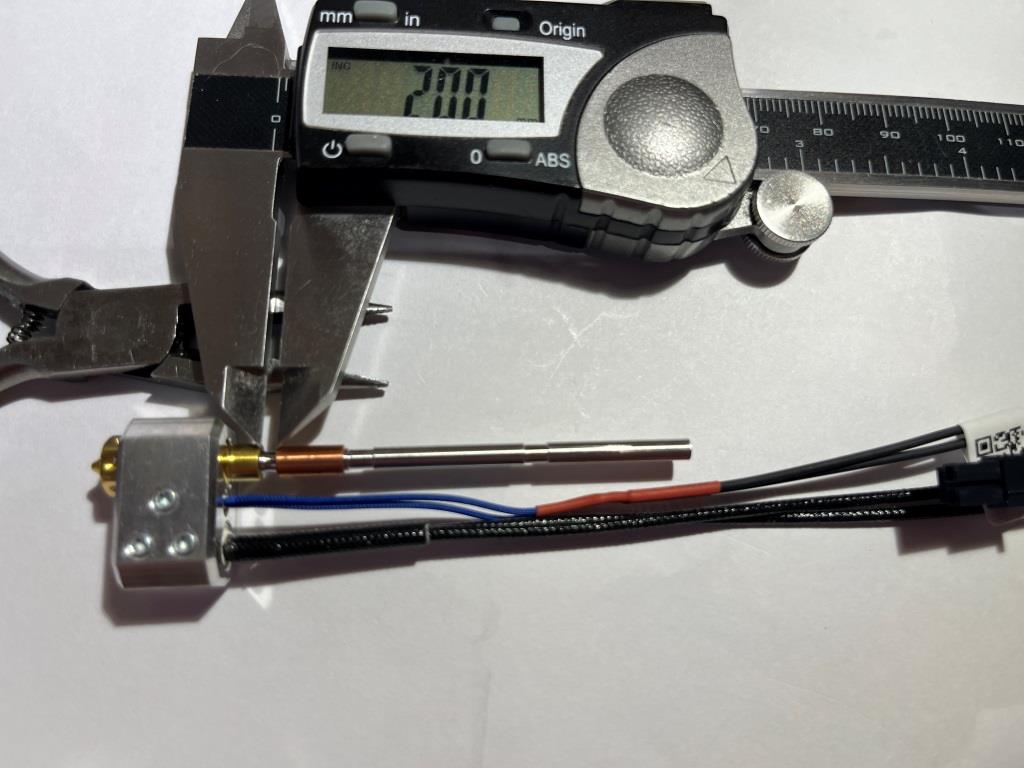
Before inserting the hotend tube into the heatsink hole, place the printer frame on its ‘back’ (PSU/xBuddy Box) side. This make the insertion step MUCH easier.
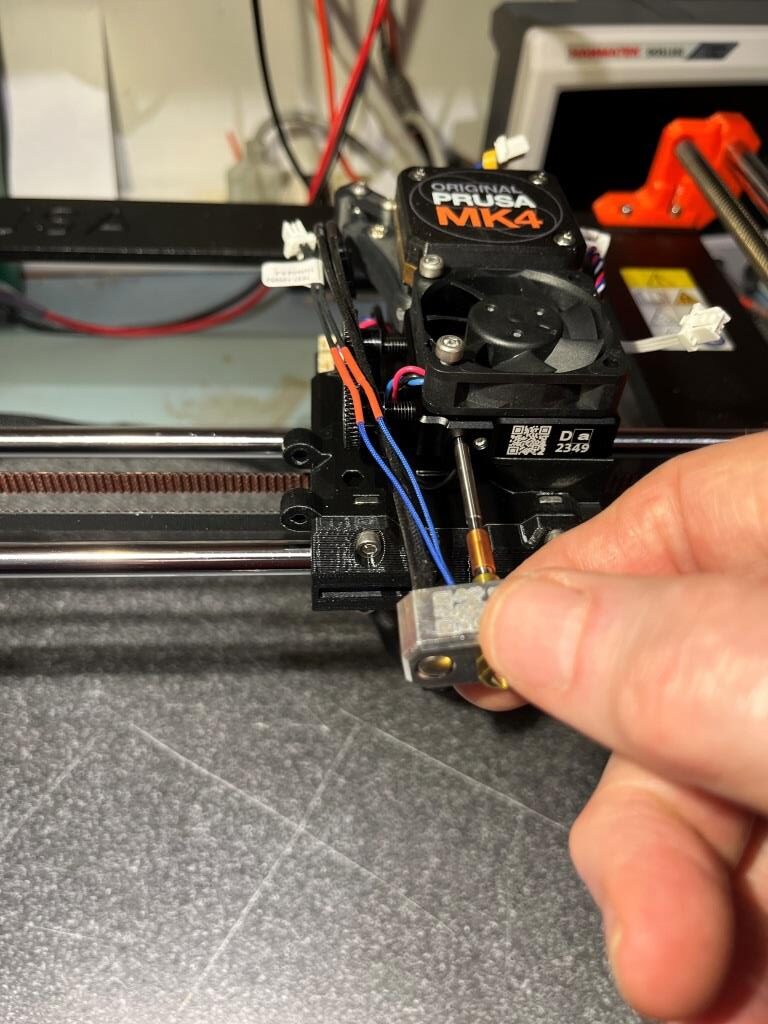
Note: Contrary to what is shown in the above photo, it is better to leave the upper thumbscrew off until after the hotend cables have been dressed through the wire channel and connected to the Love board.
Step 30 Assembling the fan-door: mounting fan
Builder sonra commented that he used a piece of Scotch tape to hold the wires in place during assembly. Once everything was assembled, he removed the tape:
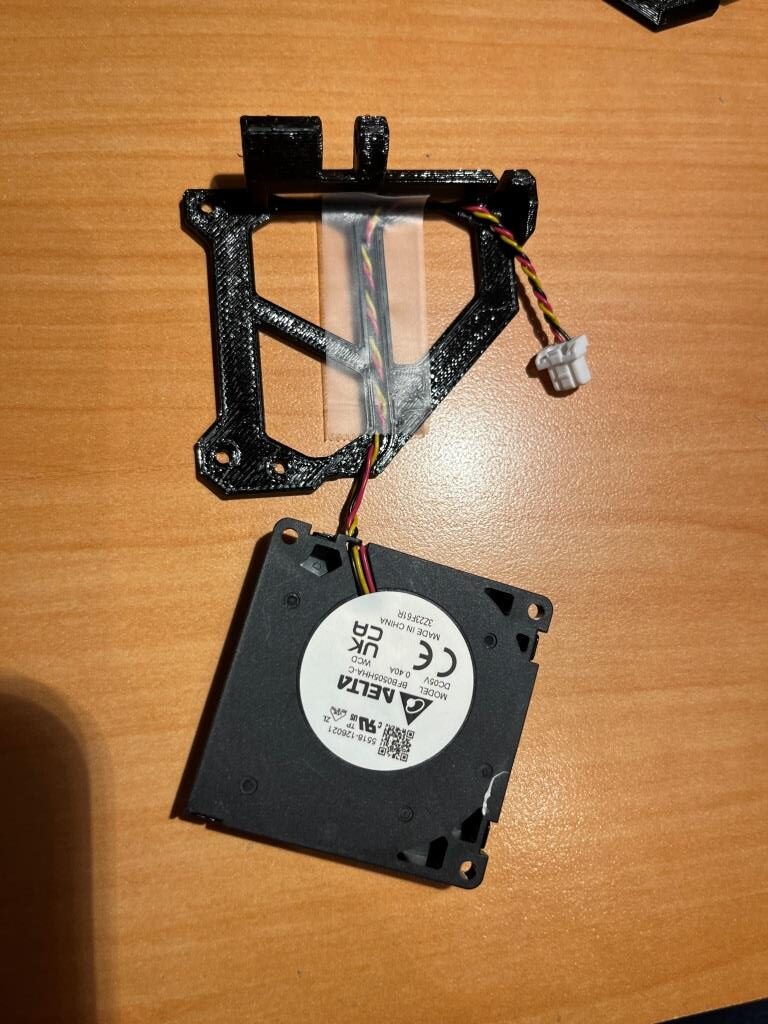
Step 31 Assembling the fan-door: assembling fan-shroud
This step calls for attaching the fan to the fan-door using 2ea 3x10mm screws. The screws pass through the fan mounting holes and screw into holes in the fan-door – no nuts – just screws into the material. Unfortunately, at least on my part the 3mm screw didn’t pass through the fan part, and it wasn’t just a matter of wiggling them a bit to get them to go through. The fan mounting holes were just too small.
A chat with the Prusa guys (only 1-2 minutes wait time in the middle of the day!!) confirmed that the fan part number (3Z23F61R) was the correct one, so I have no idea what happened. I drilled the holes out with a 3mm clearance drill and that solved the problem, at least in my case. For anyone reading this, don’t be surprised if the fan mounting holes are under-sized.
Step 39 Covering the LoveBoard: side cover
Some builders commented that the right-hand side cover for the Love board caused problems with the later X-axis self-test. Apparently it hits the ‘Trapezoidal screw’ mounting screwhead before the software thinks it should, and fails the test. I looked at my arrangement and saw that it was going to do the same thing. So, I proactively addressed this issue – we’ll see how I did when I get to the X-axis self test:
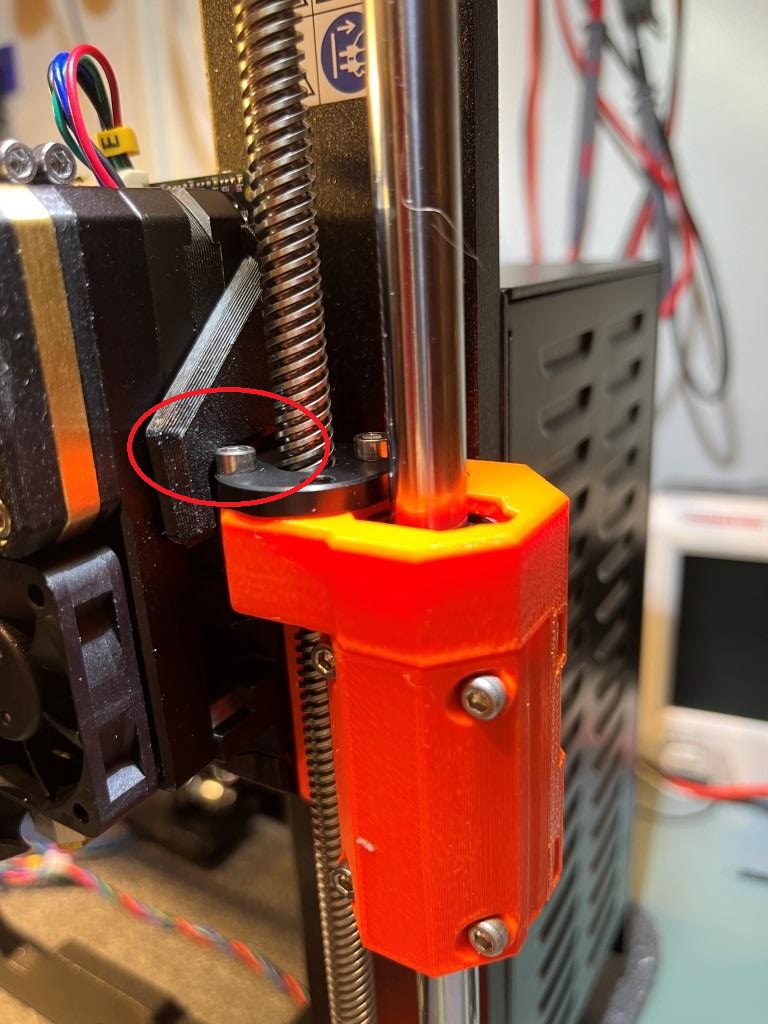
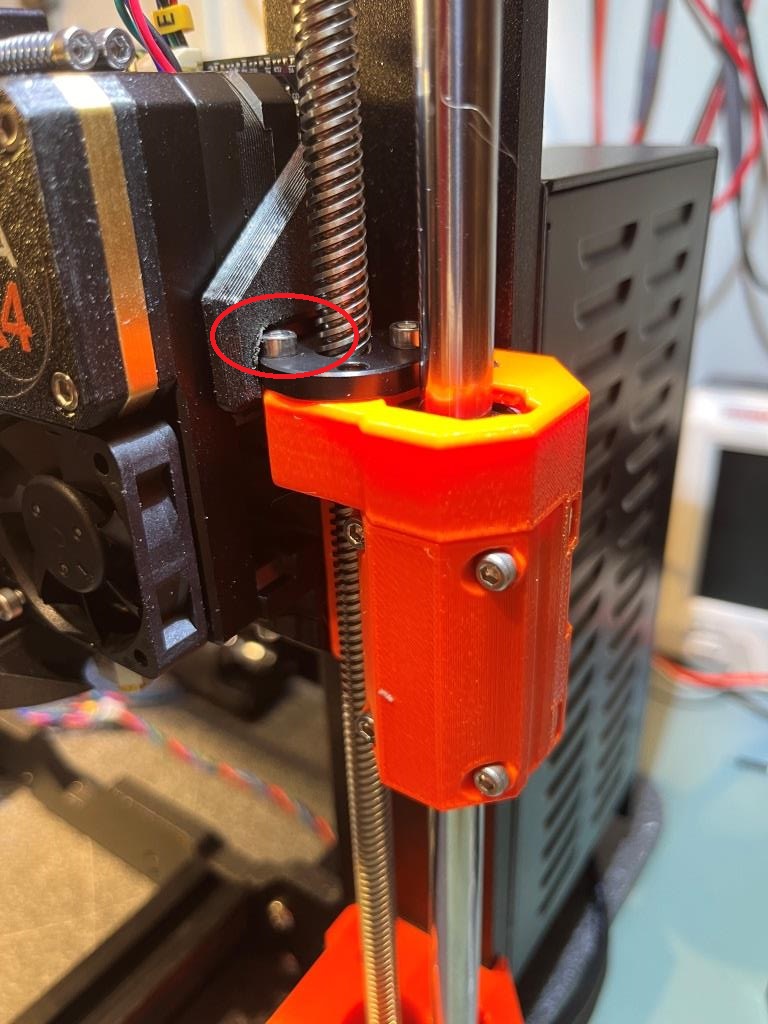
Step 41 Tensioning the X-axis belt:
Prusa put together a real fancy phone app to help kit builders to optimize belt tensions, as shown below:

The app ‘listens’ to audio of a belt being strummed by the user, calculates its frequency, and displays it on a pseudo spectrum of sorts while announcing either ‘too tight’, ‘too loose’ or ‘just right (The Prusa version of ‘Goldielocks and the three Bears’). The problem is, it doesn’t do a very good job, and violates just about every rule for user interfaces that Alan Cooper (the father of Visual Basic) described in his seminal book ‘About Face’ some thirty years ago. The one thing this app did for me (actually, just the above picture of the app) was to tell me the optimum belt tension frequency – 82Hz. I then did a google search for ’82Hz audio note’ which led me to this site that provides a 1-hour recording of an 82Hz note. With this playing in one ear of my BT headphones, and listening the belt note with the other, I was able to determine that my belt ‘note’ was pretty close to 82Hz – all without using the app at all. Prusa probably paid somebody a lot of money to develop a fancy phone app that is, in the words of a Texas cattleman, “All hat and no cattle”.
Chapter 6: xLCD assembly:
Apparently Prusa Mk4 kits utilize at least two physically different xLCD boards with correspondingly different 3D printed mounting parts, so the kit builder needs to know which version they have to know which set of instructions to follow. The key difference is where one of the cables is attached to the board with a ‘Faston’ (spade lug) connector, as shown in the screenshots below:
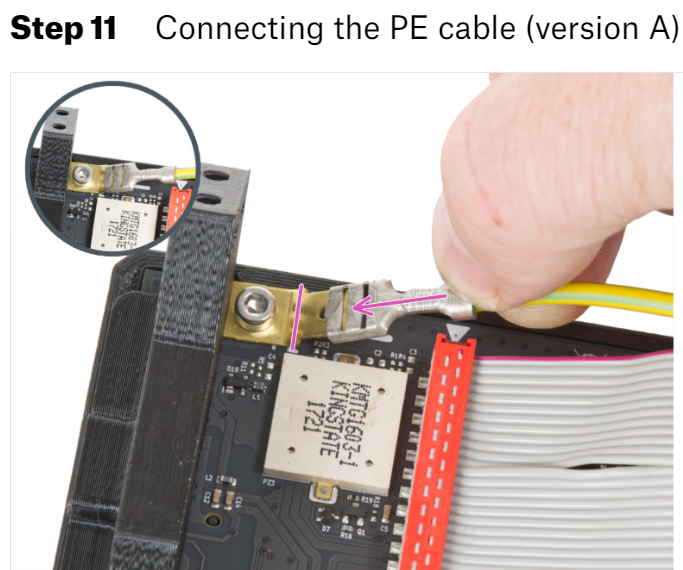
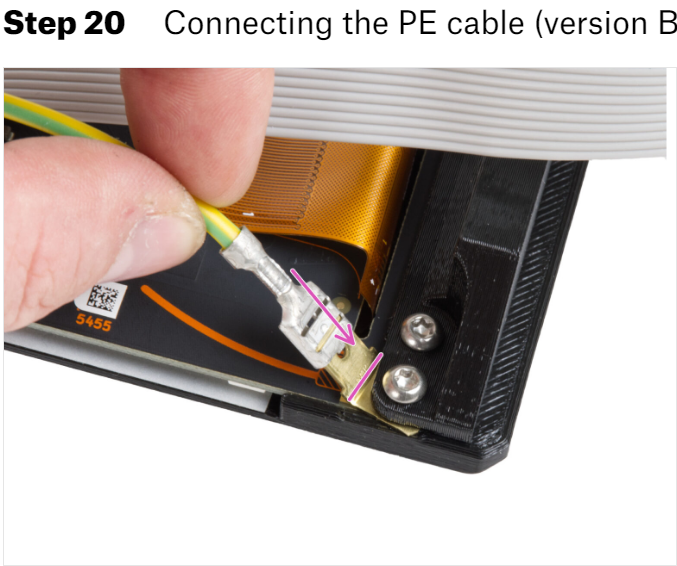
If you have Version A (which I did), then follow Step 3 xLCD assembly (version A): through Step 11 Connecting the PE cable (version A). If you have version B, skip to Step 12 xLCD assembly (version B):
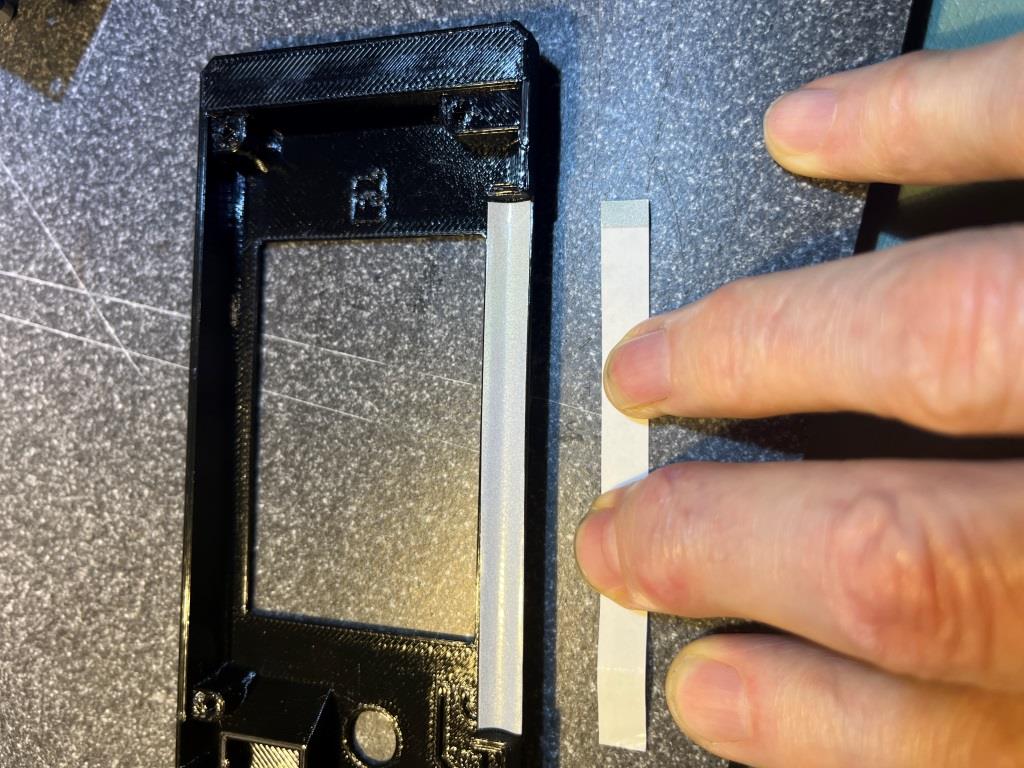
Step 6 Installing the xReflector sticker (Version A):
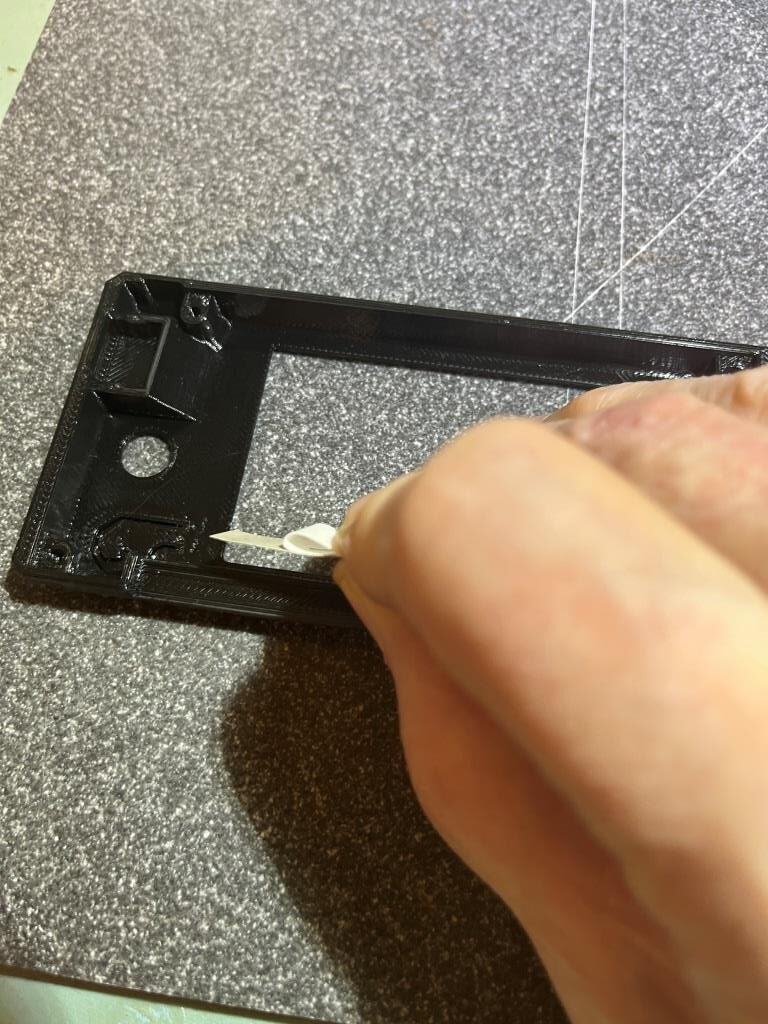
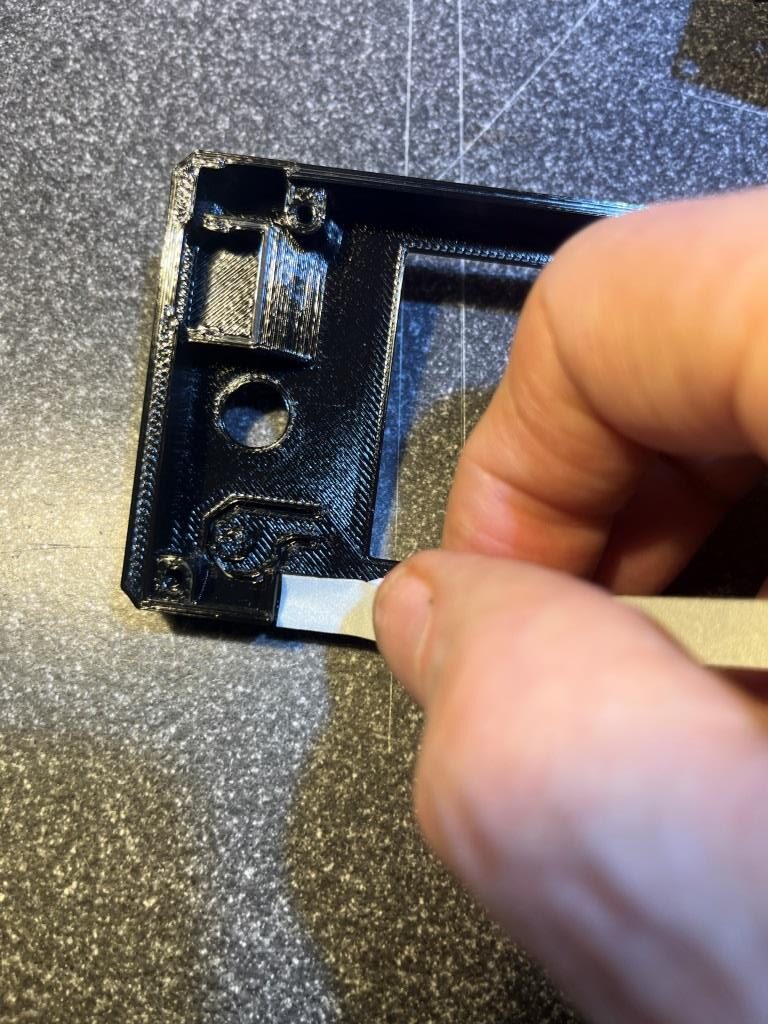
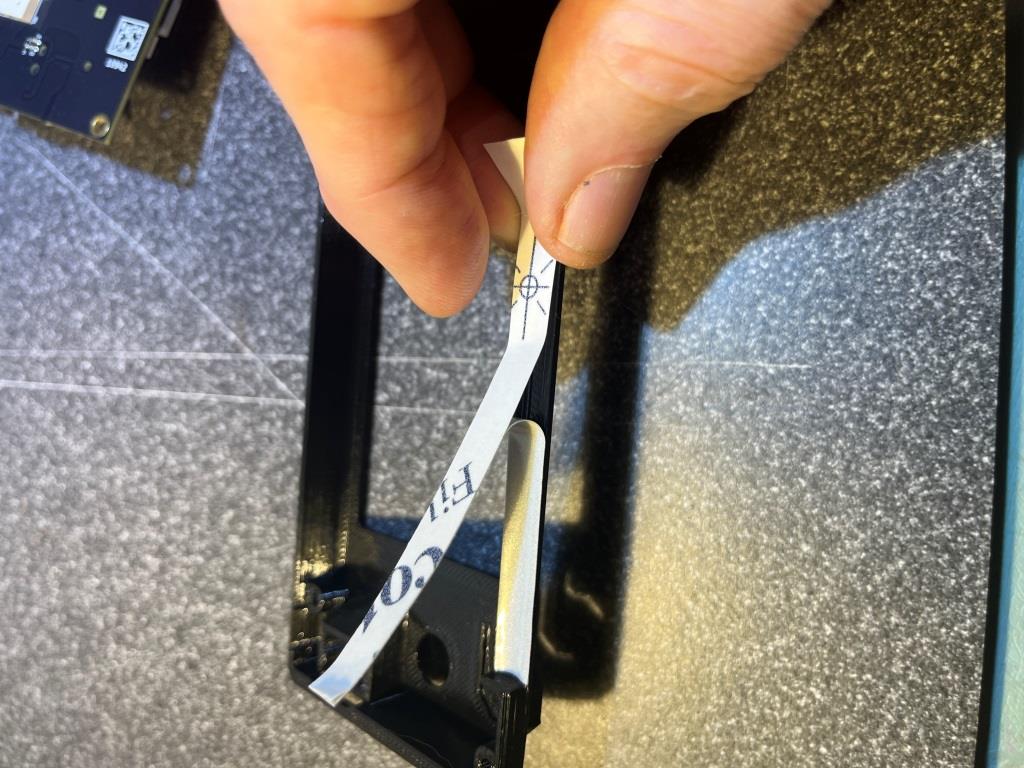
Looking through the comments, I found a warning to not cut off the excess length from the reflective sticker, as there was already a perforation across one end that can be pulled off after the sticker is in place. Maybe this was put there as a ‘handle’, but Prusa never told anyone about it?
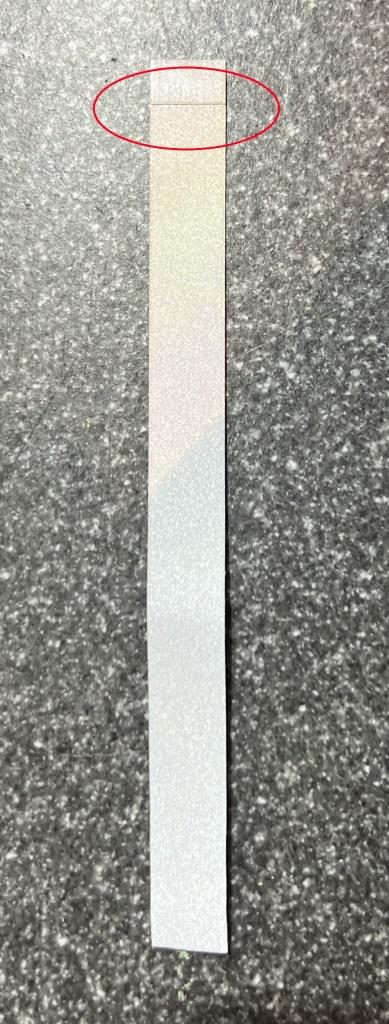
Here are some photos showing the sticker application process:
Step 7 Assembling the xLCD-support-right (Version A)
This step turns out to be one of those where you really need three hands – using only two always leaves something out to slip away – rats!
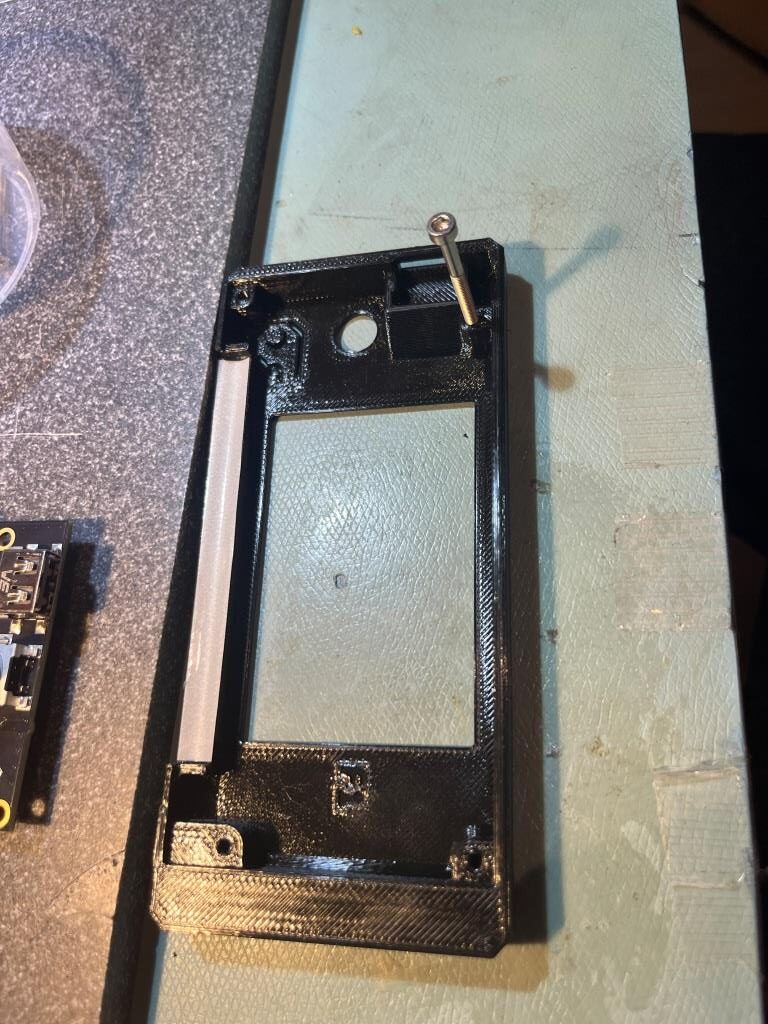
Builder doug commented: The time you take to “practice” this step in advance will pay off with an easy installation. Do yourself a favor and test-fit everything first. Pre-tap the screw holes by running the M3x8 at least halfway into each hole. Ream out the 3 holes in the supports with the M3x8 to make sure they don’t bind. Make sure the support-right piece fits correctly into the little cutout. Some screens drop straight in, others will need to be angled in bottom-first. Tolerances are very tight here. If you have a little bit of reflective tape sticking out over the inner edge, trim it back. Try dropping the screen in without the support to see how it fits. Make sure the USB port sits all the way down in the socket. Only when you’re sure everything goes where it needs to should you do the actual assembly. Leave all the screws at least 2-3 turns loose until everything is in place, then slowly tighten each one evenly until they’re all seated.
I took this to heart, and used a 3x30mm screw to test each hole for proper fit, as shown in the following photo:
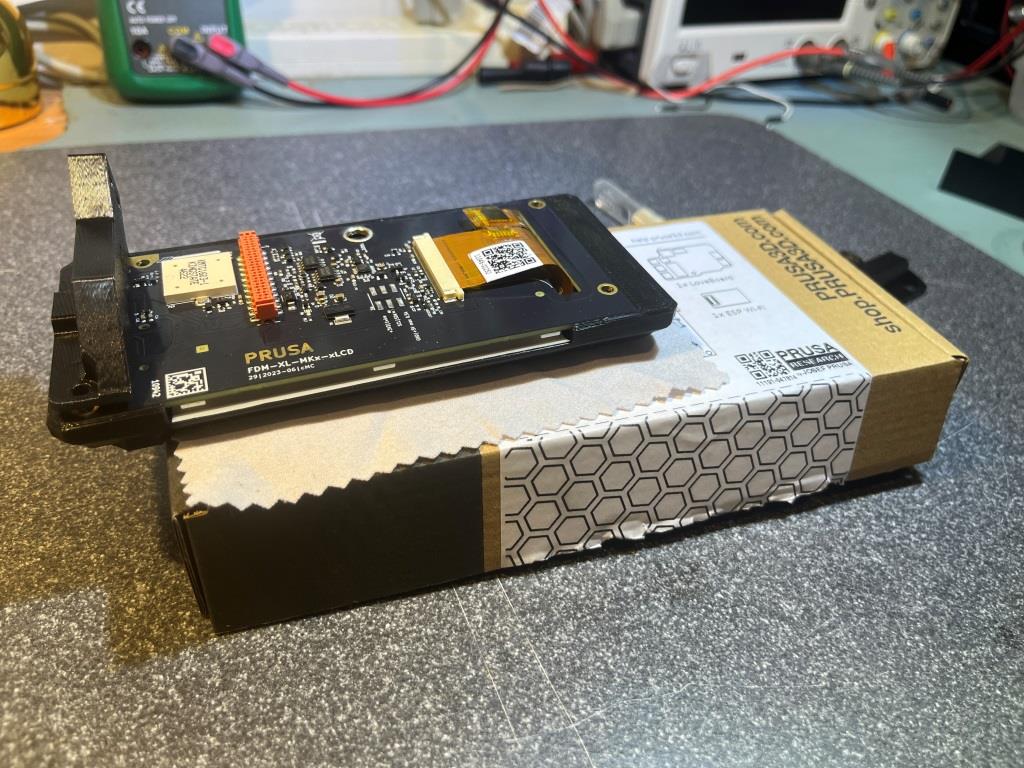
Then, after sleeping on the problem overnight, I realized that I actually had a third hand, if I could place the assembly on something that was raised up enough from my work surface to accommodate the shaft of the selector control. I got up the next morning and looked around my space, and realized that the perfect ‘something’ was the box the xLCD assembly came in, as shown in the following photo:
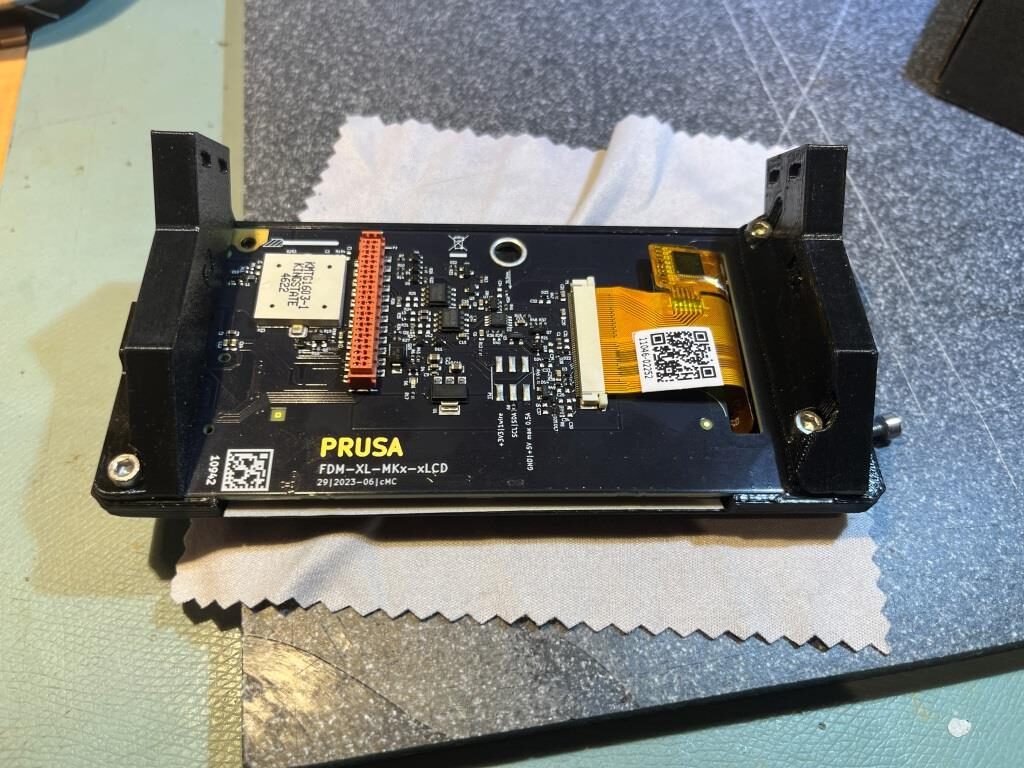
After getting the ‘-right-support’ part mounted successfully, the ‘-left-support’ piece went on fairly easily. Here’s the (almost – still missing the ‘faston’ connector) completed assembly
Step 30 Guiding the Z motor right cable
It took me a while to understand what the instructions were saying on this step. The instructions talk about forming a loop, and then about the motor cable going through both loops – huh? I guess that can be an issue with assembly instructions written by a Czech speaker and then translated into English. Anyway, here are some photos for how I think it should work
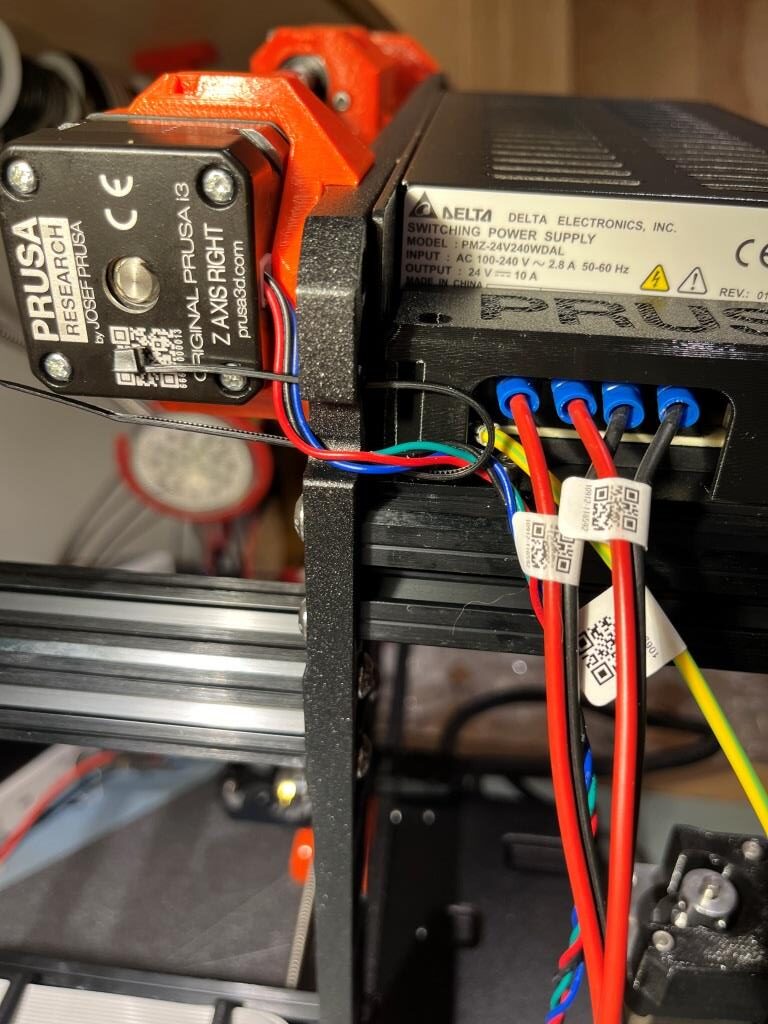
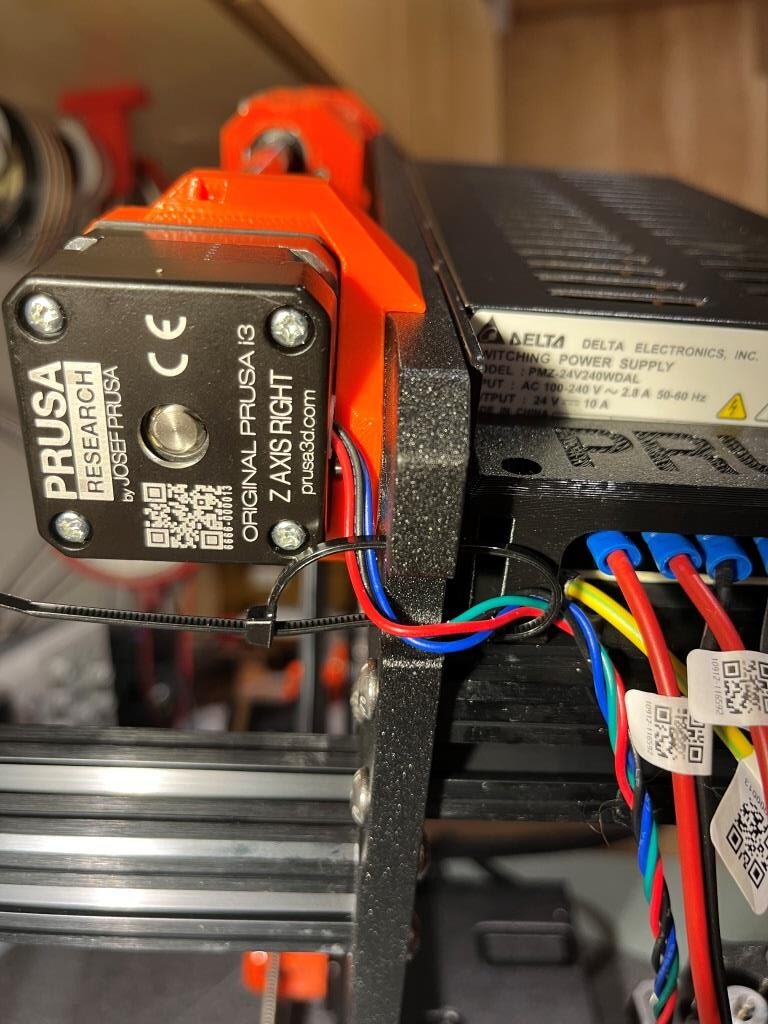
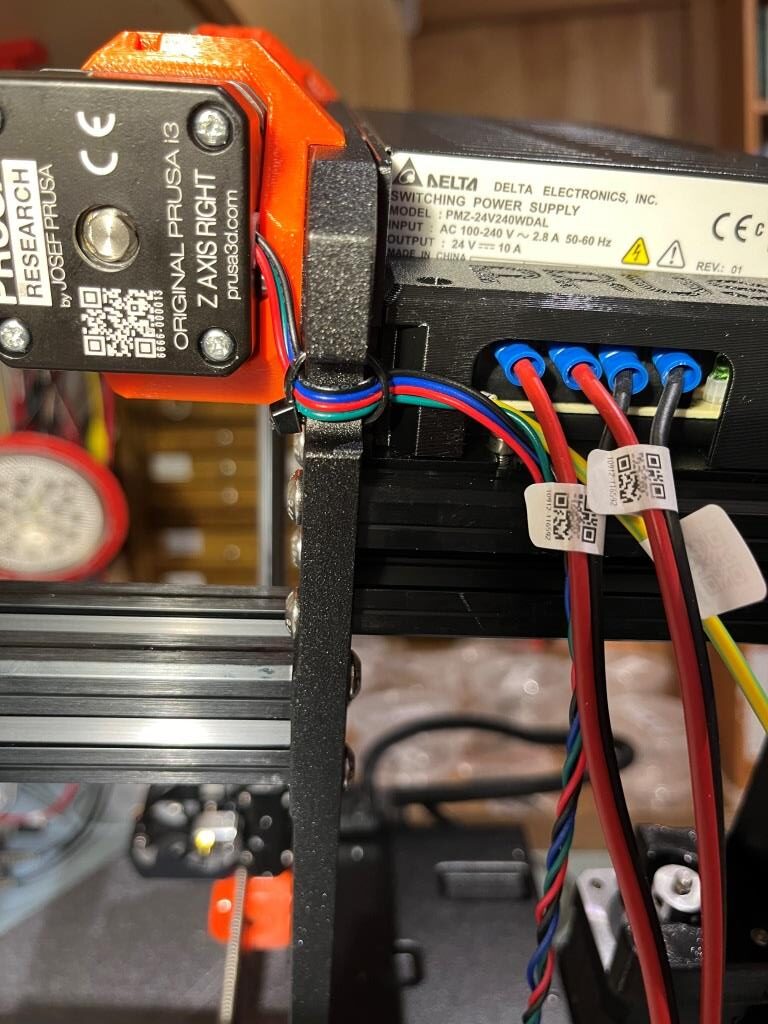
Step 41 Time for energy delivery
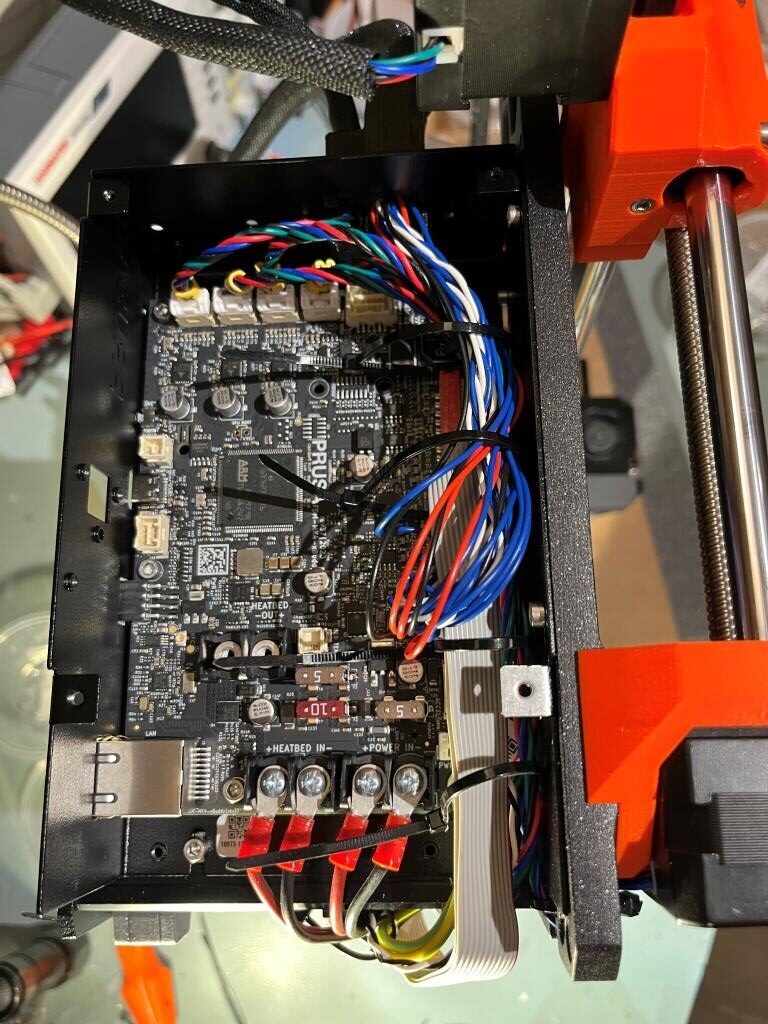
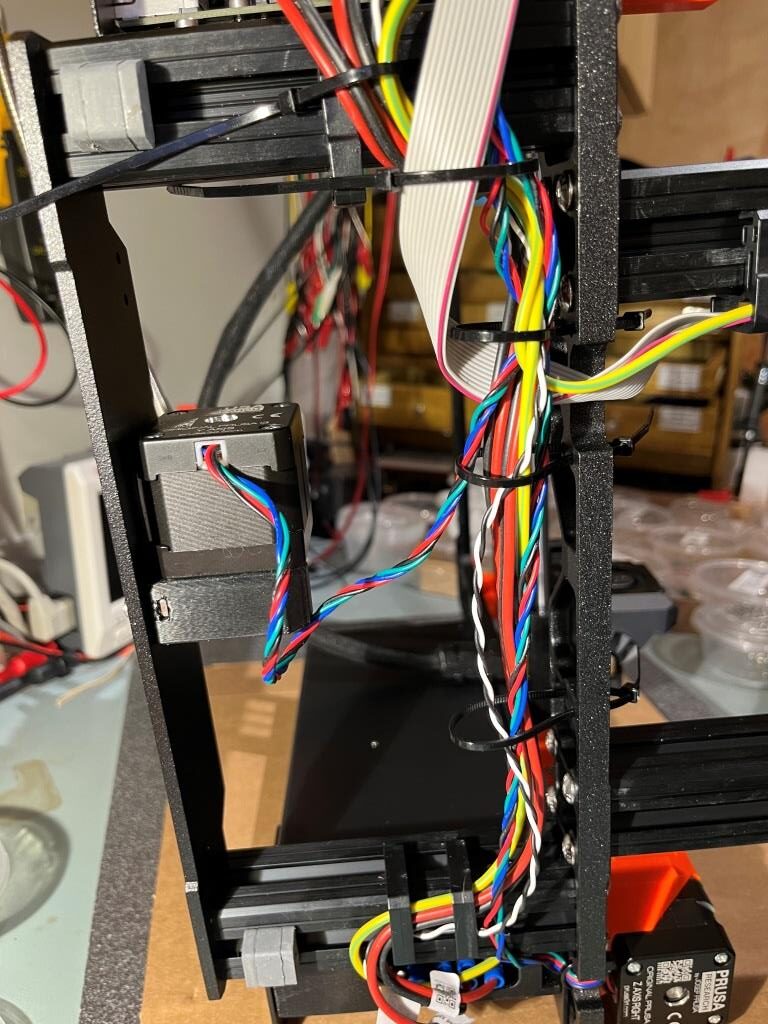
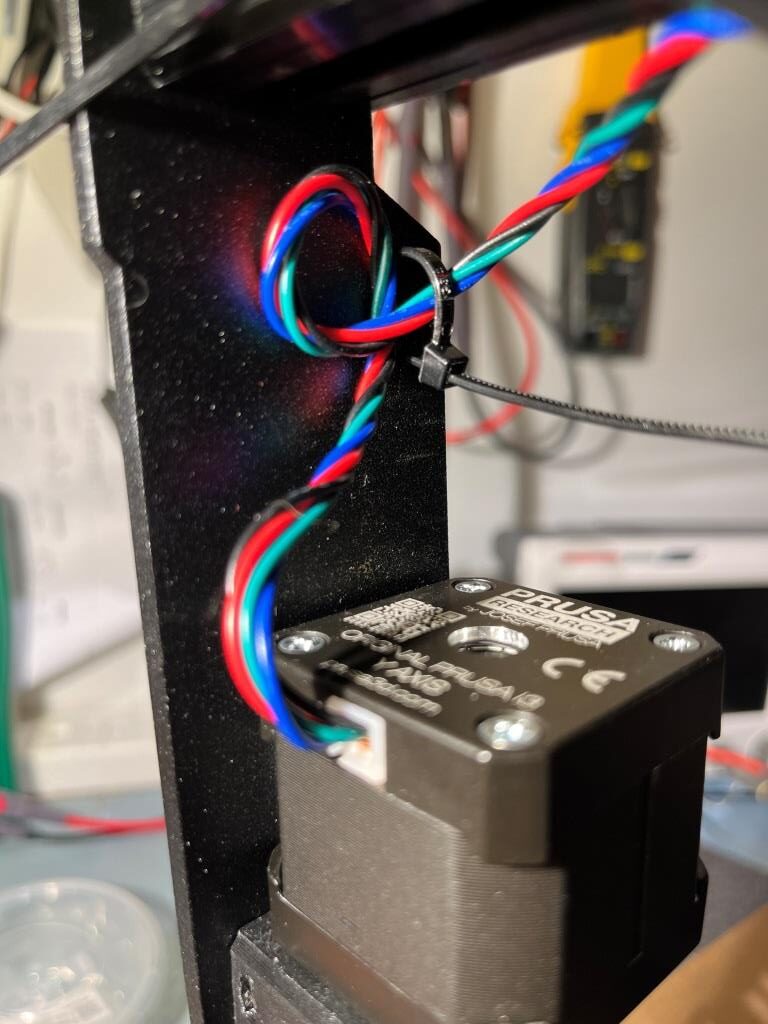
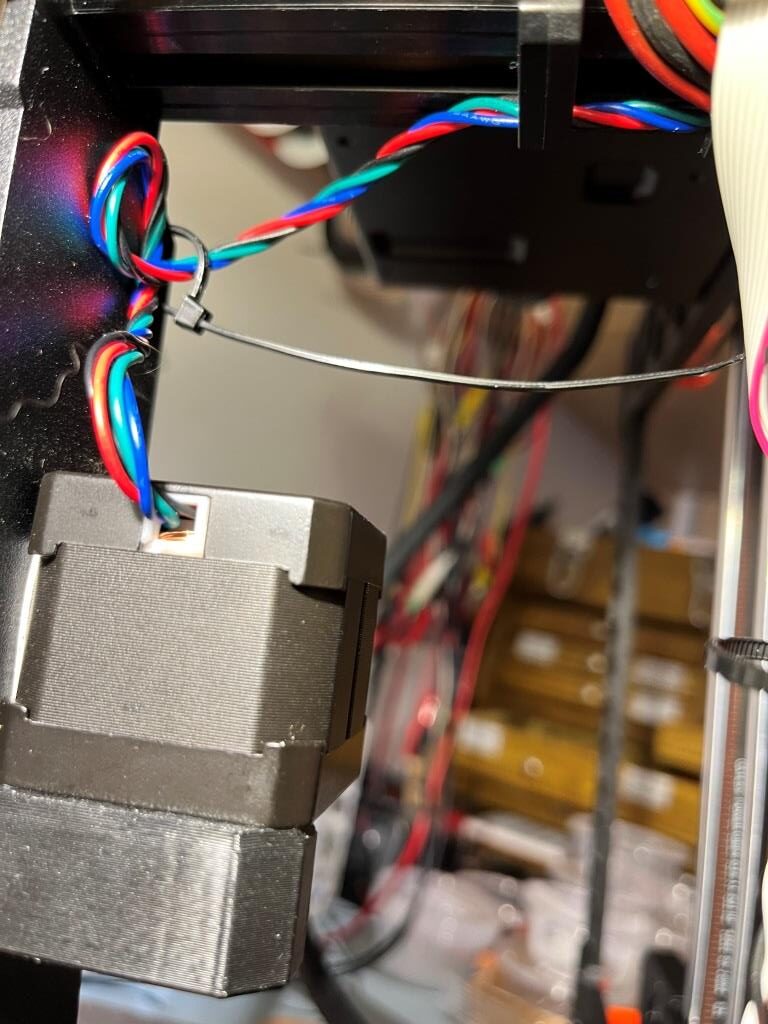
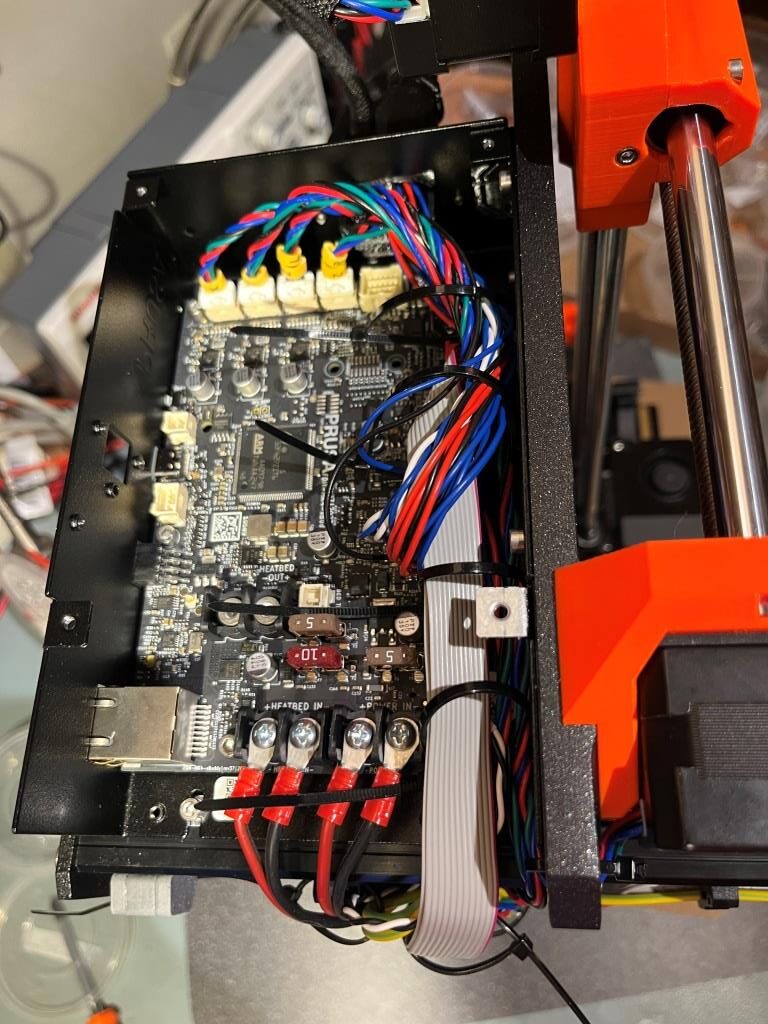
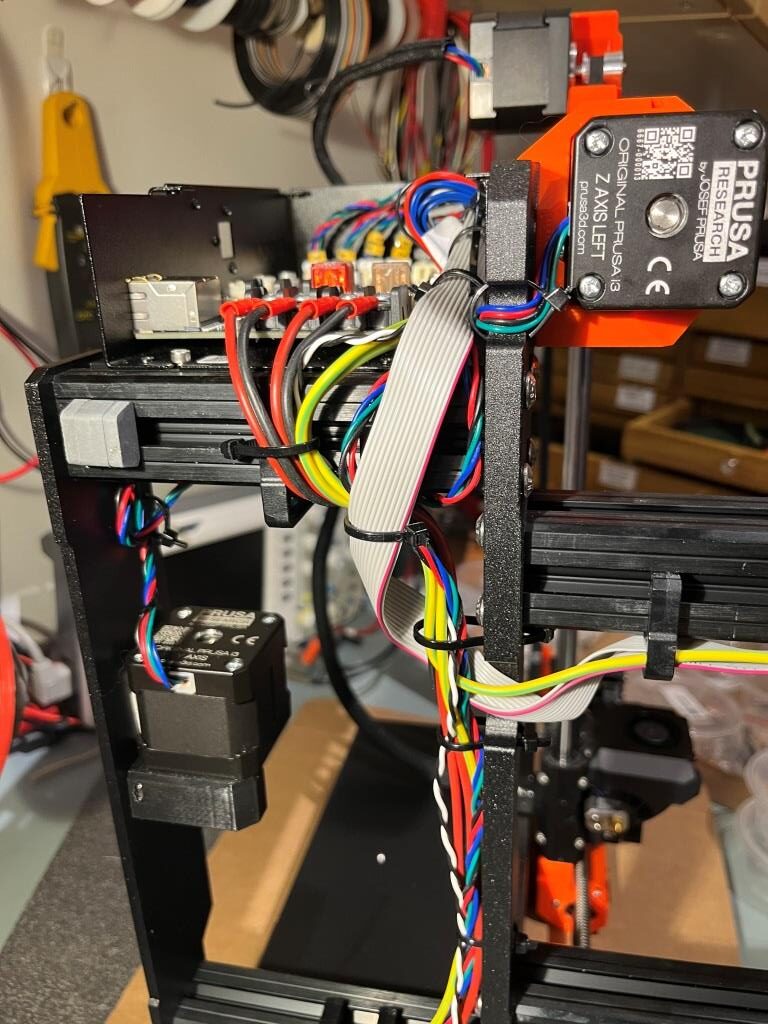
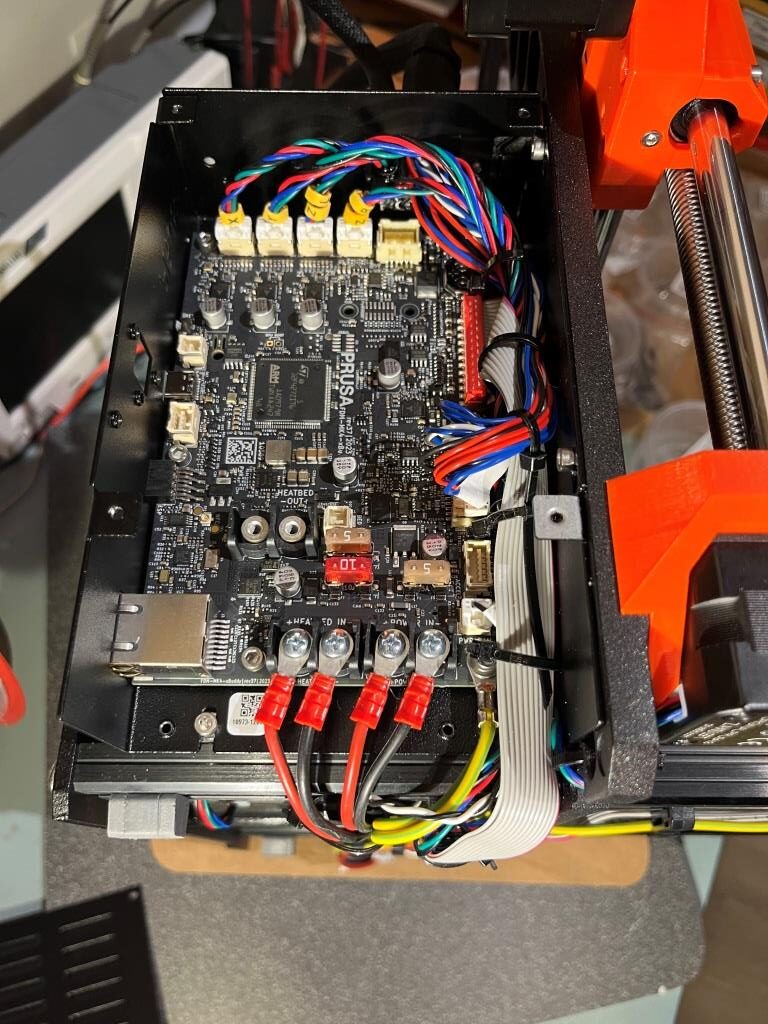
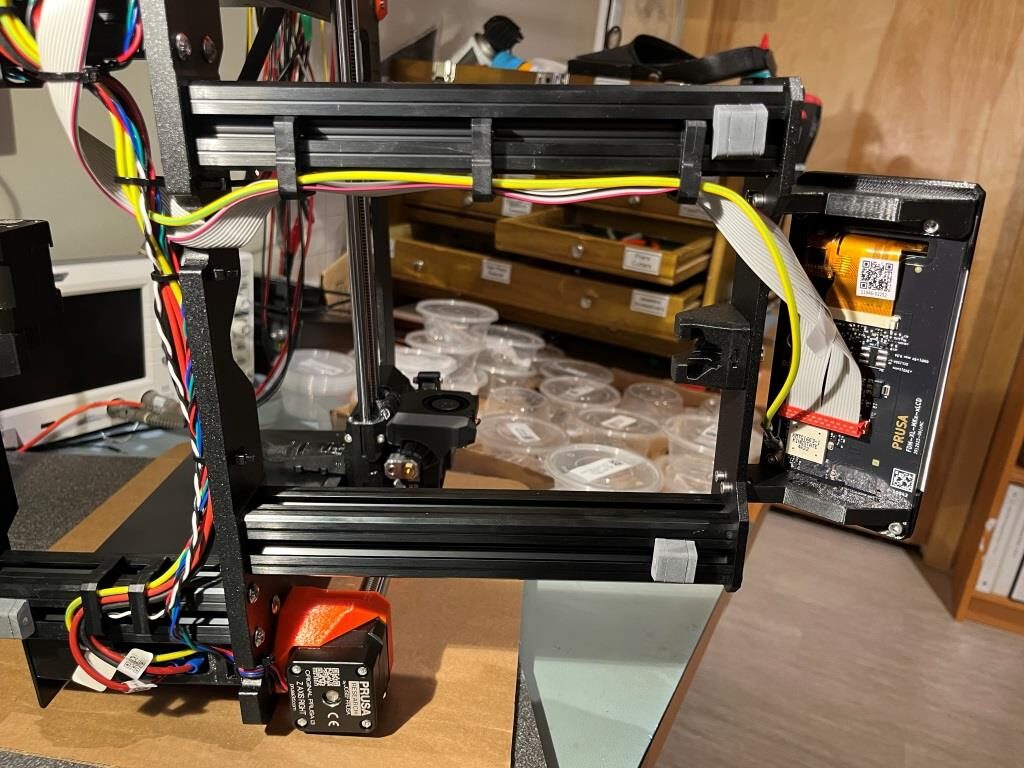
At this point all the critical wiring harness routing and connections have been accomplished. Here are a bunch of pictures of my printer at this point. In particular, I routed the Y-axis motor cable a bit differently than per the assembly manual, as (like at least one other builder) I didn’t like having the cable cross the open space between the rear frame panel and the main frame cast piece. I have hopefully provided plenty of documentation to show the result. The photos show a general progression from ‘preliminary’ (with zip ties engaged but not cinched) to ‘final’ (with everything cinched down as closely as I felt reasonable. Enjoy your gummy bears!
23 June 2024 Update:
When I got to the part where the Y-carriage is mounted onto the frame, I realized why re-routing the Y-axis motor cable was a BAD idea. This interferes with the rear rod mount on the left (two bearing) side of the Y-carriage assembly. Had to go back and UNre-route this cable 🙁
When I got to the part where the Y-carriage is mounted onto the frame I realized why re-routing the Y-axis motor cable was a BAD
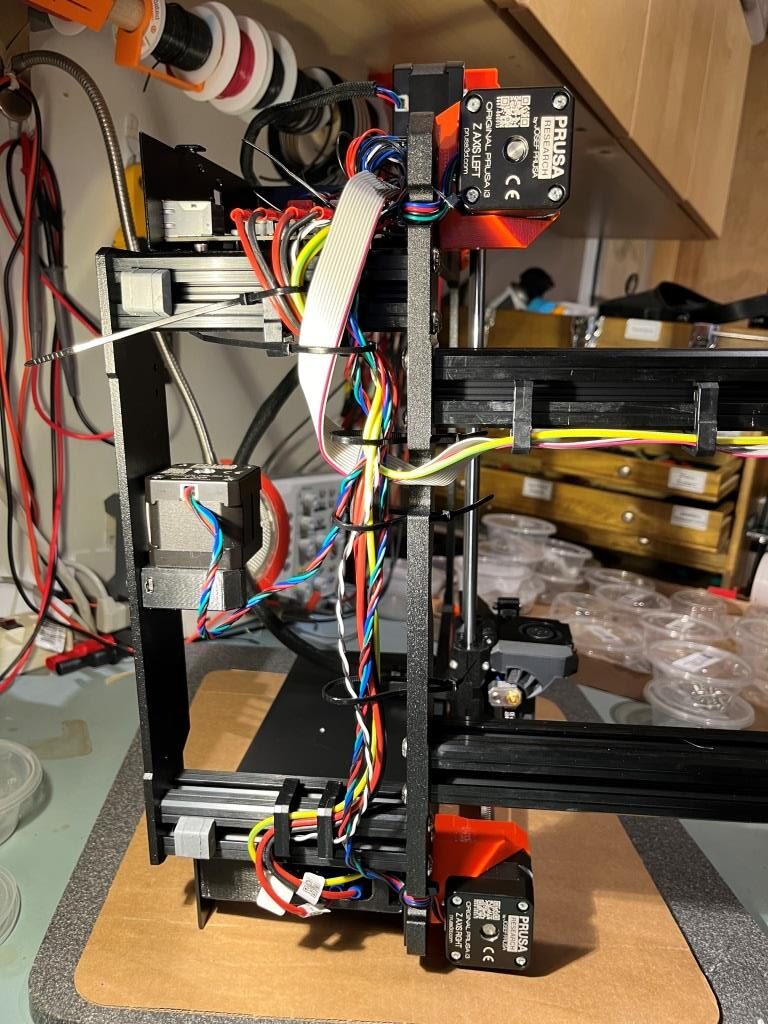
Chapter 7 Y-carriage & Heatbed assembly
Step 23 Inserting smooth rods into Y-carriage
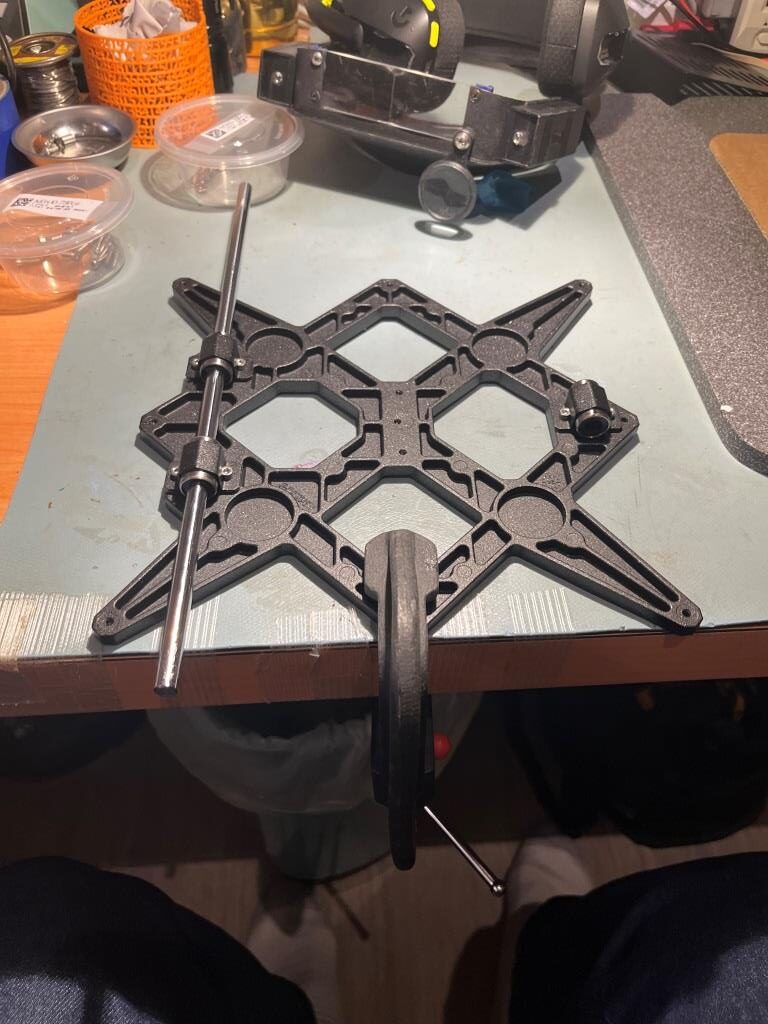
The part of this step where the builder tightens the bearing clips while moving the rods to watch for binding is the familiar ‘I need three hands’ situation. I solved this problem by (lightly, to avoid damage) C-clamping the Y-carriage to my work surface, as shown in the following photo. That way I could slide a bearing rod back and forth with one hand while slowly tightening the screws on the associated bearing clip(s)
Step 26 Installing the Y-carriage
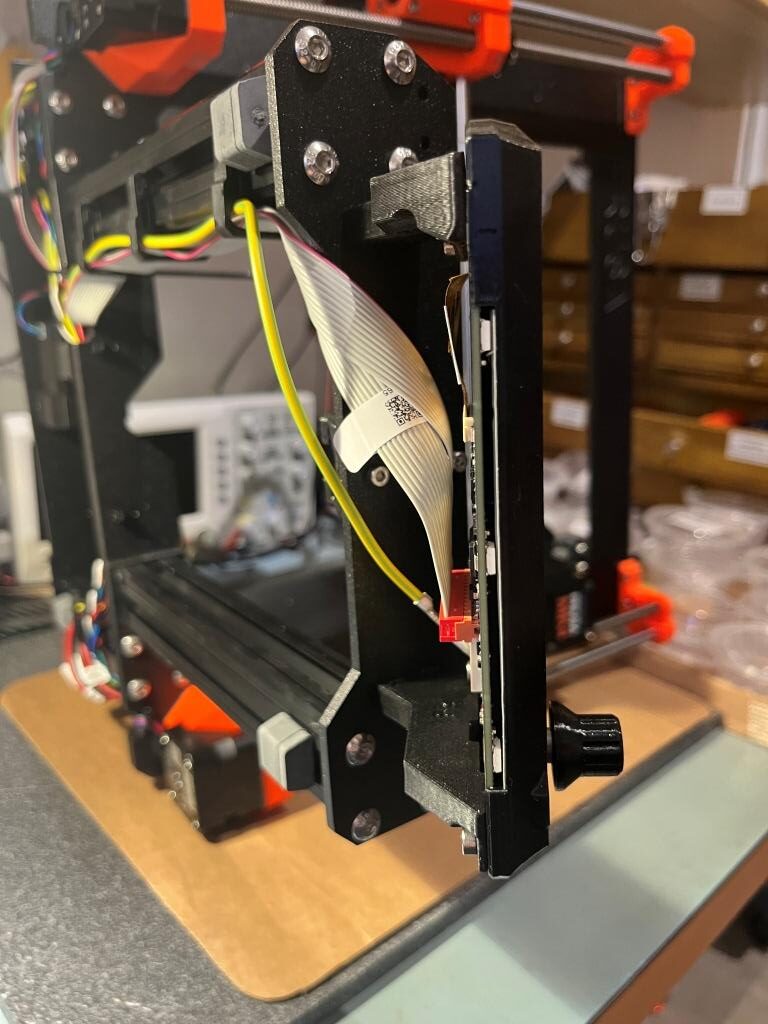
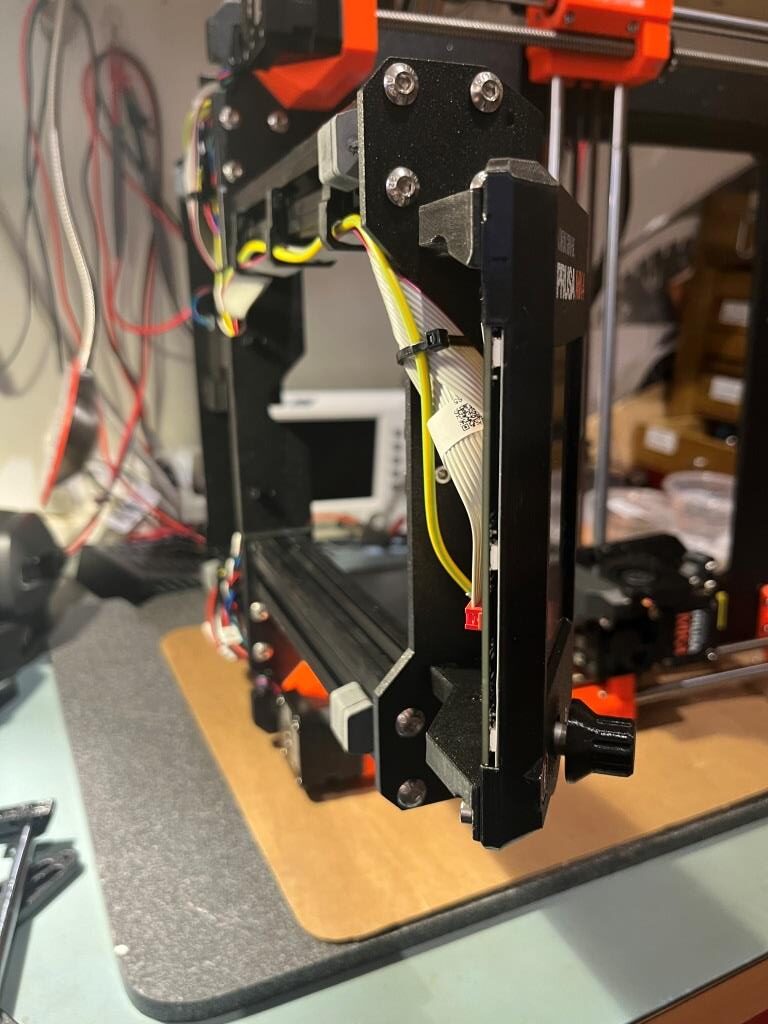
It was at this point in the project that I noticed that the LCD cable and PE wire from the front panel assembly was hanging down to the point where it would probably touch whatever surface the printer was mounted to – not good! So, I used up one of the spare zip ties to pull these two cables up against the bottom of the frame, as shown in the following two pictures.
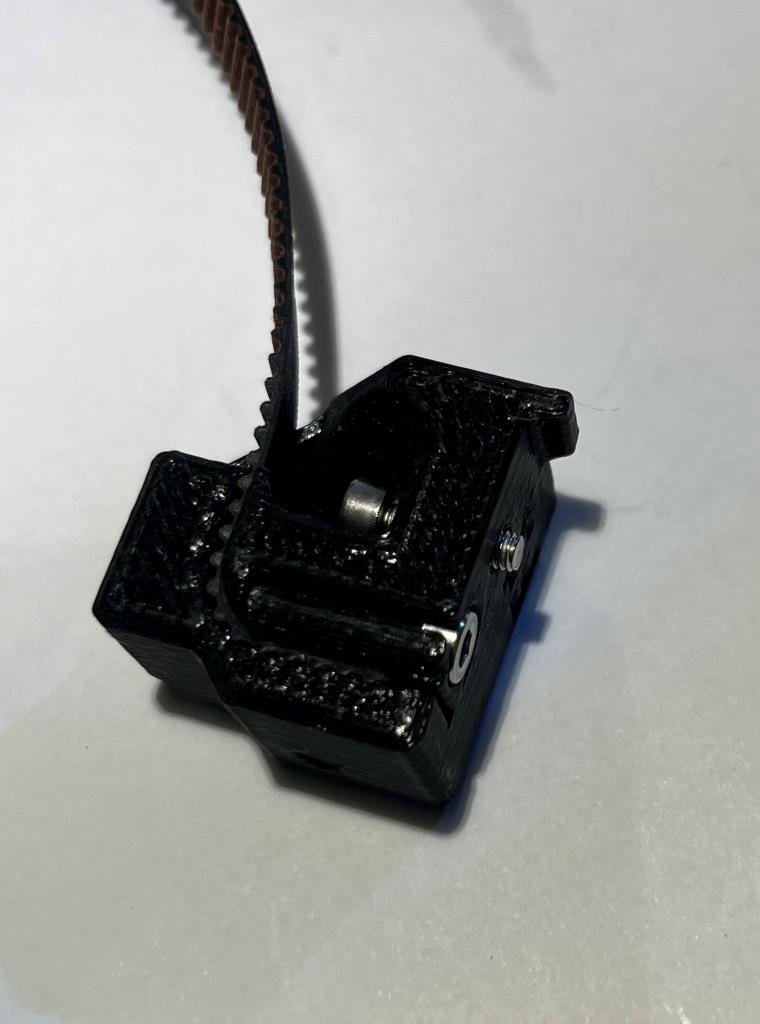
Step 31 Attaching the Y belt holder
This one threw me for a bit, as I didn’t see how the part could possibly fit as described. I went back and forth over the directions and photos several times, and FINALLY figured it out. Because there were many comments about breaking the part by screwing in the belt-end locking screw too far, I only screwed mine in about halfway. Then, when I tried to attach the part to the Y-carriage frame, it wouldn’t go because the screwhead interfered. It wasn’t until I twigged to this picture from the directions:
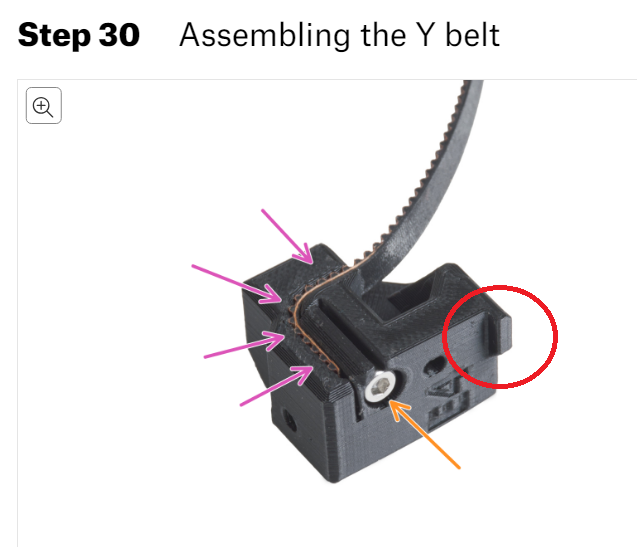
That I noticed that the head of the belt-end capture screw was flush with (or even a little below) the surface of the part – DUH!!
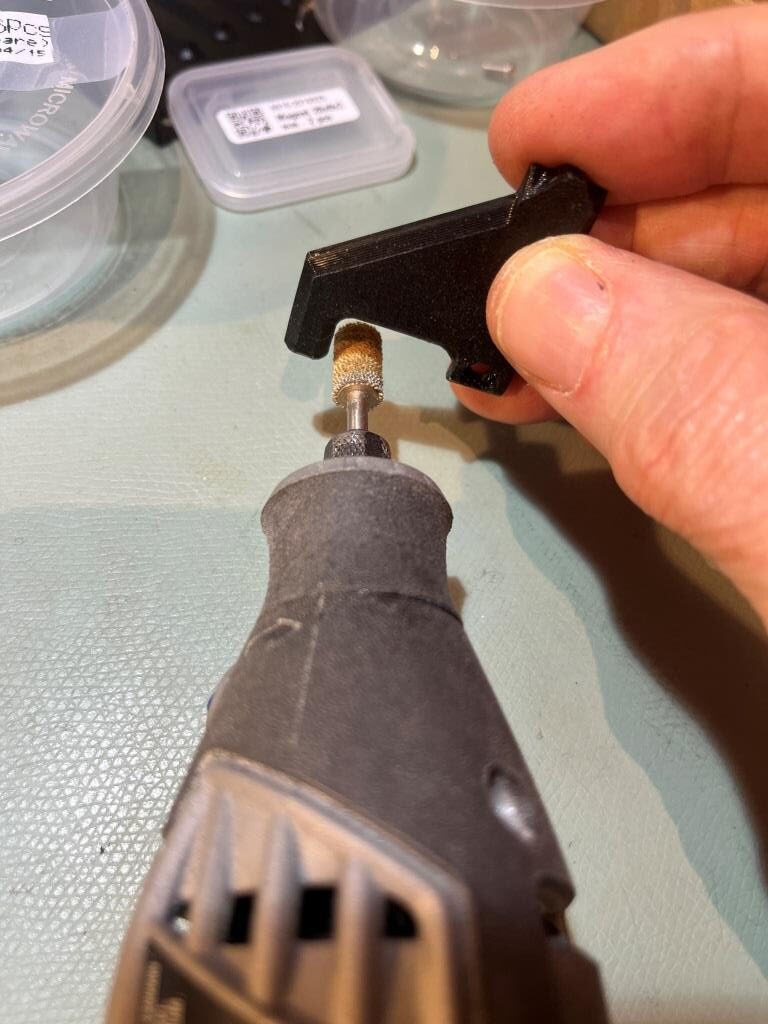
The next ‘trick’ was to figure out how to actually mount the part to the Y-carriage frame. As it turns out, the little lip circled in red above fits over the left (toward the back of the printer) edge of the center plate of the Y-carriage. If that lip is snug against the side of the center plate, then the mounting screw will be lined up with the threaded hole in the plate. So, the part should be set up as shown below before attempting to mount the part to the plate:
24 June 2024 Update: Final Thoughts
I finished the printer last night, but had other activities this morning, so I didn’t get a chance to actually try it out until this evening.
Following the ‘Preflight’ instructions, I was able to connect the Mk4 to my PC via the ‘PrusaLink’ wireless link, and transfer a print file from the PC to the printer; this worked seamlessly, and quickly (although it was a fairly small model) too! I was also able to use the Prusa slicer configuration wizard to add the Mk4 printer to my available printer configurations – also nice.
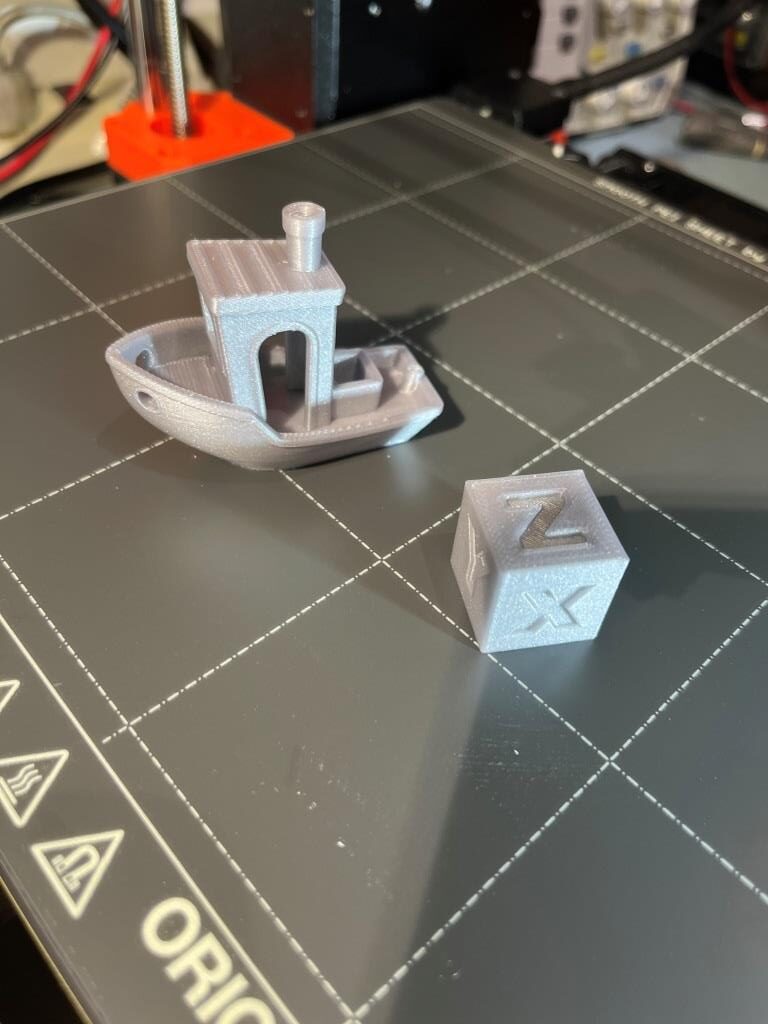
I printed a 20cm Cal cube which came out wonderfully, and then I tried my (or at least my printer’s) hand at the Benchy model that came on the Prusa USB card. Here’s a photo of them both together on the Mk4 print plate, and also a time-lapse video of the Benchy being printed
I purchased a Mk3 kit in early 2019 and enjoyed (mostly) building and using it. Over the years I upgraded it to the ‘S+’ model with a 0.6mm extruder. It has been a very reliable over the years, and even when it got into trouble (like with the dreaded blob-of-death) I had no problem tearing it down and putting it back together again. Now that I have my Mk4 running, I look forward to even better performance and reliability, and I’m sure I will be able to find a good home for My Mk3S+
30 June 2024 Update:
It’s been a week since I got my Mk4 assembled, and I have to say it has been a joy to use – even more so than my trusty Mk3S+. I’d like to emphasize that after finishing the last step of the assembly guide, eating all remaining Haribos, and installing the orange Nextruder silicone sock, My Mk4 has printed like a dream, with absolutely no adjustment required. I’m a hobbyist/engineer/tinkerer, so I don’t do a whole lot of printing, but to me that makes it more important – not less – that prints don’t require a lot of setup time. Here’s my current ‘menagerie’ after one week.
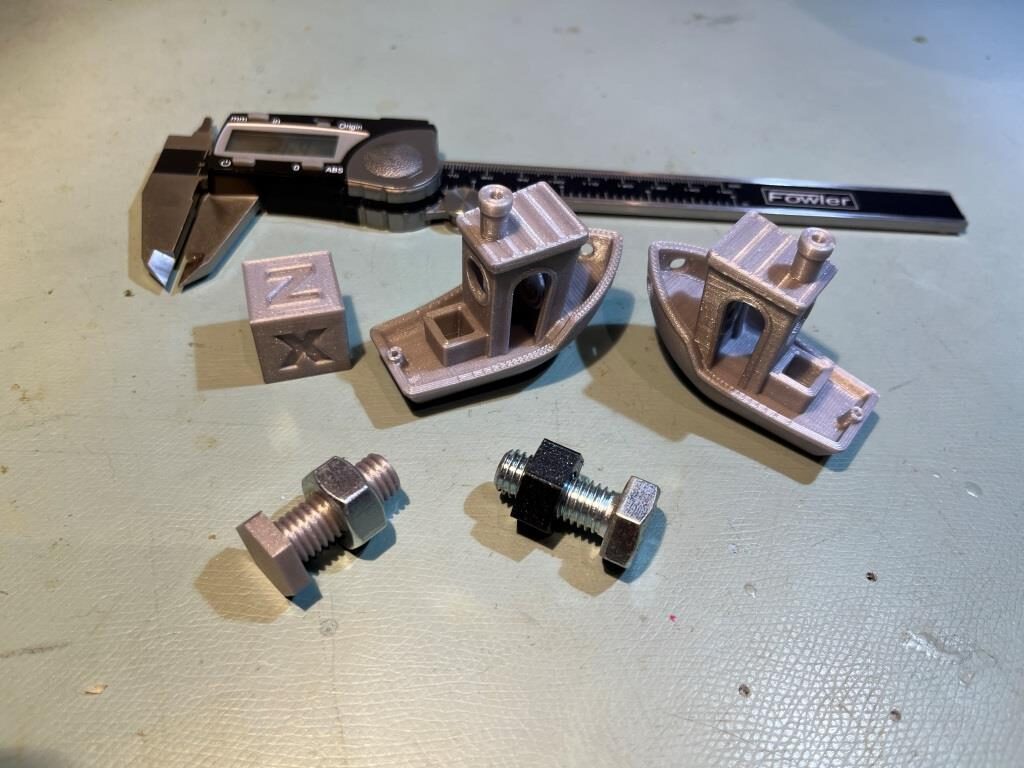
In particular, I’d like to call attention to the 10mm bolt and nut pictured above, along with a real 10mm bolt and nut. The real nut is on the printed bolt, and the printed nut is on the real bolt. The printed bolt and nut were both printed using the stock Mk4 ‘0.15mm SPEED’ configuration for PLA and were designed in ‘OnShape’ using the OnShape ‘ThreadCutter’ extension. If you haven’t used OnShape, I suggest you give it a try.
Stay tuned,
Frank