Yearly Archives: 2022

FlashForge Creator PRO 2 IDEX Filament/Color Designator Project

Posted 29 July 2022

I’ve had my Flashforge Creator PRO 2 IDEX 3D printer for a while now, and ever since Jaco Theron and I got the Prusa Slicer Configuration for this printer working, I have been enjoying trouble-free (as much as any 3D printer is ‘trouble-free’) dual-color printing.

However, there are some ‘gotchas’ that can make using this printer annoying.

  • The way that the FFCP2 filament spools are arranged on the back of the printer means that the filament from the left spool feeds the right extruder, and vice versa, which leads to confusion about which filament feeds what extruder
  • The printer configuration in the slicer refers to the left extruder as ‘Extruder 2, the left extruder temperature as ‘T1’, the right extruder as ‘Extruder 1, the right extruder temperature as ‘T0’, so I’m never sure which physical extruder I’m dealing with when setting up for a print.
  • The filament spools are located at the rear of the printer, so it’s impossible to tell what filament type is loaded without physically rotating the whole printer, removing the spool from the holder, and looking at the label. And, since my short-term memory is about equal to that of a amoeba, I wind up doing this multiple times.

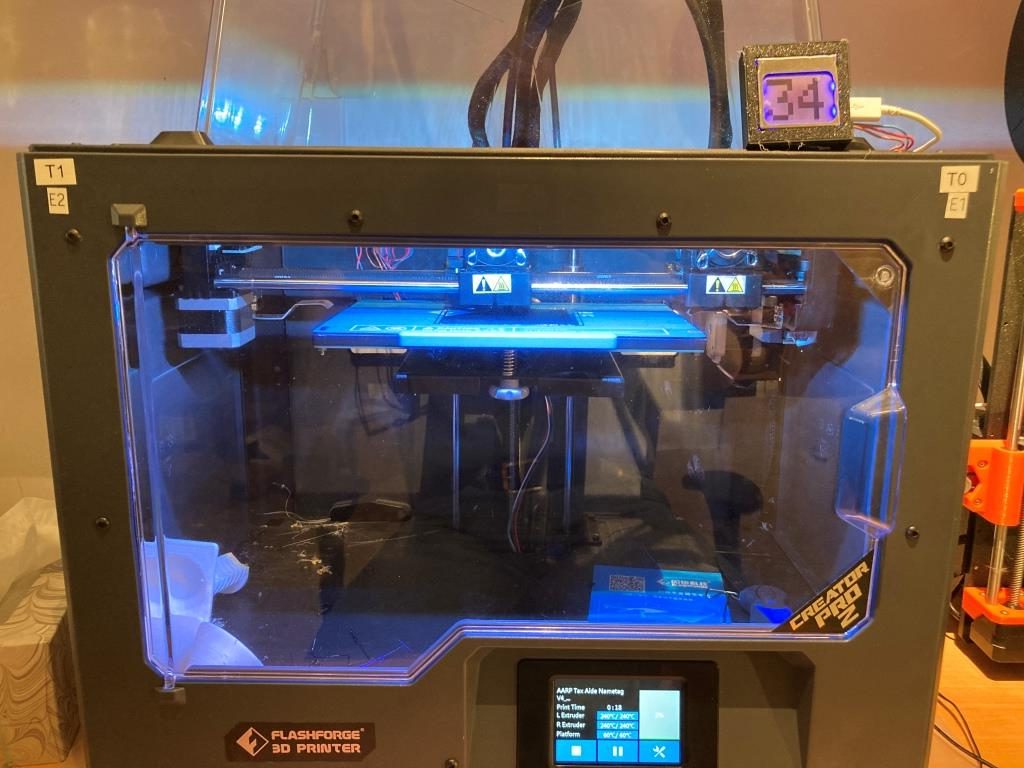
So, I decided to see what I could do to ameliorate this issue. The first thing I did was to use my handy-dandy Brother label maker to label the left and right extruders with their respective designations in the software, as shown in the photo below.

The next thing was to use my newly-acquired Blender super-powers to create and install removable filament color/type tags to both sides so I would no longer have to rely on my crappy memory to know what filament type and color was loaded on each side, as shown in the following photo.

Filament type and color tags for each extruder

The type/color tags slide into slots in the plate holders, and the plate holders are mounted using the FFCP2′ 4mm hex-head front plate mounting screws. I printed up tags for all my normal colors and filament types and store them inside the printer (the red box seen inside the printer on the left-hand side). Then, when I change a spool, I change the tags to match the new filament type & color.

Additional Work on Wall Tracking Algorithm

Posted 15 July 2022,
After getting everything working (or so I thought) in my sandbox, I started running into problems again with wall tracking. It just wasn’t very smooth at all. So, I decided to create a part-task version of my Wall-E3 code (WallE3_WallTrackTuning.ino) to just tackle PID tuning for left/right wall tracking. this version allows PID and offset values to be entered interactively to facilitate faster tuning. After a number of runs, I wound up with a PID set of (200,20,0). This produce a very nice, smooth tracking behavior.

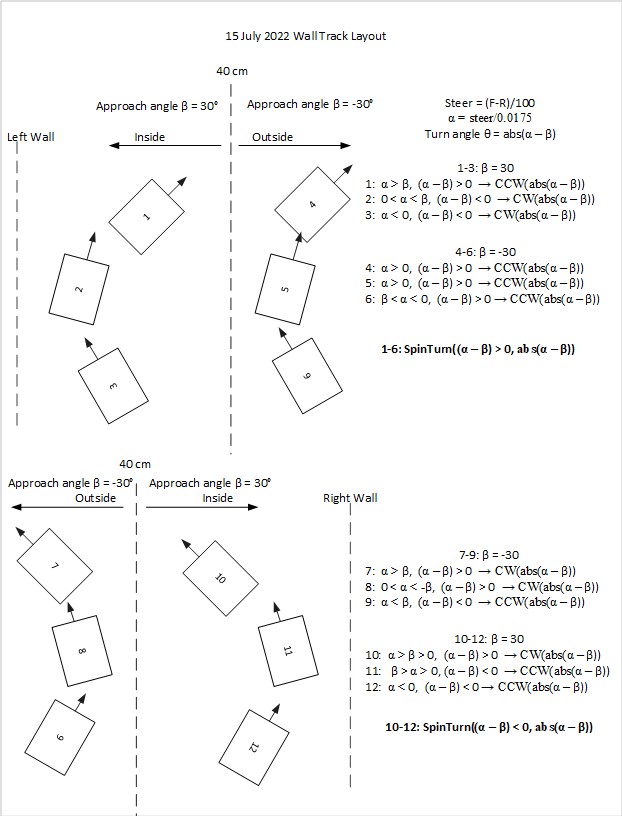
In addition, I went back through all my code and re-educated myself on exactly how my current wall offset capture algorithm developed and whether or not it was, in fact, what I wanted. I started by diagramming all (I hope) relevant initial orientation and offset cases, as shown in the following Visio chart.

Wall Capture Algorithm Recap

In the above figure, four basic configurations are diagrammed; The first two are for left-side tracking with the robot starting in three different configurations inside the desired 40cm tracking offset, and three more outside the tracking offset. The second two are the same as the first, but for right-side tracking.

The algorithm is based on knowing the robot’s orientation w/r/t the local wall, which is determined by the expression ‘Steer = (Front – Rear)/100’, implemented in the Teensy 3.5 MCU that manages the VL53L0X lidar array. This result is available to the main program as ‘glLeftSteeringVal’ and ‘glRightSteeringVal’. The steering values are proportional to the orientation angle in degrees, calculated as OrientDeg = steerval/0.0175.

Expressions for which way and how much to turn to achieve the desired capture approach angle of +/- 30 degrees were determined for each of the 12 starting configurations shown (numbered 1-12 in the above figure). An examination of the resulting expressions showed that they could be collapsed down into just two different calls to the ‘SpinTurn(isCCW, numdeg)’ subroutine – one for left-side tracking, and one for right-side tracking, as shown by the bold-face expressions above.

Project to Create 3D Clay Cubes

Posted 26 June 2022,

Got an interesting request from a fellow Duplicate Bridge player the other day. I was asked if I could somehow create a way to produce precise cubes of modeling clay. Of course, since I am the proud owner of not just one, but two 3D printers (a FlashForge Creator Pro II IDEX and a Prusa MK3S), I said “sure, no sweat! How many would you like?”

As usual, once I got home and started playing around with the project, I realized that I had, once again, jumped into the pool without first checking to see if there was any water. Turns out that the garden variety modeling clay is pretty gooey stuff, and sticks to EVERYTHING, including 3D printed PLA/PETG forms. But hey – a project that just falls together without any drama isn’t much of a project, is it?

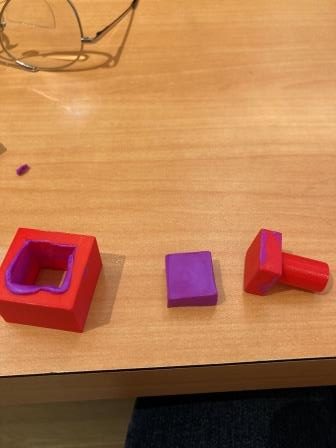
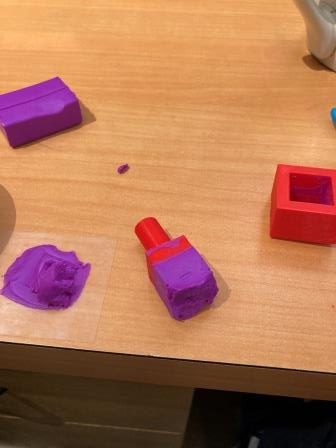
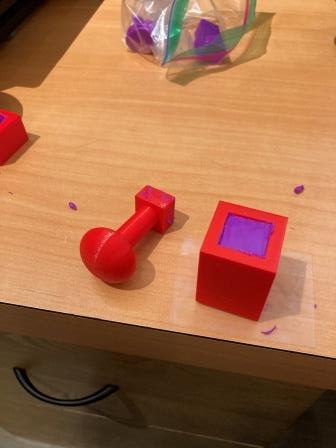
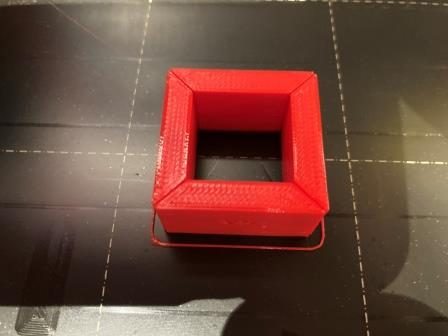
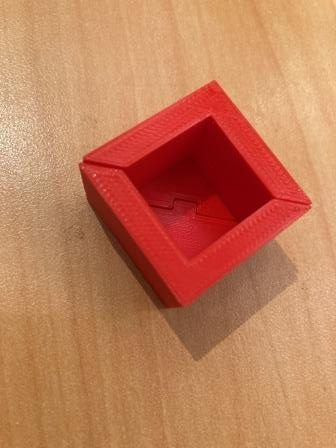
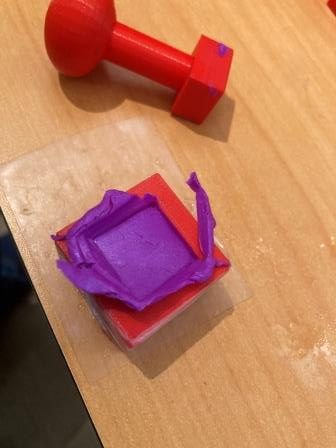
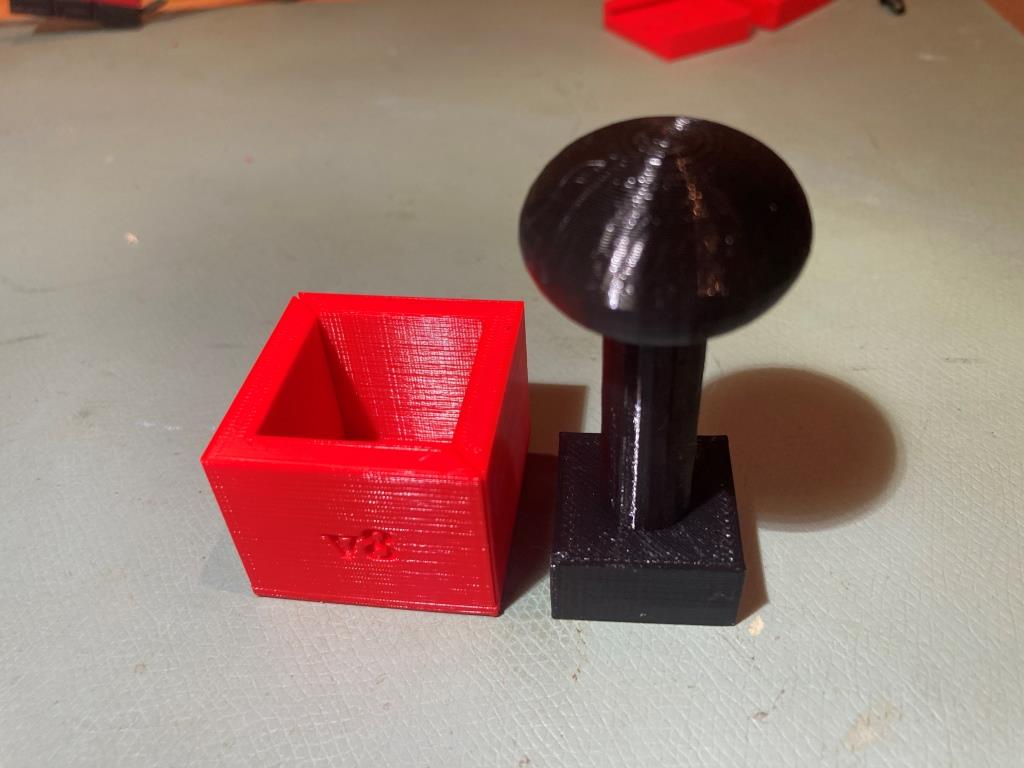
Anyway, I adopted my usual tactic of “fail quickly, fail often” (Space X has nothing on me!) to home in on something that might produce what I was after. My first thought was a simple rectangular cylinder with inner dimensions matching the desired clay cube dimensions, combined with a press that just barely slides into the cylinder, as shown below:

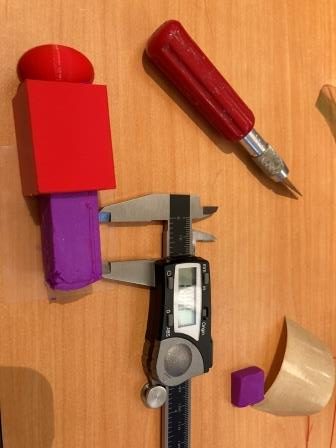
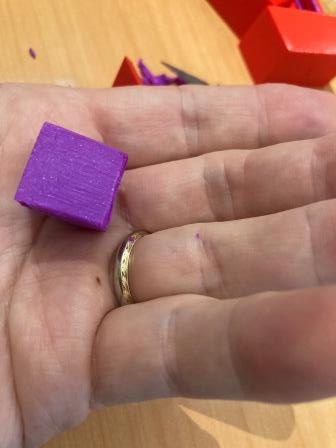
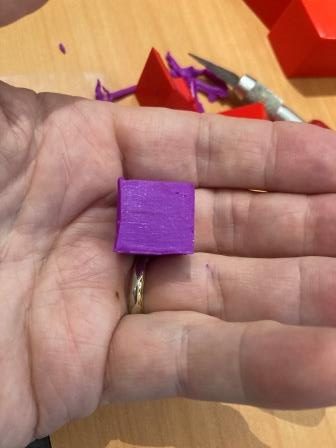
This worked OK, but had some drawbacks. The original press with just a simple cylindrical handle really didn’t allow for much pressure without hurting my hand, so I added a ‘squashed ball’ top to make that easier, and added some length to the extrusion die to produce a longer extruded clay blank, which I intended to cut to length with an Exacto knife. Again, this worked OK, but not spectacularly; as can be seen in the last of the above photos, the extruded blank exhibited some grooves created by some errant pieces of filament.

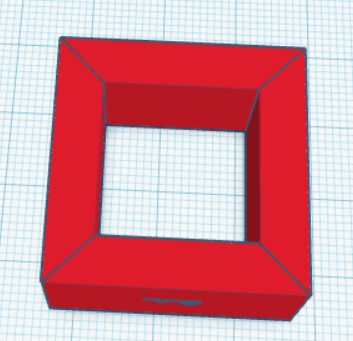
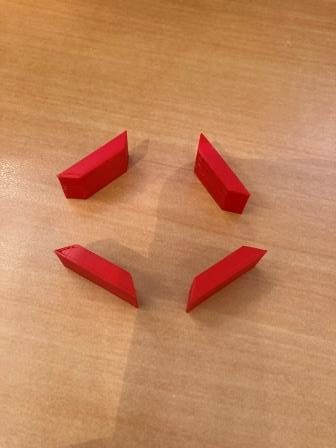
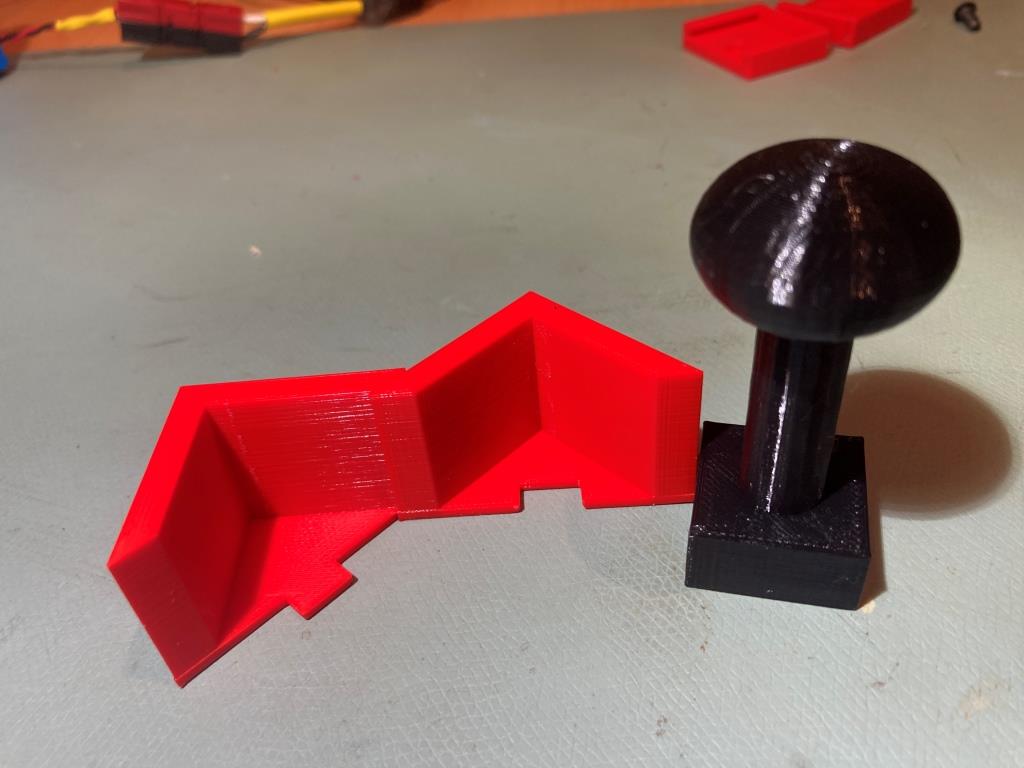
My next thought was to use a long rectangular cylinder not as an extrusion die, but just as a removable form; after pressing clay into the form with the press, the form would be cut away to access the clay blank, which would then be cut to length as before. However, this would require a new form for every blank, so that wasn’t great. Then I hit upon the idea of making the form out of nested pieces, as shown below:

Idea for nested pieces to create a removable form

While the print turned out very well, the result of having four removable sides was kind of a mess – very difficult to get together (and then somehow bind/tape the thing together)

Next I tried a similar ‘removable form’ idea, but with just two removable pieces rather than four, and an end-piece as well.

Two-piece form with end cap

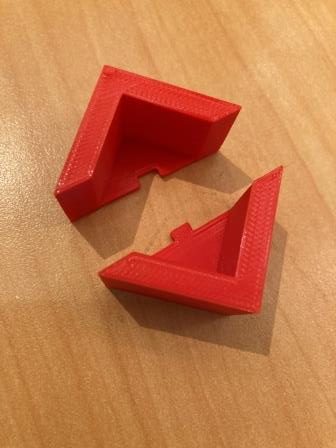
This didn’t work very well either, because the two pieces could easily slide against each other, making it impossible to keep the desired shape. So, I tried again but used a notch and cutout feature to keep the pieces aligned, as shown below

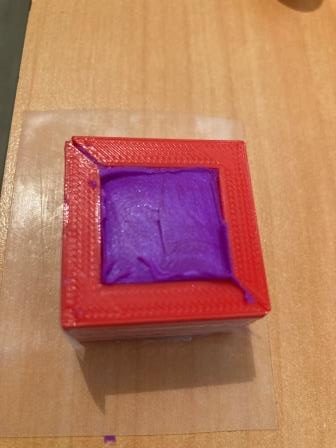
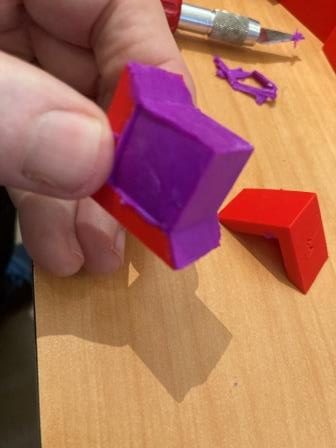
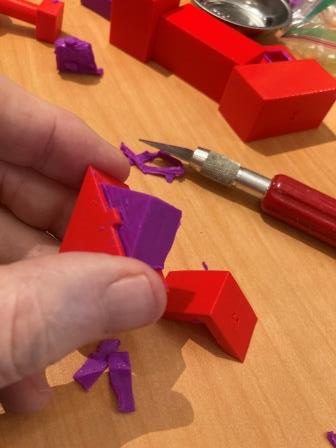
This worked well enough that I decided to try forming a cube with my Sculpey clay and my press. To start, I wrapped the form with nylon filament strapping tape to withstand the press pressure, and started loading clay balls into the form. This actually worked fairly well, but when I pulled the form apart, the clay stuck to the walls and deformed badly.

Back to the web to research release agents for modeling clay, and found this site that specifically recommended water as a release agent for Sculpey clay – yay!

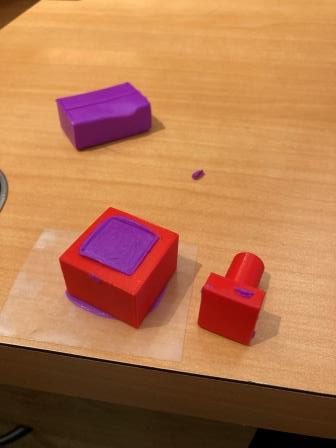
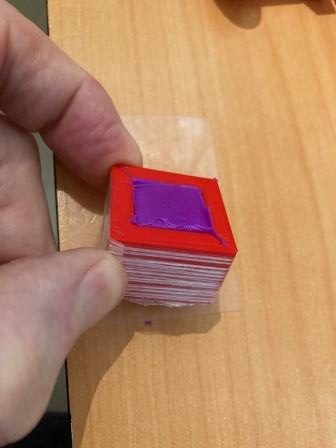
So, I tried again to form a cube, as shown below:

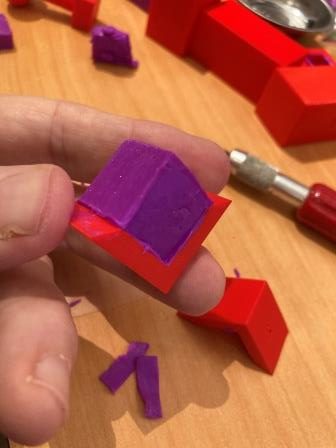
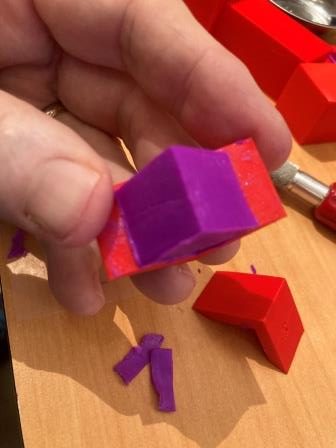
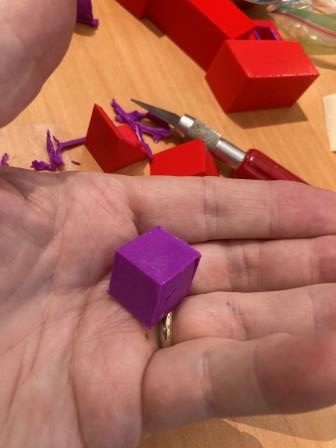
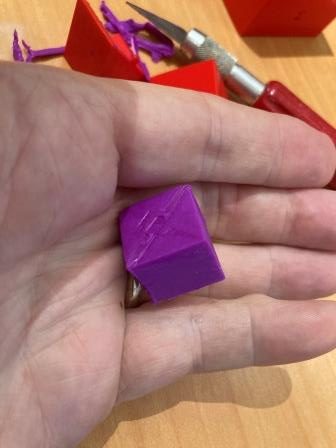
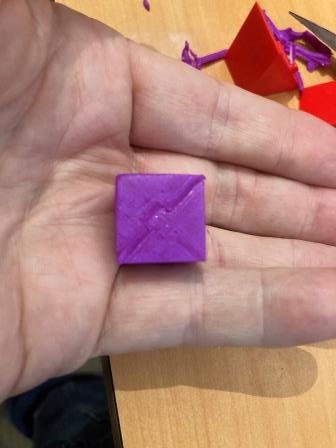
This time I got a pretty nice cube, with each side almost exactly 19mm or 3/4″ – yay!

So at this point it’s time to consult with my bridge club friend and find out if this really what they want. Stay tuned!

29 July 2022 Update:

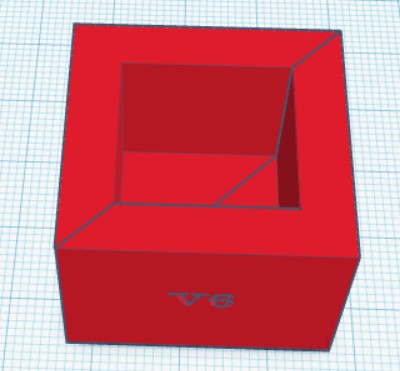
Got some feedback from my ‘customer’ today. She liked the split-form implementation, but would like to try a 1x1x1 inch cube instead of the 3/4×3/4×3/4 we started with. So, I went back to TCad and ‘whipped up’ (well, for me, ‘whipping up takes a while…) the new version shown below:

1x1x1″ Clay Cube Press
Cube press showing split halves with registration notch

Frank

Wall-E3 Charging Station Integration, Part II

Posted 28 May 2022

After getting the IR homing capability working with Wall-E3, I started working on the ability to recognize the charging beacon during normal wall-following operations, and then transitioning (or not, depending on battery level) to the charge station docking procedure.

The ‘transition-to-charge’ feature assumes that the robot is tracking the right-hand wall within a few meters of the charging station, and detects the beacon. To connect to the charger, the robot must first navigate away from the wall to a point on the IR beacon centerline, turn to line up with the beam, and then follow it to the charger.

As I was testing this feature, I noticed at one point the robot detected the IR beacon while tracking the wall opposite the charger, not the wall where the charger was installed. This is a real problem, because my current ‘transition-to-charger’ algorithm assumes the geometry associated with the common wall case. In the common wall case, the robot makes a 90 deg turn away from the wall and moves to a spot calculated to put it on the beam centerline, but this won’t work at all if the robot is starting from a point on the opposite wall. In that case, the robot needs to travel forward or backward parallel to the opposite wall by a distance calculated to put it on centerline. So, the first thing the robot needs to be able to do is to detect which case (common wall or opposite wall) it is dealing with.

The primary difference between the two cases is how much the robot has to turn away/toward the wall it is currently tracking in order to point directly at the beacon generator; if it is on the common wall, then it may not need to turn at all, or may even have to turn a bit toward the wall to point directly at the generator. If it is currently tracking the opposite wall however, it will have to turn 30-60 deg away from the wall. So, the determination as to which case is in play, the robot needs to measure the number of degrees of heading change required to face the charger; if the heading change is 30-60 degrees, then it is the opposite wall case. If it is just a few degrees, then it is the common wall case.

The following short video shows the two cases and the heading change required to point to the charger in each case.

Turn to beacon performance, for opposite and common wall cases

21 June 2022 Update:

Progress has been a bit slow over the last month, as I’ve been doing other things, including recovering from an eye/scalp injury sustained at the Senior Games in Florida (those old guys can still pack a wallop!). However, I now think I have the charging station homing operation working, at least for the right-wall-tracking (the most common and probably only) case.

As it turns out, I didn’t really need to worry about the problem of the robot picking up the IR homing beacon while tracking the far wall (i.e. the wall perpendicular to the one associated with the charging station). As I noted above, the robot can sometimes ‘see’ a beacon signal above the threshold, but when it does, the steering signal (goes from -1 to +1) is always off scale on one side or another. So, by adding the requirement that the steering signal be within the range of -0.8 to +0.8, this case is entirely eliminated, leaving only the ‘same-wall’ homing case – yay!

I made a number of improvements to the IR homing code, in particular the ‘initial approach’ code that places the robot optimally with respect to the IR beacon beam, so that the subsequent ‘home-to-charging-station’ procedure is almost always successful.

In the following short video, the robot tracks the opposite wall, makes the turn to track the adjacent wall, and then detects the IR homing beacon at the conclusion of the offset capture phase for the adjacent wall. Then the robot transitions to ‘I’m hungry – feed me’ mode.

In ‘feed me’ mode, the robot first aligns itself with the beacon in a two-stage (coarse and fine) procedure. Once this is accomplished, the robot determines its distance from the beacon, and then uses this information to determine how far off the adjacent wall it should be to perfectly line up with the center of the IR beam, makes a turn to be perpendicular to the adjacent wall, and then moves forward or backward to achieve the desired offset measurement. Once this is accomplished the robot re-aligns itself with the beacon again, using the same two-stage procedure. Once all this is done, the robot then homes on the beacon to connect to the charger.

The above algorithm is shown in action in the following short video. When viewing the video, keep the following in mind:

  • The homing beacon is only recognized at the conclusion of the wall offset capture maneuver for the adjacent wall, even though the IR beacon signal is above the threshold as soon as the robot make the turn to the adjacent wall. This is done to place the robot at a known location to start the process.
  • While aligning itself to the beacon, the robot turns ON its red laser pointer to allow us humans to follow the action. Although the ‘red’ laser looks mostly white in the video, it is indeed red.
  • The beacon alignment takes place in two stages – coarse, then fine. This can be see by the speed at which the red laser dot moves back and forth.
  • In this particular video, the robot is already at the proper wall offset, so the ‘move to desired rear distance’ operation is truncated – the robot makes the turn to be perpendicular to the wall, determines it is at the proper offset, and so immediately turns back to align to the beacon signal.
Successful ‘track and then home to charger’ run

Wall-E3 Charging Station Integration

Posted 14 April 2022

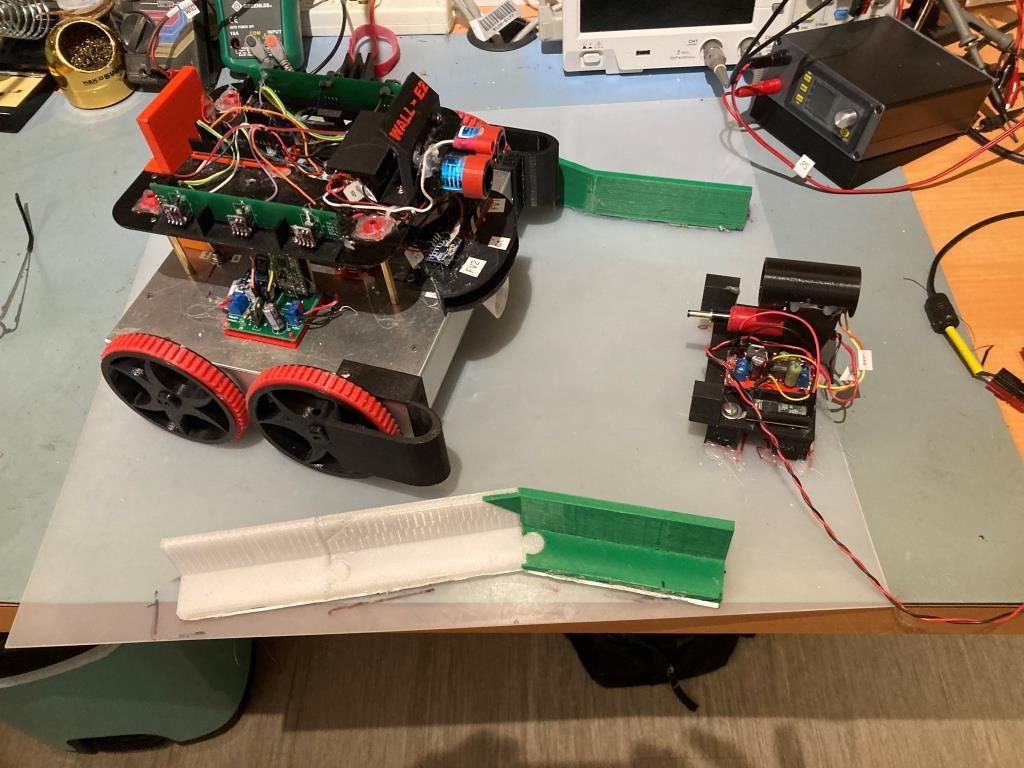
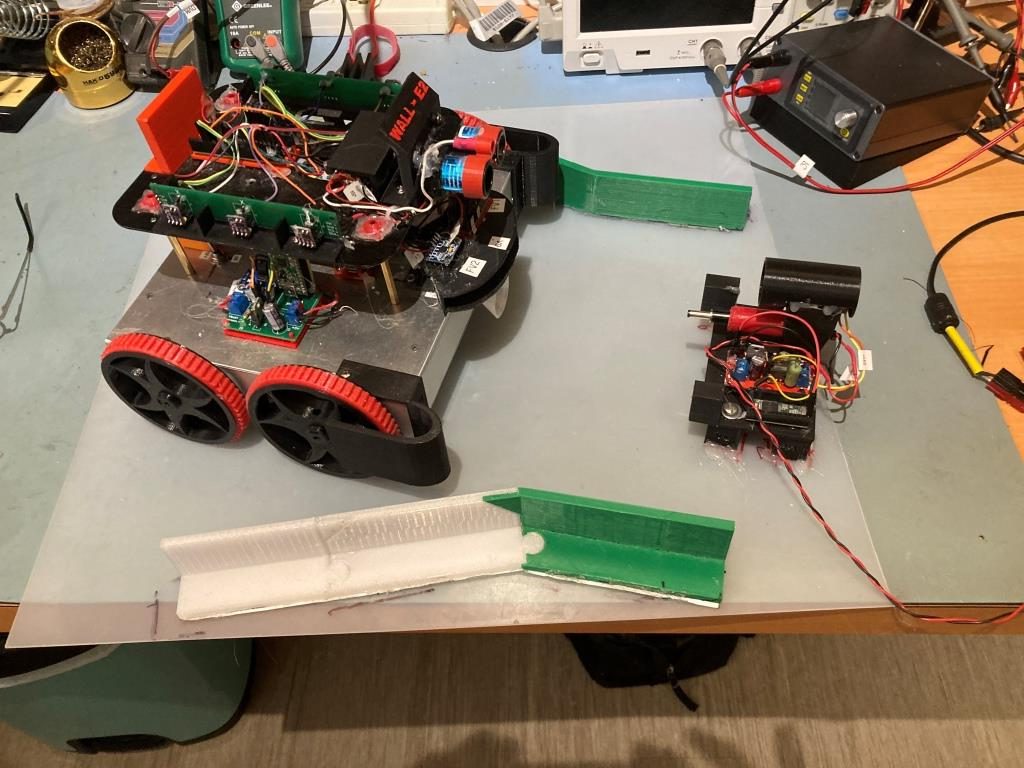
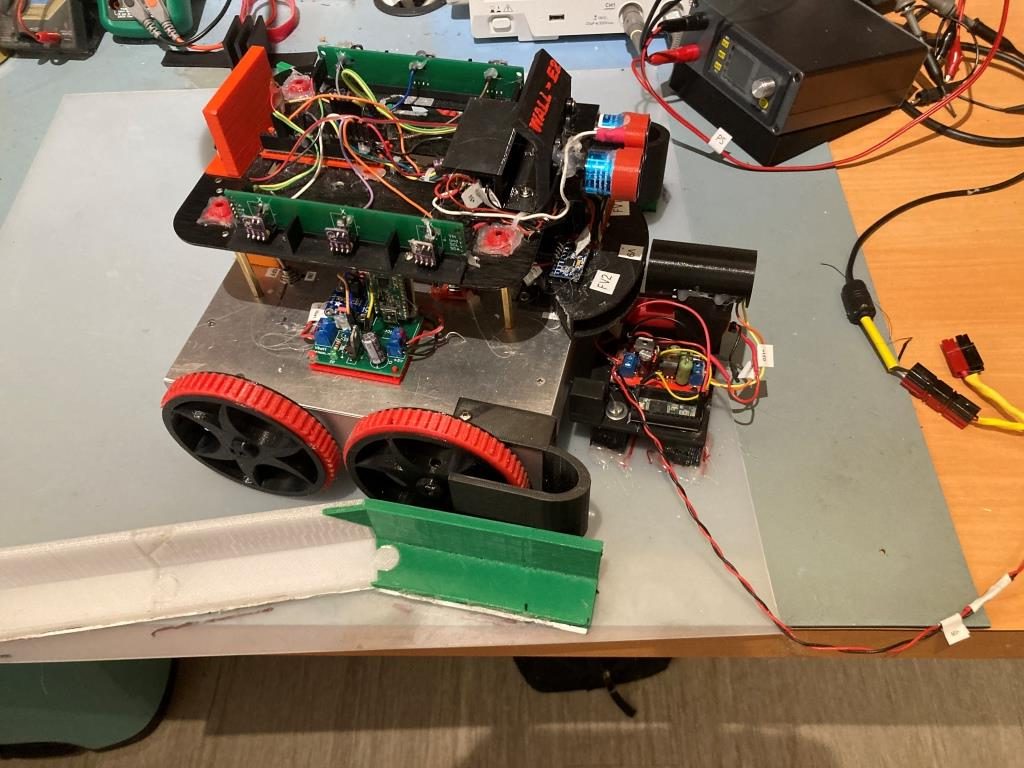
Wall-E3 has a significantly different form-factor than Wall-E2, requiring modification of the lead-in rails on the charging station, as shown below.

Once the required mods were made, I uncommented ‘#define IR_HOMING_ONLY in my code to have Wall-E3 concentrate solely on homing to the charging station, and then worked my way into a set of PID values (100,0,30) that gave reasonable homing performance, as shown in the following short video:

And here’s an Excel plot showing typical homing performance.

24 April 2022 Update:

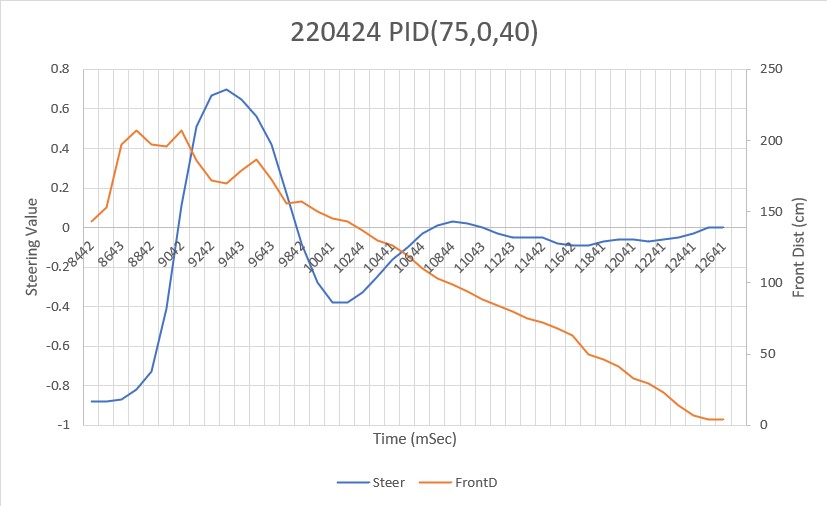
The above data and video was collected using the ‘NoPing’ version of the IR Homing algorithm, so I went back and did this again using the version that monitors the front distance, both for detecting a ‘stuck’ condition and for the ability to navigate around the charging station if a charge isn’t needed. Of course, this didn’t work right away for various reasons, but eventually I got it working and made another test run. Here’s a short slo-mo video, and the accompanying Excel chart showing homing performance.

IR Homing run in slo-mo with tracking status shown on rear panel LEDs
Steering value and front distance vs time

01 May 2022 Update:

Wall-E3 has made some significant progress in the last week, and is now capable of switching from right-wall tracking to IR Homing to the charging station, as shown in the following short video and telemetry output:

automatic switching from right-wall tracking to charging station homing

Stay tuned,

Frank

New Wall-Following Capability For Wall-E3

Posted 28 March, 2022

I’ve been working with Wall-E3, my new Teensy 3.5-powered autonomous wall-following robot. I’ve gotten left-wall and right-wall tracking working pretty well, but the transition from one wall to the next (typically right-angle) wall was pretty awkward. The robot basically ran right up to the next wall, stopped, backed up, and then made a right-angle turn to follow the next wall. So, I am trying to make that transition a bit smoother.

After trying a few different ideas, the one I settled on was to use my current very successful ‘SpinTurn()’ function to do the transition. I modified my ‘CheckForAnomalies()’ function to add a check for forward distance less than twice the desired offset distance. When this distance is detected, the robot stops and then makes a right-angle ‘spin’ turn (one sides wheels go forward, the other sides wheels go backward) in the direction away from the currently tracked wall, and then re-enters ‘Track’ mode causing it to track the next wall normally. Here’s a short video showing the process:

robot tracking left wall, then making a ‘spin’ turn to follow the next wall

Now that I have it working for left-wall tracking, it should be easy to port it to the right-wall tracking condition.

07 April 2022 Update:

Well, as usual, what I thought would be easy has turned out to be anything but. I was able to port the left wall tracking algorithm to the right side, but as I was testing the result, I noticed that Wall-E3 doesn’t really track the right (or left, for that matter) wall. After it ‘captures’ the desired wall offset and turns back to the parallel orientation, it basically goes straight ahead (same speed applied to both side’s motors). If the initial orientation is close to parallel, it looks like it is tracking, but it isn’t.

So, I tried a number of ideas to actually get it to track the desired offset, but they all resulted in poor-to-catastrophic tracking. After working the problem, I began to see that, as always, the issue is the errors associated with the VL53L0X sensor distance measurements. There are two distinct types of errors – an initial ‘calibration’ error associated with sensor-to-sensor variation, and the measurement error that occurs when the robot isn’t oriented parallel to the measured surface.

Calibration Errors:

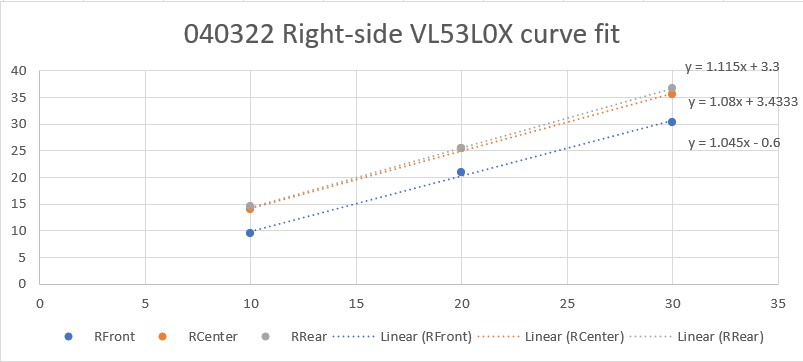
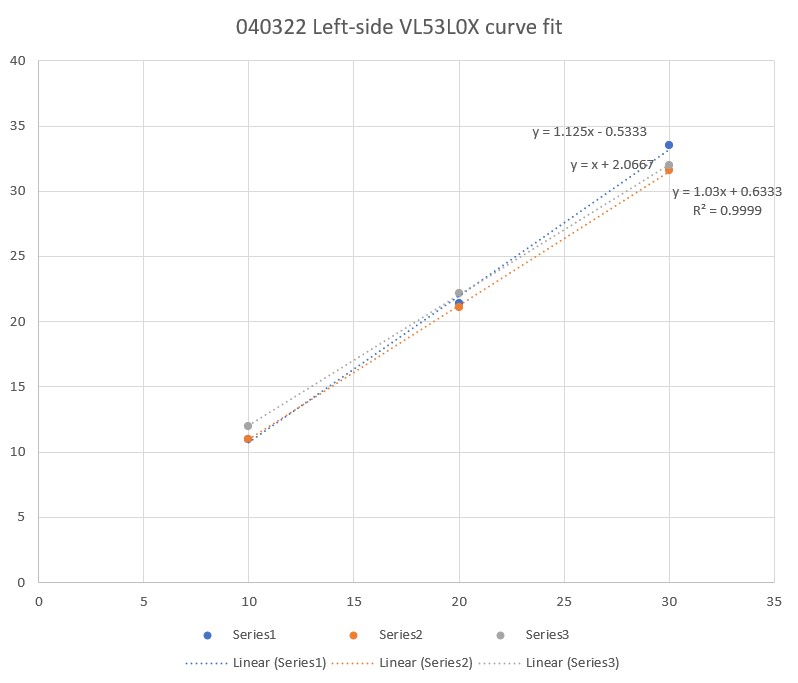
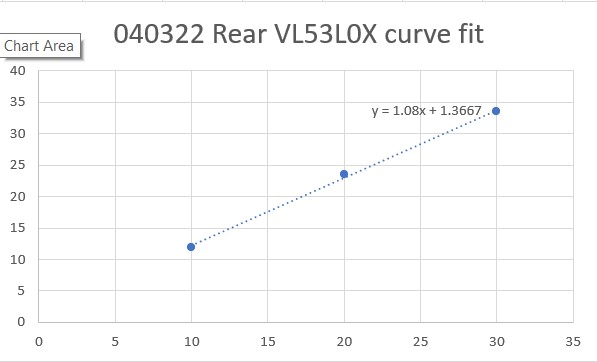
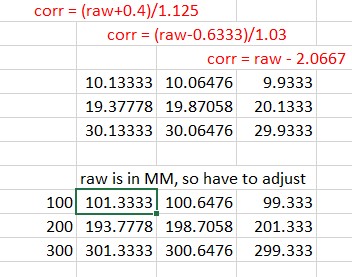
Each individual VL53L0X sensor gets a slightly different value for the distance to the target, and sometimes ‘slightly’ can be pretty big – 2-3cm at 20cm, for instance. Up until now I had been ignoring these errors, but the time had come to do something about. So, as I always do when troubleshooting an issue, I started taking data. I ran a bunch of trials for all seven VL53L0X sensors at various distances. After gathering the data, I used Excel’s curve-fitting capability to fit a linear equation to the points, as shown below:

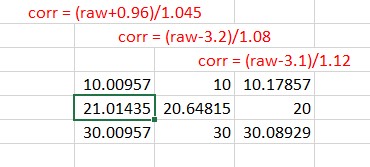
The linear-fit equations gave me a starting point, but they still had to be tweaked a bit to provide the best possible match between what the VL53L0X sensor reported and the actual measurement. Again I used Excel to tweak the equations to give the best match as shown below:

Left-side ‘tweaked’ correction expression
Right-side ‘tweaked’ correction expression
Rear ‘tweaked’ correction expression

The expressions shown in red are the ones used to correct the VL53L0X-measured distances to be as close as possible to the actual distances (10cm, 20cm, 30cm).

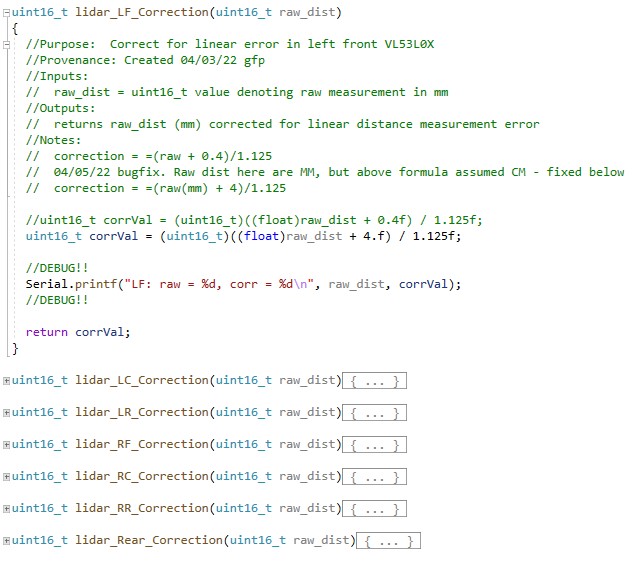
The above corrections were coded into a set of seven ‘correction’ functions for the Teensy 3.5 program that manages the two VL53L0X arrays and the single VL53L0X rear distance sensor.

Correction functions in Teensy_7VL53L0X_I2C_Slave_V4.ino

While this did, indeed, solve a lot of problems – especially with the calculations for wall offset capture initial approach angle, it still didn’t entirely address Wall-E3’s inconsistent offset tracking performance.

Orientation Angle Induced Errors:

Wall-E3 tracks walls by offset by comparing the center VL53L0X measurement to the desired offset, and adjusting the left/right motor speeds to turn the robot in the desired direction. Unfortunately, the turn also throws off the measurements as now the sensors are pointing off-perpendicular, and return a different distance than the actual robot-to-wall perpendicular distance. I tried adjusting the PID controller algorithm to control the robot’s steering angle rather than the offset distance, and then calculating a new steering angle each time – this worked, but not very well.

So, the solution (I think) is to come up with a distance correction factor for off-perpendicular orientations. Going through the trigonometry, I came up with this expression:

corrdist=measdist*cos(steeringAngle) 

I programmed this into the following function:

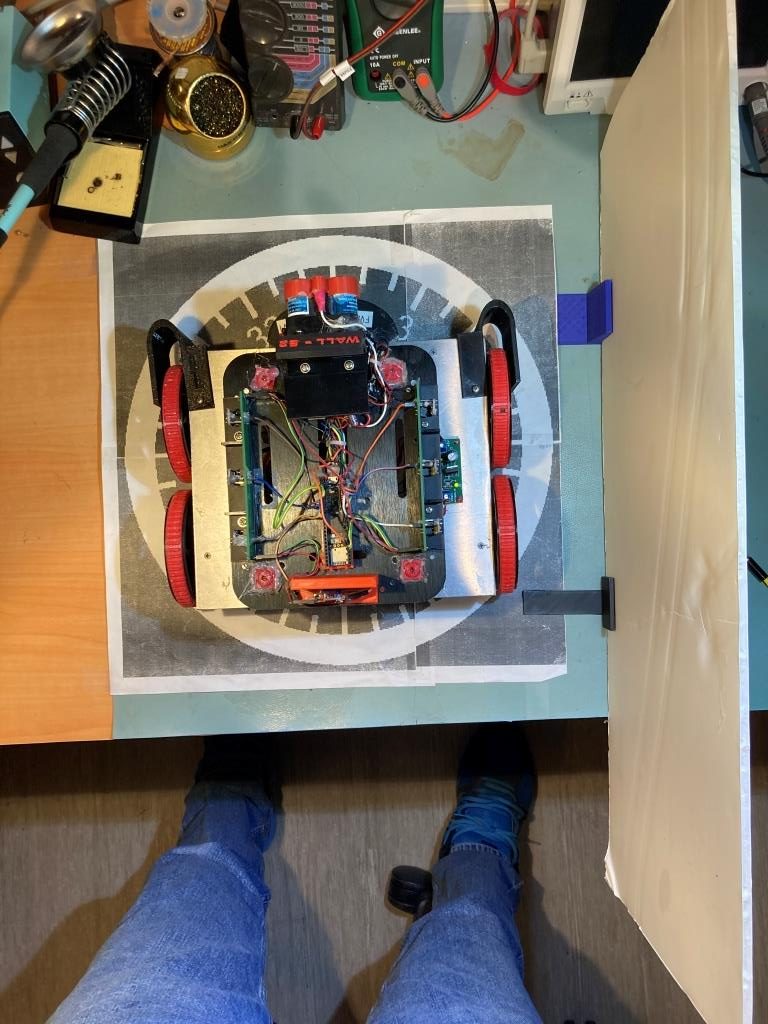
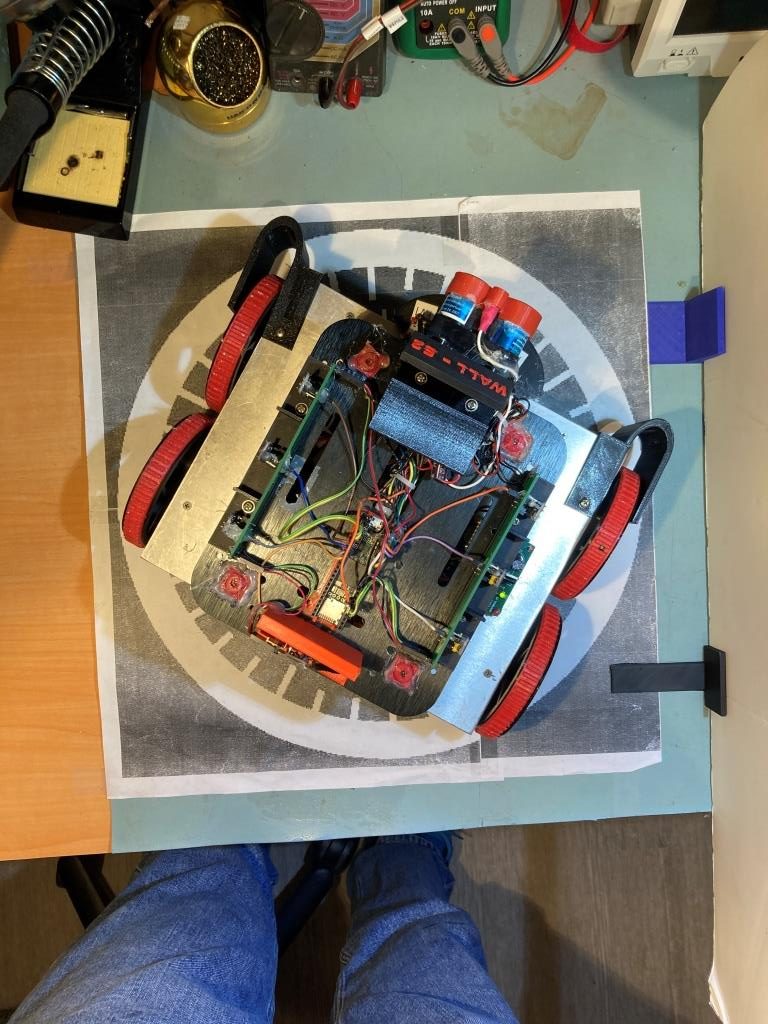
and then ran some tests to verify that the correction algorithm was having the desired effect. Here’s the setup:

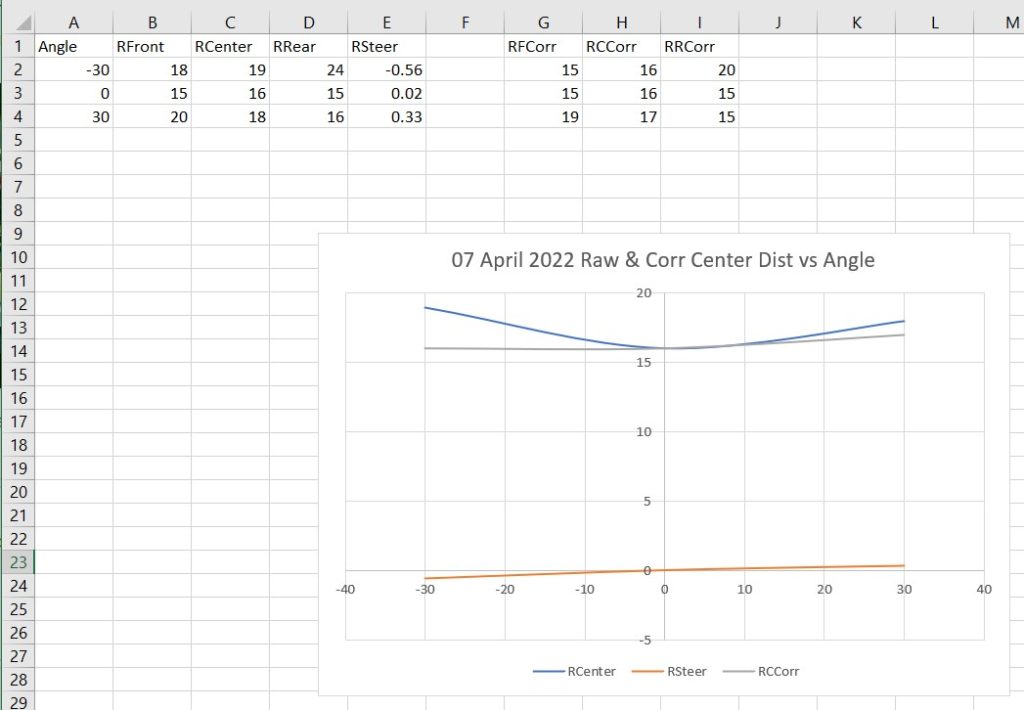
and here are some Excel plots showing the results

Distance correction for off-perpendicular angles

As can be seen from the above plot, the corrected distance (gray curve) is pretty constant for angles of -30, 0 and +30 degrees.

09 April 2022 Update:

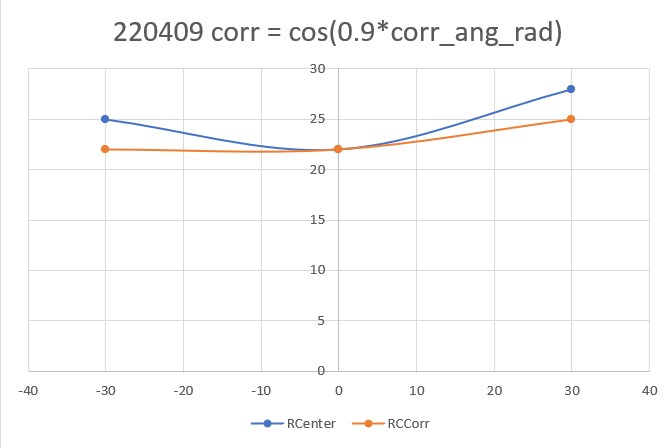
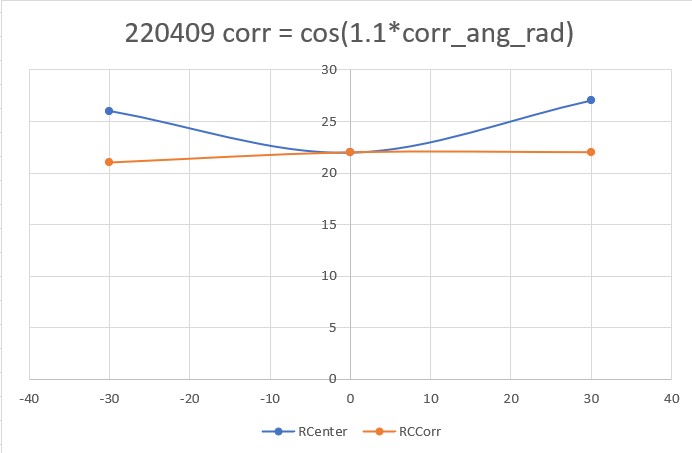
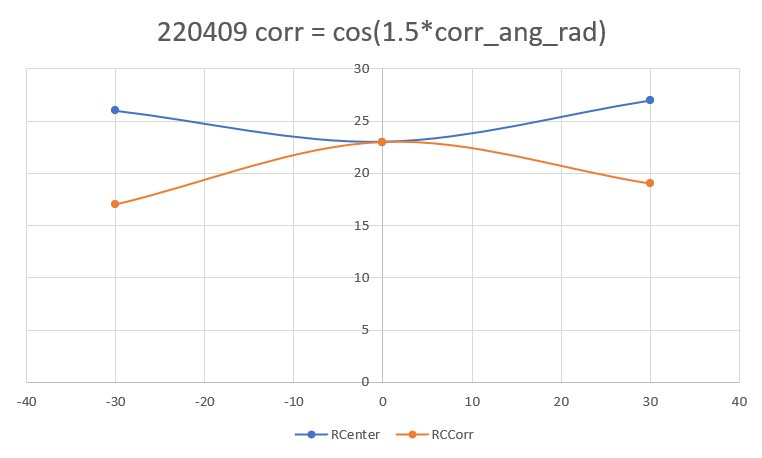
I have been thinking about the above orientation angle induced errors issue for a couple of days. I wasn’t really happy with that correction as shown in the above Excel plot, and it occurred to me that I didn’t really have to strictly abide by the above correction expression derived from the actual geometry. What I really wanted was a correction that would be accurate at low (or zero) offset angles, but would slightly over-correct for orientation angles in the +/- 30 deg range. In this way, when the PID engine adjusts the motor speeds to correct for an offset error, the system doesn’t try to run away. In fact, for a slight overcorrection algorithm, the center distance reported by the robot might actually go down rather than up for off-perpendicular angles. This would tend to make the PID think that it was over-correcting instead of under-correcting as it does with uncorrected distance reporting.

So, I went back to my test setup, and made some more measurements of corrected vs uncorrected center distances for -30, 0, and 30 degree orientations, for varying values of ‘tweak’ values in he correction expression, as shown in the Excel plots below:

Out of the above correction values, I like the “cos(1.1*corr_ang_rad)” configuration the best. The correction doesn’t modify the center distance at all for the parallel case, and produces a very slight over-correction at the +/- 30 degree orientation cases.

I added the ‘1.1*’ correction to the ‘OrientCorr()’ function and performed another right wall tracking test in my office ‘sandbox’ as shown in the short video below:

Right wall tracking with sensor calibration and orientation correction applied

Here is the telemetry output for this run:

Looking at the video and the telemetry, the first leg starts with the normal offset capture maneuver, which ends with the robot about 44cm from the wall. Then it makes a pretty distinct correction toward the wall, overshoots the desired offset, and winds up the leg at about 22cm from the wall.

The second leg again starts with a capture maneuver to about 43cm. Then it stabilizes at about 32cm from the wall – nice.

The third leg maneuvers to about 43cm, and then again stabilizes at about 30cm.

The fourth leg was a bit anomalous, as it appeared to way overcorrect after capturing the desired 40cm offset, but I couldn’t find anything in the telemetry to explain it. It’s a mystery!

It’s clear from the above that I no longer need to correct for orientation angle induced errors during the offset maneuver, as these are now handled by my recent ‘global’ correction code. This will probably help with subsequent offset tracking, as the initial offset should be closer to the offset target at the start of the tracking phase. We’ll see…

After a number of trial runs, I finally settled (as much as anything is ‘settled’ in the Wall-E world) on PID = (400,5,40). Here’s a short video showing performance in this configuration:

And, once again, I still have to port this configuration and code back to the left-side wall tracking configuration. Here’s a short video of left-side wall tracking. Interestingly, my ‘random walk’ PID tuning technique resulted in significantly different PID values (300,0,200) vs (400,5,40) than the right side. No clue why.

At this point, I believe I have gone about as far as I can at the moment for wall tracking. WallE3 now can consistently track the walls in my office ‘sandbox’ using either the left-side or the right-side wall for reference. My plan going forward is to ‘archive’ this version (WallE3_WallTrack_V5) by copying it to a new project. The new project will have the goal of integrating charging station homing/connection into the system.

In preparation, I recently modified the charging station lead-in structure to accommodate the wider wheelbase on WallE3, as shown in the following photo:

17 April 2022 Update:

Well, I spoke too soon when I said above that wall-tracking was “settled”. I ran into a couple of significant problems; first, when the robot is already close to the proper offset, it is supposed to just turn to parallel the wall and then go into tracking mode, but on a number of occasions Wall-E3 ran out of control into the next wall. Secondly, wall tracking was anything but smooth, and I couldn’t get it to reliably track the desired offset. So, back to the drawing board (again).

The ‘close enough’ failures were being caused by a flaw in the ‘RotateToParallelOrientation() routine; as the robot approached the parallel orientation, the PID controller also started slowing the rotation speed, to the point where the robot wasn’t rotating anymore – just going straight ahead. If the actual parallel orientation wasn’t reached, the robot just kept going straight ahead forever – oops! The fix for this was to abandon the RotateToParallelOrientation() subroutine entirely, and just use WallOrientDeg() to get the current angular offset from parallel, and SpinTurn() to turn that angular amount back to parallel. RotateToParallelOrientation() is only used in two places (TrackRight/LeftWallOffset()), so the entire function can be removed as well.

The issue with offset tracking continues to bedevil me. When the robot is turned to approach the offset, the measured distances go the wrong way, so the PID tends to ‘wind up’ and drive the robot toward or away from the wall, rather than smoothly approaching the offset. I thought I had the answer to this by ‘tweaking’ the distance corrections due to off-parallel angles, but sadly, this did not help.

So, I removed the off-angle distance correction and went back to just tracking the steering angle – a value proportional to the difference between the front and rear side distance measurements. Now tracking was much more stable, but the robot traveled in a straight line slightly toward the wall. After a few trials, I realized that the robot was doing exactly what I told it to do – drive the front/back measurement error to zero, but unfortunately ‘zero’ did not equate to ‘parallel’. After scratching my head for a while, I realized that rather than using zero as the setpoint, I should use the value that causes the robot to travel parallel to the wall – which turned out to be about 0.25. Using this value I could increase the Kp value back up to 400 or so, and this resulted in very good tracking of whatever offset resulted from the ‘offset approach’ phase of the tracking algorithm. Just this step was a huge improvement in tracking performance, but it wasn’t quite ‘offset tracking’ yet as it didn’t pay any attention to the actual offset – just the difference between the front and back wall offset measurements.

Once I had this working, I was able to re-incorporate my earlier idea of biasing the actual steering value with a term that is proportional to the actual offset, i.e.

WallTrackSteerVal = glRightSteeringVal + (float)(glRightCenterCm – offsetCm) / 50.f;

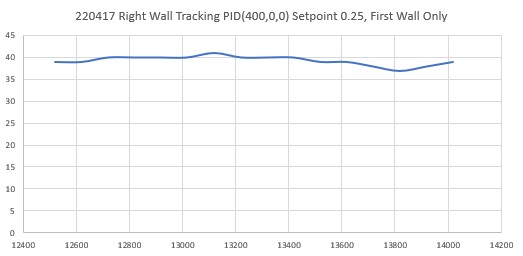
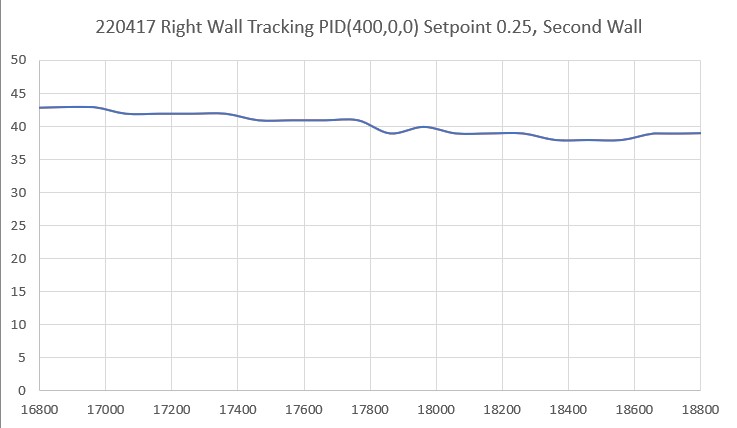
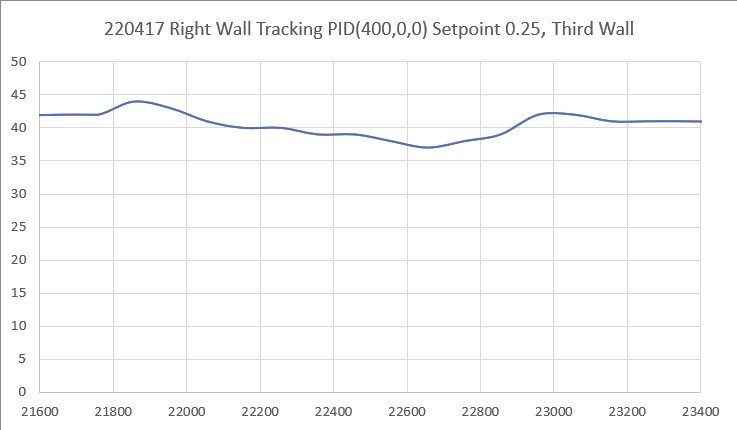
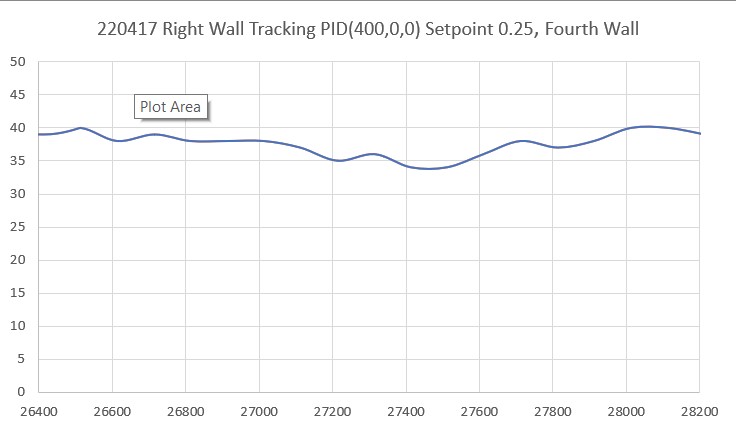
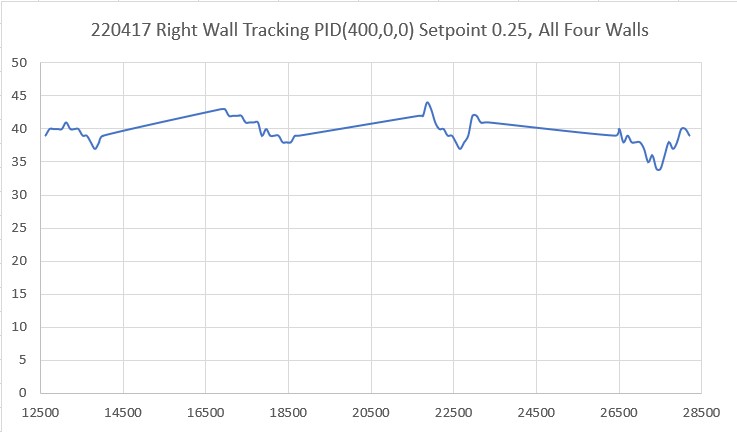
This, coupled with the empirically determined steering value setpoint of 0.25 resulted in a very stable, very precise tracking performance, as shown in the short video below and the associated telemetry and Excel plots.

PID (400,0,0), SetPoint = +0.25
All four wall sections – note straight lines are due to gaps between wall sections

So now I think I finally (I’ve only been working on this for the last three years!) have a wall tracking algorithm that actually makes sense and does what it is supposed to do – track the wall at a constant offset – yay!!

After getting the right side working, I ported everything back to the left side, with some differences; for the left side approach phase, I wound up using a fudge factor of 10cm vice 5cm to get the approach to stop near the desired offset. Also, the base steering value setpoint was -0.35 instead of +0.25, and the input (WallTrackSteerVal) wound up being

With these settings, Wall-E3 seemed pretty comfortable navigating around my office ‘sandbox’, as shown in the following short video:

Stay tuned,

Frank

Wall-E3 Right Wall Following Trial

Posted 23 March 2022,

Earlier this month I was able to demonstrate a multi-lap left-side wall tracking run by Wall-E3 in my office ‘sandbox’. This post describes my efforts to extend this capability to right-side wall tracking.

Since I already had the left-side wall tracking algorithm “in the can”, I thought it would be a piece of cake to extend this capability to right-side tracking. Little did I know that this would turn into yet another adventure in Wonderland – but at least when I finally made it back out of the rabbit-hole, the result was a distinct improvement over the left-side algorithm I started with. Here’s the left-side code:

The above code works, in the sense that it allows Wall-E3 to successfully track the left-side wall of my ‘sandbox’. However, as I worked on porting the left-side tracking code to the right side, I kept thinking – this is awful code – surely there is a better way?

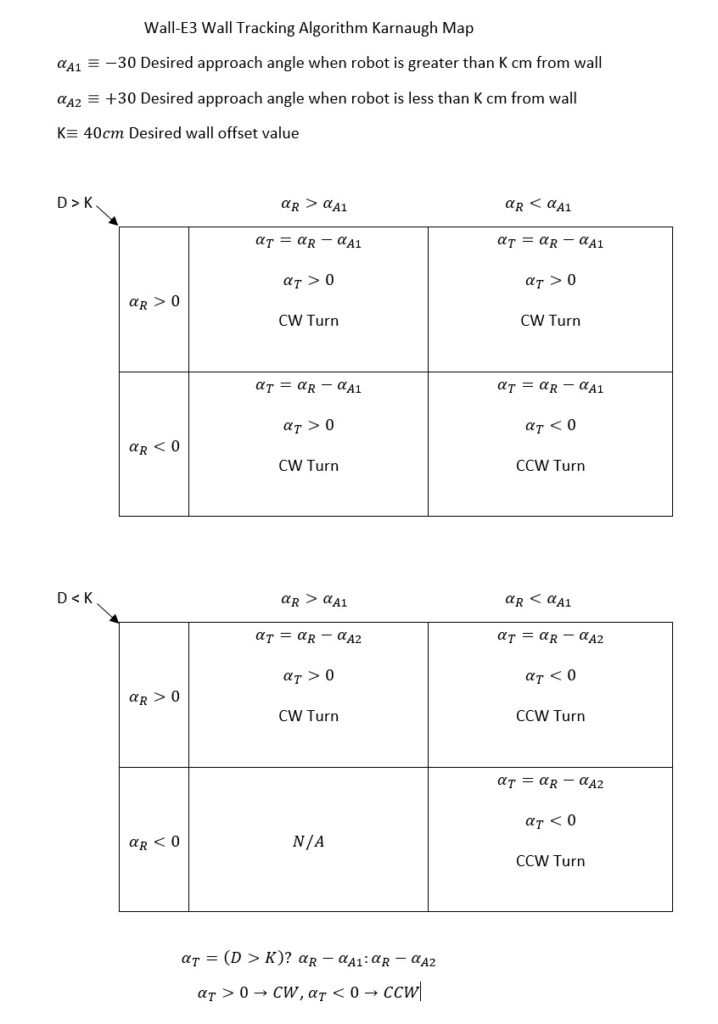
After letting this problem percolate for few days, I decided to see if I could approach the problem a little more logically. I realized there were two major conditions associated with the problem – namely is the robot’s initial position inside or outside the desired offset distance K? In addition, the robot can start out parallel to the wall, or pointed toward or away from the wall. Ignoring the ‘started out parallel’ degenerate case, this reminded me of a 3-parameter Karnaugh map configuration, so I started sketching it out in my notebook, and then later in a Word document, as shown below:

As shown above, I broke the 3-parameter into two 2-parameter Karnaugh maps, and the output is denoted by αT. After a few minutes it became obvious that the formula for αT is pretty simple – its either αR – αA1 or αR – αA2 depending on whether the robot starts out outside or inside the desired offset distance. In code, this boils down to one line, as shown at the bottom of the Karnaugh map above, using the C++ ‘?’ trinary operator, and choosing CW vs CCW is easy too, as a negative result implies CCW, and a positive one implies CW. The actual code block is shown below:

Here’s a short video of Wall-E3 navigating the office ‘sandbox’ while tracking the right-side wall.

So, it looks like Wall-E3 now has tracking ability for both left-side and right-side walls, although I still have to clean things up and port the simpler right-side code into TrackLeftWallOffset().

25 March 2022 Update:

Well, that was easy! I just got through porting the new right-side wall tracking algorithm over to TrackLeftWallOffset(), and right out of the box was able to demonstrate successful left-wall tracking in my office ‘sandbox’.

At this point I believe I’m going to consider the ‘WallE3_WallTrack_V3’ project ‘finished’ (in the sense that most, if not all, my wall tracking goals have been met with this version), and move on to V4, thereby limiting the possible damage from my next inevitable descent through the rabbit hole into wonderland.

Stay tuned,

Frank

Teensy 4.1 Replacement for Teensy 3.5?

A while back, I had some problems with damaged Teensy 3.5 main controllers on Wall-E3, my autonomous wall-following robot. I eventually traced the problem back to large voltage transients that occurred when I connected/disconnected the charging probe. These transients were conducted to the Teensy 3.5 pin used to detect the probe connection status, causing the Teensy to immediately reboot, and then eventually become unusable. I solved this problem by using a non-conductive photonic charger connect/disconnect system using the supplied charge LED on the TP5100 charger coupled to a photoresistor.

Unfortunately, I ran through most of my Teensy 3.5 stock while I was figuring this out, and now this part is unavailable from PJRC or anywhere else – maybe a victim of the world-wide chip shortage? The good news though is that the Teensys 4.1, successor to the Teensy 3.5 is available, so I purchased a few to evaluate as a replacement for the T3.5 on my robot.

The Teensy 4.1 has the same form factor and pin layout as the T3.5, which means it is a drop-in replacement in most cases. However, there are some gotchas. According to the comparison sheet on Paul Stoffregen’s PJRC site, the T4.1 is 5X faster (600MHz vs 120MHz) and has more memory. However, it doesn’t have any analog output DACs (T3.5 has 2), and more importantly, the T4.1 pins are not 5V tolerant!

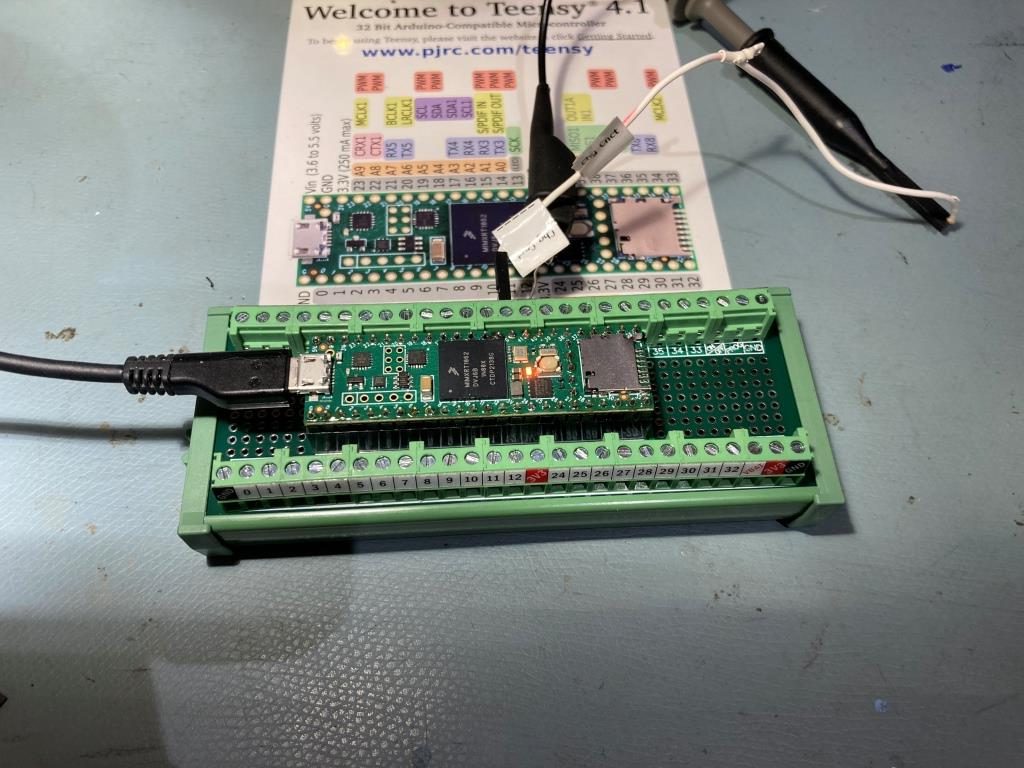
To start my evaluation, I loaded a simple ‘blink’ program, and as expected it worked great. Here’s the test setup, utilizing my newly-discovered OONO breakout board.

Teensy 4.1 on the OONO breakout board

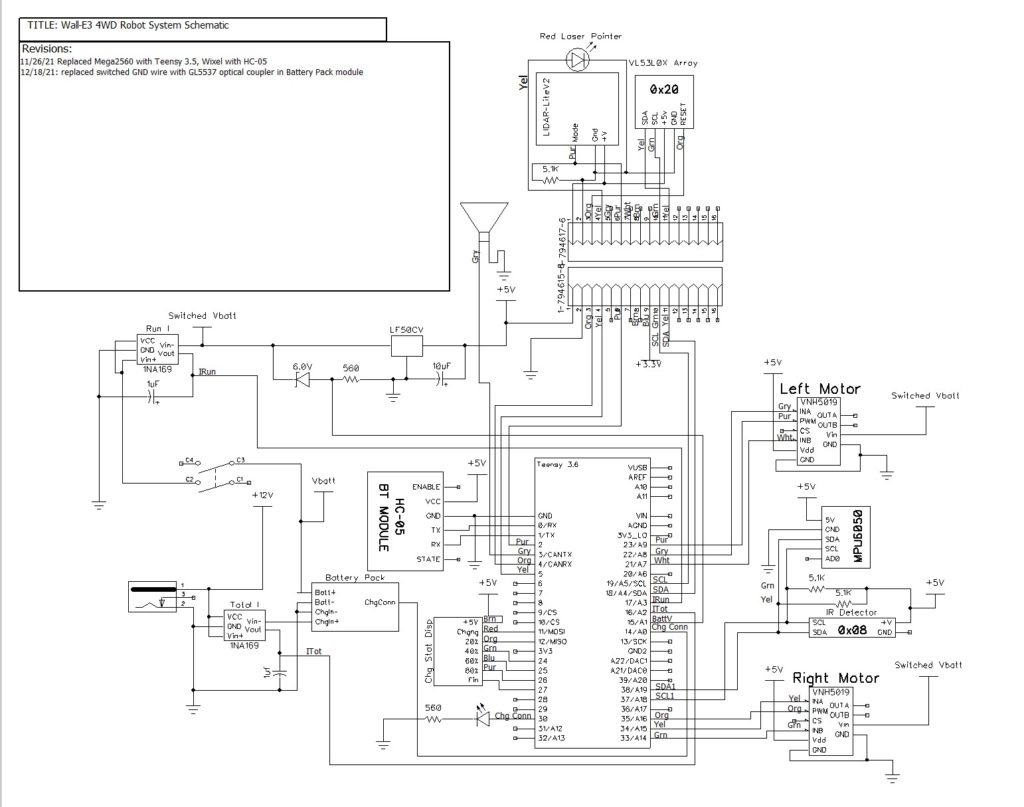
After this first test, I am convinced that the T4.1 will work nicely as a T3.5 replacement, except possibly for the 5V tolerance issue. To investigate this, I looked at my current system schematic

Wall-E3 System Schematic

Wall-E3’s main controller is directly connected to two VNH5019 motor controllers, several LEDs (the Chg Stat Display module), two INA169 current sense modules, a Pulsed Light (now owned by Garmin) LIDAR system via it’s ‘Mode’ pin, the ‘HC-05 BT Module’ (now replaced by my new 5V Reg/Wixel board) via its TX/RX pins, and the battery pack via the ‘Chg Conn’ pin (this the photonic connection discussed above). It is also connected to a MPU6050 IMU, a Teensy 3.2 running the IR charging beam detector, and another Teensy 3.5 running the 7-element VL53L0X distance sensing array, all via two different I2C ports.

The I2C ports are no problem, as they are either Teensy-to-Teensy or Teensy-to-MPU6050, which has an onboard regulator to regulate 5V down to 3.3, so the data lanes are 3.3V. The LED panels is passive (doesn’t generate any signals of its own), so that’s not a problem. The Wixel RF Transceiver inside my 5V Regulator/Wixel module runs on 3.3V, so the RX/TX lines are compatible with Teensy 4.1. The ‘Irun’, ‘Itot’ and ‘BattV’ A/D inputs are all below 3.3V at their maximum values (The Irun and Itot lines max out at about 2V (2 amps through the current sensor), while BattV maxes out at about 2.4V (8.4V max battery voltage minus 6V drop through a 6V zener diode).

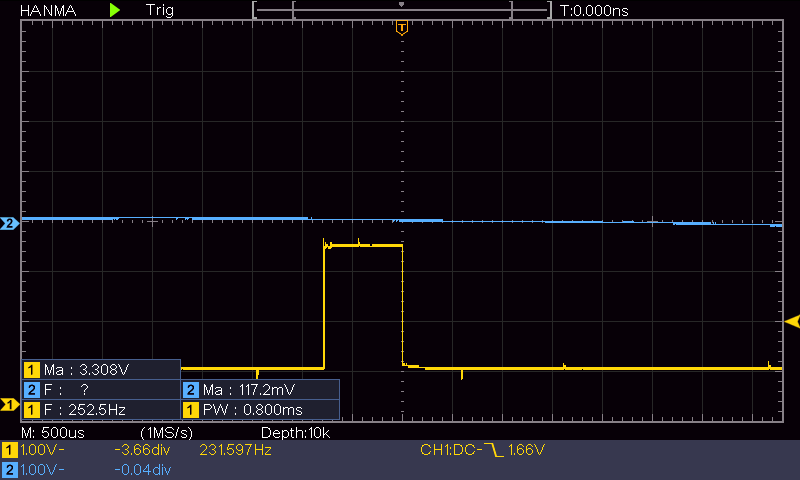
The ‘Mode’ line on the LIDAR could be an issue. The original Pulsed Light LIDAR was acquired by Garmin, so the original datasheets are no longer available. The Garmin datasheet says that the MODE pin output is limited to 3.3V, but I don’t know if that is the same for the original Pulsed Light model I’m using on Wall-E3. So, I hooked up my digital O’scope to the LIDAR’s MODE pin on Wall-E3 and measured it directly. As shown in the following scope grab, the output is indeed limited to 3.3V – yay!

Pulsed Light LIDAR-Lite MODE pin pulse output. Note max amplitude (Ma) = 3.308V

So, it looks like I can drop a Teensy 4.1 into Wall-E3’s system and it should do fine. I don’t really need the speed and/or memory improvements, but I do need a replacement for the now-defunct Teensy 3.5, in case I manage to kill yet another one.

21 March 2022 Update:

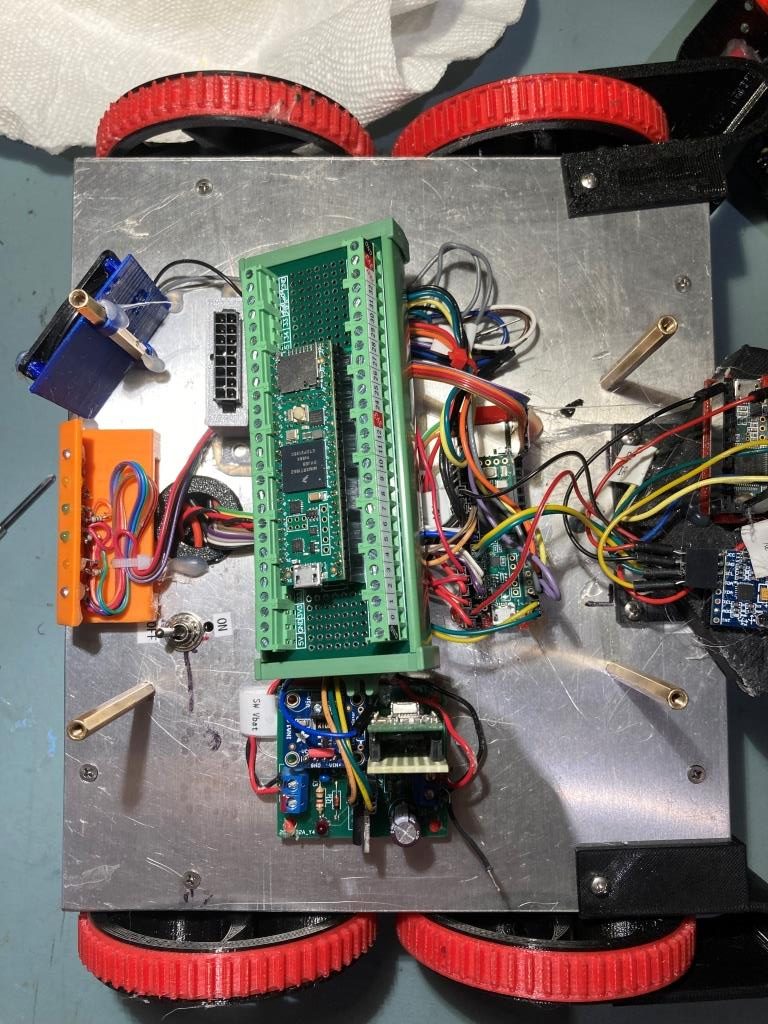
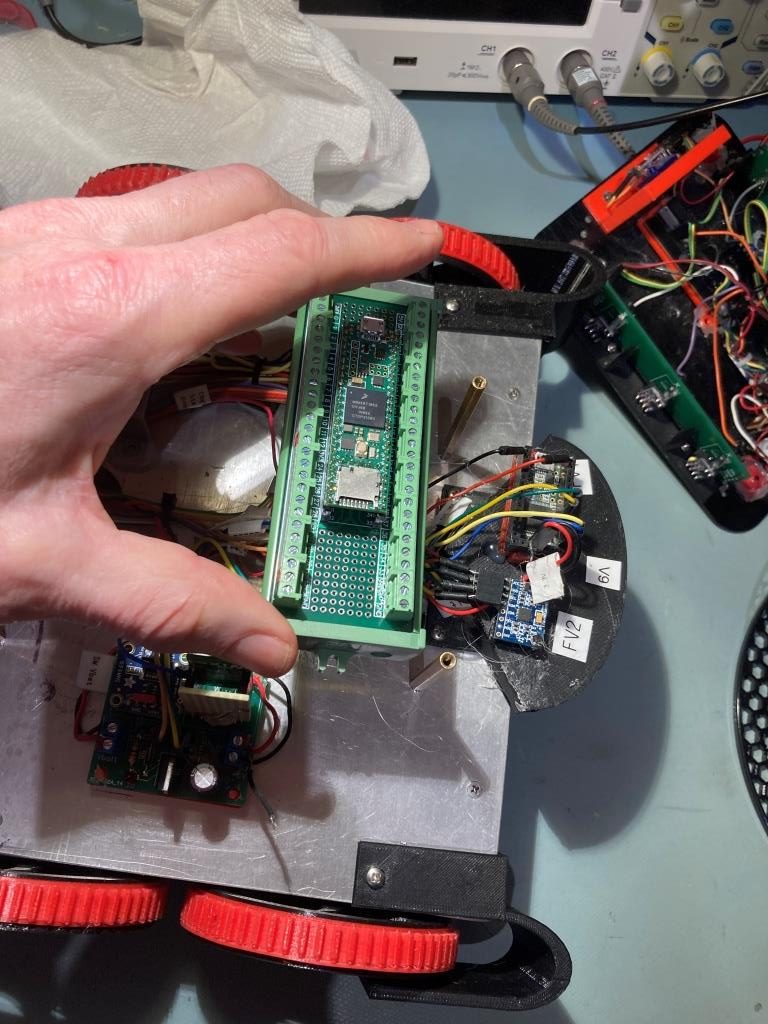
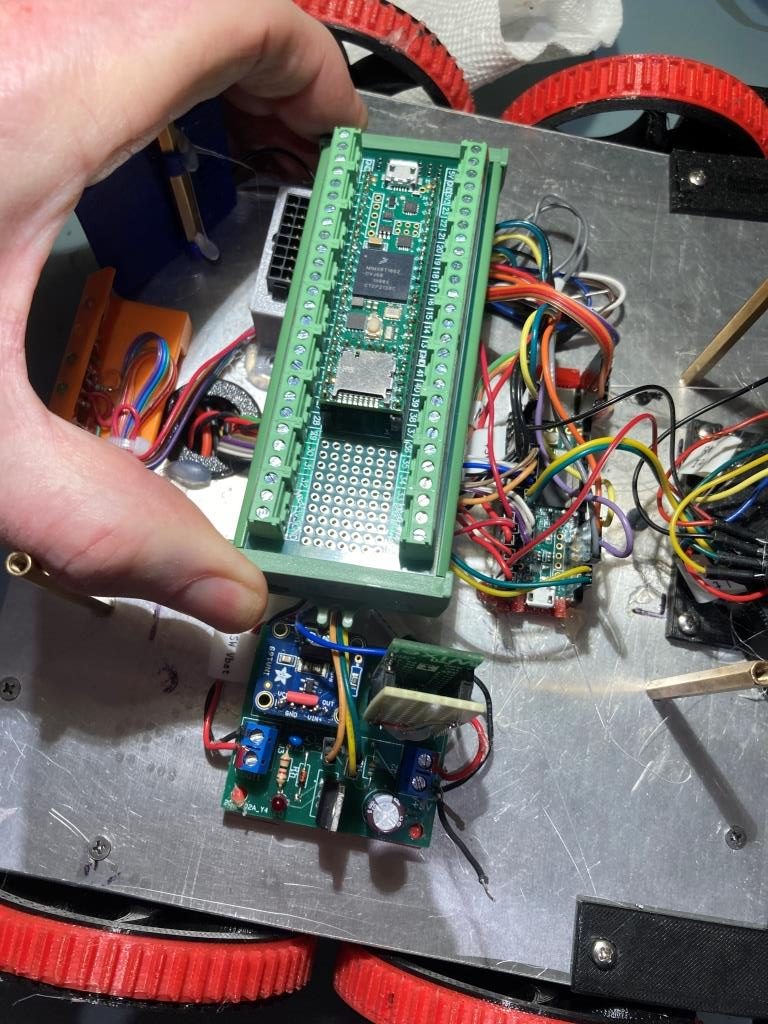
I took the time today to see how (or if) the Teensy 4.1 breakout module would fit on my current Wall-E3 robot. As shown below, it’s pretty big!

Based on the above photos, I don’t think this breakout board has a future on Wall-E3. Even though the module will fit, that doesn’t take into account the fact that the wiring from the module will extend horizontally from the module, rather than vertically as it does with the plain ‘Teensy + Female header’ arrangement. It was a great idea a the time, but I guess the reality is that the breakout module will be relegated to testing,

07 September 2024 Update:

I was playing with my 4WD robot and noticed the MPU6050 IMU wasn’t responding correctly, so to start the troubleshooting process I pulled the MPU6050 off the robot and connected it to a Teensy 4.1 instead of the Teensy 3.5 I have in the robot, because I had a 4.1 available and didn’t have a 3.5. This led to a couple of interesting discoveries:

  • I discovered it is very difficult to get a Teensy 4.1 with pins to fit into my ‘small’ plugboard. No amount of finger pressure would get the pins to fit into the correct sockets. This continued until I discovered that, way back in the day when I first got a couple of 4.1’s to try, I had soldered header pins to all the pins on the 4.1, including the five pins across the breakout board – oops! A few seconds with a side-cutter to remove these pins and I was back in business.
  • The default Wire1 pins on a Teensy 4.1 are different than the ones on a 3.5/3.2, and this threw me for a bit of a loop. Eventually I figured out that Wire1.begin() gets aimed at the proper default pins based on the compile target – Teensy 4.1 vs Teensy 3.5.

After making these changes, I was able to compile and run my ‘Teensy_MPU6050_DMP6_V4.ino’ Arduino sketch and verified that my MPU6050 module was working fine.

Stay tuned,

Frank

Wall-E3 Time Required for All-Sensor Update

Corralling all sensor data updates into one place:

I have been struggling with how to manage sensor data updates for Wall-E3. When I originally started working with Wall-E, it had only three sensors – a left and right-side HC-04 ‘ping’ sensor and the front LIDAR distance sensor, so data updates weren’t a significant part of the algorithm. Since then the sensor population as ballooned past the double-digit mark, with seven VL53L0X side/rear distance sensors, the front LIDAR sensor, two high-side current sensors, and the MPU6050 IMU.

Back in August 2020 I decided to change from a ‘request only when needed’ to a TIMER interrupt-based sensor update paradigm. The idea was to update all sensor data X times/sec in an Interrupt Service Routine (ISR). This worked great, but caused other problems that eventually led me to abandon this approach. In addition to not knowing exactly when/where in the program the sensor data changed, it appeared this approach was incompatible with my use of the PID library for motion control. The PID library’s ‘Compute()’ function expects to be called in a loop that runs many times faster than the PID’s internal update period (100mSec by default). PID::Compute() returns without doing anything until its internal 100mSec timer expires, at which point it does one PID computation and then resets the timer. So, there was a conflict, because I wanted to call PID::Compute() each time the TIMER ISR executed (using a ‘global’ boolean flag), but PID::Compute() wants to execute only when it’s internal timer expires. I never could figure out how to make those two requirements work together. Eventually I abandoned both of them. First, I dumped the PID library and rolled my own PIDCalcs() function that computed a new output every time it was called, and I dumped the timer ISR in favor of ‘just in time’ sensor data updates.

Fast-forward to the present, and now I’m still struggling to figure out how to manage sensor data updates. As my latest ‘sand-box’ testing showed, I need to update all the distance sensors even when I’m only tracking one side, so just updating one side or the other doesn’t work. So, I created a ‘UpdateAllDistances()’ function as shown below:

This function also causes the front and rear distance arrays to be updated and new front/rear variances to be calculated. The function is intended to be called from both the left and right wall tracking loops, and anywhere else updated distance and related data updates are required.

Having created this function, the next question becomes – how long does this function take to execute? If it is too long, then tracking performance will suffer. To answer this question, I placed code at the beginning and end of UpdateAllDistances() to toggle a hardware pin so I can measure the elapsed time on a scope, and I placed code at the beginning/end of a small WALL_TRACK_UPDATE_INTERVAL_MSEC test loop in setup(), as follows:

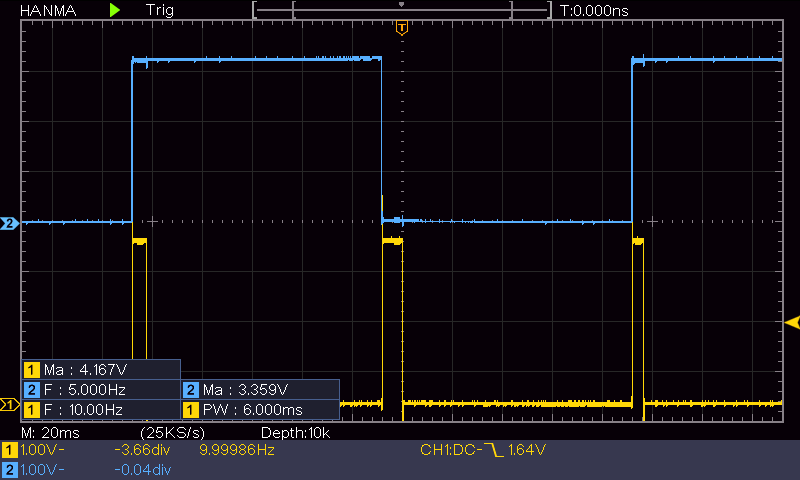
With this test, I got the following output on my HANMATECK DOS1102 digital O’Scope:

200mSec tracking loop (blue) and UpdateAllEnvironmentParameters() duration (yellow)

As can bee seen in the above plot, UpdateAllEnvironmentParameters() takes around 6-10mSec to update all environmental parameters (basically everything except MPU6050 heading), leaving 190-194mSec to complete the rest of the tracking update loop. This is very good news, as it means I can basically think of UpdateAllEnvironmentParameters() as a one-line ‘do everything’ command with negligible duration.

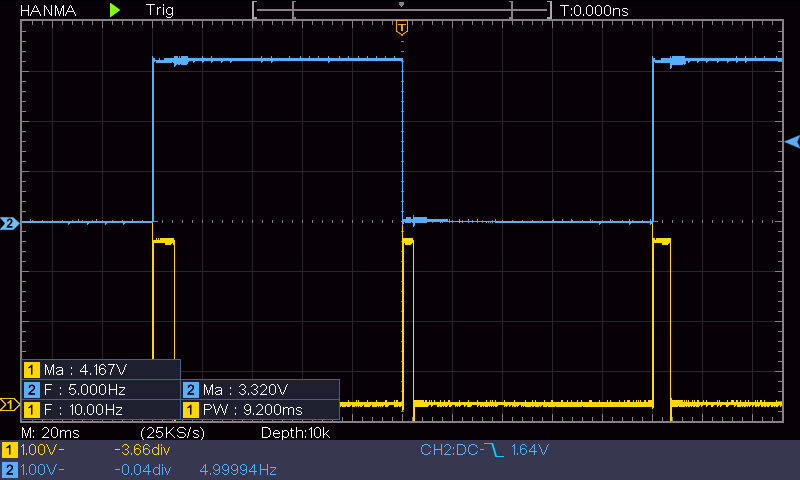
Next I made the same measurement, but this time with the actual ‘TrackLeftWallOffset() code being executed. As can be seen from the following image, the result is essentially identical to the first test; UpdateAllEnvironmentParameters() takes around 6-10mSec.

200mSec tracking loop (blue) and UpdateAllEnvironmentParameters() duration (yellow)

Then I did this test one more time, except this time I toggled the blue trace at the beginning and end of wall track processing, to show the time remaining in the 200mSec loop. Here’s what actually happens in the tracking loop:

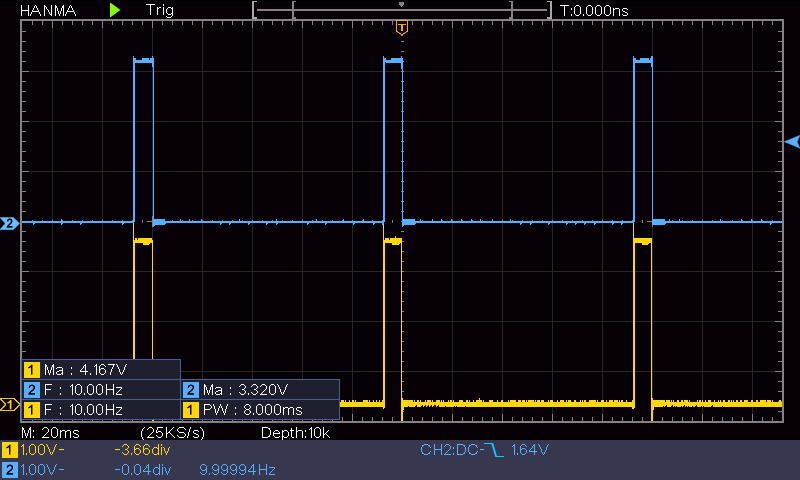
And here’s the screen grab from my O’scope showing the actual duration of everything in the above loop.

tracking loop processing duration (blue) and UpdateAllEnvironmentParameters() duration (yellow)

As can be seen, almost all of the tracking processing time is spent in UpdateAllEnvironmentParameters(), and there is plenty of time to do additional processing (like anomaly handling). The 200 mSec loop is denoted above by adjacent rising edges of the blue trace, and all processing is finished at the trailing edge of the blue trace, so only about 10mSec, or about 5%, of the 200mSec is taken.

So it is clear that consolidating all environmental sensor updates into one function is a big winner. The time taken for sensor data updates is a small percentage of the time available for the entire tracking loop, but it is almost all of the time required in each tracking loop. This is very interesting result. The time required for sensor update probably cannot be reduced, as it depends on the actual hardware sensor response times and the ability to get the sensor data back to the main Teensy 3.5 processor via I2C. However, it now appears that I could easily reduce the overall tracking loop duration from the nominal 200mSec to 100, 50, or even 20mSec with no adverse effects, and presumably a corresponding increase in tracking performance. This is probably the biggest win associated with the change from the Arduino MEGA2560 to the Teensy 3.5 – so much less time required for processing.

Stay tuned,

Frank

Wall-E3 Multi-Lap Wall-Following Trial

Posted 06 March 2022

I’ve pretty much finished with transitioning my autonomous wall-following robot from the old Arduino MEGA 2560 main controller to the new Teensy 3.5 main controller, and now I am moving on to actually getting Wall-E3 to do the job it was created for – namely, to follow walls autonomously. This post describes the result of a multi-lap run through my little testing ‘sandbox’, consisting of a set of barriers forming a 2m X 2m rectangular ‘room’. Here’s a short video showing the run:

I captured the telemetry output from the run and went back through it pretty much line-by-line, trying to make sure I understood all the actions displayed in the video – particularly the little off-piste excursion at about 1:00 on the second lap, just before the end of the run (the run was cancelled when a portion of the wall fell over on Wall-E3).

First Leg: 36.0- 38.9 Sec (5-8 sec in video)

In the first leg, the robot starts off parallel to the wall on the left, but too close (16cm instead of 40cm). It makes a 27.1º CW turn away from the wall to achieve a cut angle of 30º, moves forward, and then turns back 30º CCW to end up parallel to the wall, and about 36cm away – almost perfectly spaced 40cm off the wall.

Next it tracks down the wall from 14.992 sec to 17.390sec , trying (and generally succeeding) to maintain the 40cm standoff distance.

At 17.390 sec it detects an upcoming obstacle (the obstacle detection distance was set to 20cm for this run), and stops (not quite getting all the way stopped before running into the wall – oops!).

First-to-Second Leg Transition:

The handling procedure for the ‘OBSTACLE_AHEAD’ case is to stop, back straight up to achieve the nominal wall offset distance (40cm here), then make a 90º turn (CW in this case) away from the wall to orient itself parallel to the wall again.

As can be seen from the above telemetry, that is exactly what happens, backing up to the point where the front LIDAR sensor shows 38cm and then making the required 90º turn with SpinTurn(CW, 90.00, 45.00). The ‘backup and turn’ evolution is completed in approximately 1.5 sec.

Second Leg: 47.4 – 49.0 Sec (16-19 sec in video)

Second-to-Third Leg Transition:

Third Leg: 57.0 – 59.8 Sec (25-29 sec in video)

Transition and Fourth Leg: 61.0 – 70.4 Sec (30-40 sec in video)

Transition and Fifth Leg: 71.6 – 80.9 Sec (40-50 sec in video)

Fifth-to-Sixth Leg Transition: 82.1 – 88.0 Sec (50-58 sec in video)

Sixth Leg up to Anomaly 88.9 – 89.8 Sec (57-59 sec in video)

On this leg an anomaly occurred. The robot detected a ‘Stuck Ahead’ condition, defined by the condition where the mathematical variance of the last N front LIDAR distance readings falls below a set threshold. This should never happen while the robot is actually moving, but it clearly did happen in this case (unfortunately I wasn’t recording the front distance measurement or the distance measurements to the other wall, so I can’t go back and see exactly what happened). The recovery procedure for a ‘stuck ahead’ condition is to make a 90 deg turn away from the nearest wall, move forward for 1 second, and then make another 90 deg turn to return to a parallel course, but offset 10-20 cm from the previous track. In this case, the robot turned toward the nearest wall, clearly a mistake (it was a mistake in TrackLeftWallOffset() – since fixed). However, it was not a disaster, as the robot made the second turn before hitting the wall, and from there on it returned to normal left wall tracking mode.

Summary:

This first test of left wall tracking performance was very encouraging. The robot was able to continue tracking operations over several laps, including an instance where it recovered from an inadvertent ‘Stuck’ detection. The test could easily have continued until the batteries died, but had to be aborted when one section of the foam-core wall fell in on top of the robot – oops!

Also, this run pointed out the need for more focused telemetry. For this test I was only reporting the left-side and rear distances, but now I know I need to add the right-side measurements as well as the front and rear variance numbers.

09 March 2023 Update:

After cleaning up some messy initialization code, and improving telemetry readouts, I ran another complete left-side wall-tracking lap in my sandbox, as shown in the following short video:

09 March 22 Left-side wall-tracking lap

The telemetry for this run is shown below:

From the telemetry, it takes about 8 sec for all sensor hardware initialization. After that the left/right/front/rear distance arrays are initialized, and the initial front/rear variances are calculated. All this is summarized on line 26-27.

First leg: 12.866 – 15sec (3-5 sec in video)

Left-side tracking starts on line 34. First (line 37) the robot turns to its initial offset capture heading, moves to the desired offset distance (not shown) and then turns back to parallel the wall (line 39). Actual tracking starts on line 43 at 12.866 sec elapsed time (this corresponds to about 3 sec into the video)

At line 65 (about 15 sec elapsed time) the robot ‘sees’ the upcoming wall, stops and then backs up to 38cm (16.4 – 17.3 sec, 5-6 sec in video). At line 78 it makes a 90deg CW turn to line up with the current wall section, and then navigates down the wall (18.6-21.3sec, 8-11sec in video)

Second leg: 18.6 – 21.3sec (8-11 sec in video)

The robot ‘sees’ the upcoming wall on line 119 (21.010 sec, 11sec in video), backs up (lines 123-129, 11-12 sec in video) and makes another 90deg CW turn to follow the 3rd wall

The third and 4th legs are very similar to the first two, with the robot ending back where it started at 32.574 sec (23 sec on video), ‘seeing’ the upcoming wall at line 221. At this point I transmitted the ‘C’ character over the wireless link to enter manual control to terminate the run.

Summary:

This 4-leg run was pretty much perfect. I adjusted the MIN_FRONT_OBSTACLE_DIST_CM from 20 to 30cm, and this stopped the robot from banging its head against the walls – yay! Also, the telemetry readout changes made for a much more understandable output. I was happy to see that the front variance stayed well above 10,000 the whole time, but unhappy to see that the rear variance was essentially zero the entire time. The low rear variance is due to the fact that the rear VL53L0X sensor range is only about 100cm, and after that it always reports ‘819’. This is not a real problem – it just means that I can’t use the rear variance number to detect a ‘rear stuck’ condition unless it happens within a meter or so from a wall. Hmm, maybe I could use the information from both the front & rear variance numbers to create a more robust detection system.

Stay tuned,

Frank