Posted 24 July 2019
For a while now I’ve been investigating ways of improving the wall following performance of my autonomous wall-following robot Wall-E2. At the heart of the plan is the use of a MPU6050 IMU to sense relative angle changes of the robot so that changes in the distance to the nearest wall due only to the angle change itself can be compensated out, leaving only the actual offset distance to be used for tracking.
As the test vehicle for this project, I am using my old 2-motor robot, fitted with new Pololu 125:1 metal-geared DC motors and Adafruit DRV8871 motor drivers, as shown in the photo below.
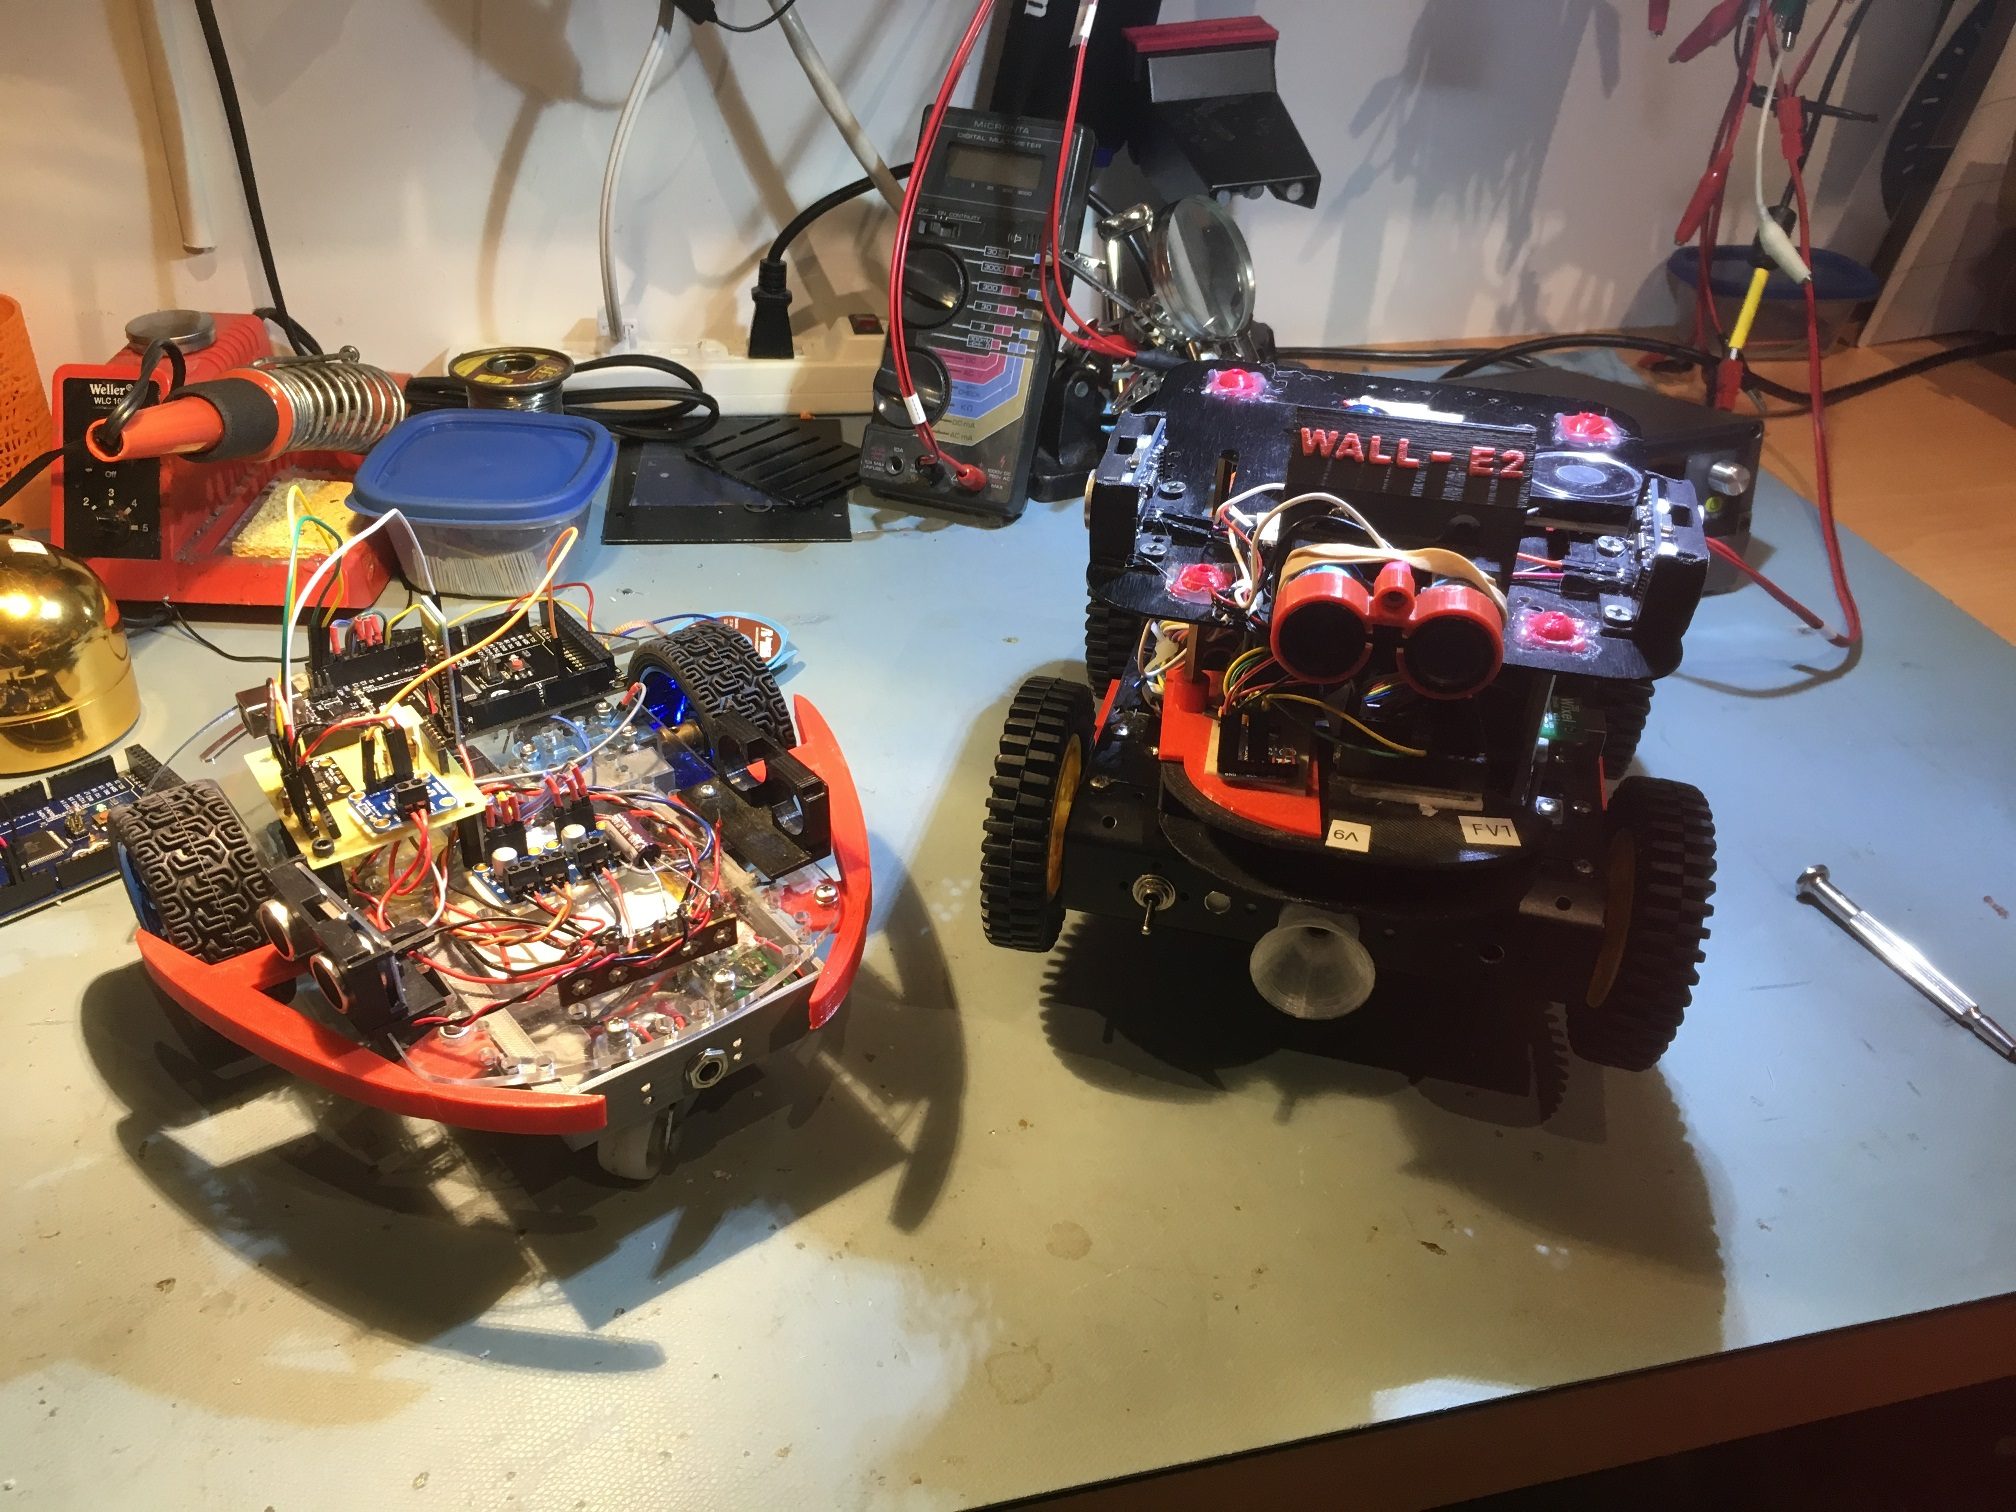
2-motor test vehicle on left, Wall-E2 on right
The DFRobots MPU6050 IMU module is mounted on the green perfboard assembly near the right wheel of the 2-motor test robot, along with an Adafruit INA169 high-side current sensor and an HC-05 Bluetooth module used for remote programming and telemetry.
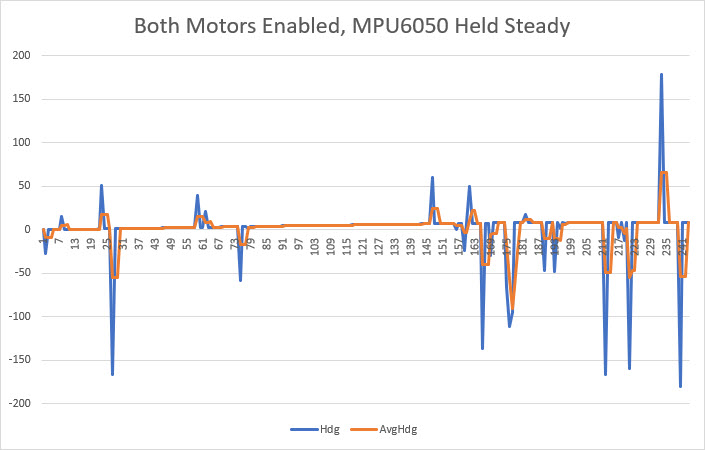
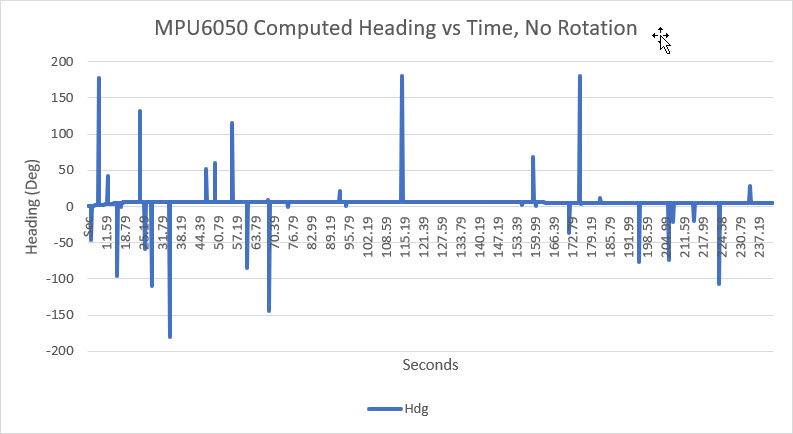
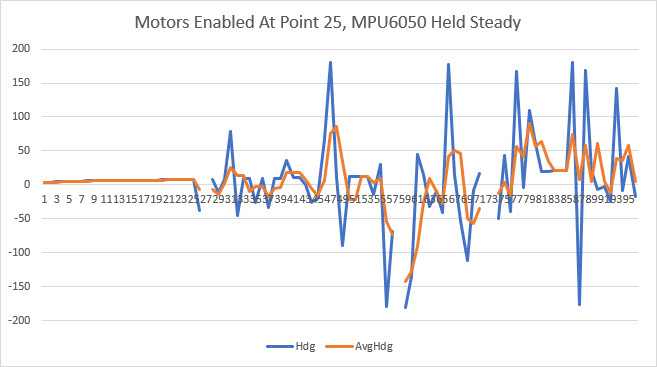
This worked great at first, but then I started experiencing anomalous behavior where the robot would lose track of the relative heading and start turning in circles. After some additional testing, I determined that this problem only occurred when the motors were running. It would work fine as long as the motors weren’t running, but since the robot had to move to do its job, not having the ability to run the motors was a real ‘buzz-kill’. I ran some experiments on the bench to demonstrate the problem, as shown in the Excel plots below:
Troubleshooting:
There were a number of possibilities for the observed behavior:
- The extra computing load required to run the motors was causing heading sensor readings to get missed (not likely, but…)
- Motor noise of some sort was feeding back into the power & ground lines
- RFI created by the motors was getting into the MPU6050 interrupt line to the Arduino Mega and causing interrupt processing to overwhelm the Mega
- RFI created by the motors was interfering with I2C communications between the Mega and the MPU6050
- Something else
Extra Computing Load:
This one was pretty easy to eliminate. The main loop does nothing most of the time, and only updates system parameters every 200 mSec. If the extra computing load was the problem, I would expect to see no ‘dead time’ between adjacent adjustment function blocks. I had some debug printing code in the program that displayed the result of the ‘millis()’ function at various points in the program, and it was clear that there was still plenty of ‘dead time’ between each 200 mSec adjustment interval.
Motor noise feeding back into power/ground:
I poked around on the power lines with my O’scope with the motors running and not running, but didn’t find anything spectacular; there was definitely some noise, but IMHO not enough to cause the problems I was seeing. So, in an effort to completely eliminate this possibility, I removed the perfboard sub-module from the robot entirely, and connected it to a separate Mega microcontroller. Since this setup used completely different power circuits (the onboard battery for the robot, PC USB cable for the second Mega), power line feedback could not possibly be a factor. With this setup I was able to demonstrate that the MPU6050 output was accurate and reasonable until I placed the perfboard sub-module in close proximity to the robot; then it started acting up just as it did when mounted on the robot.
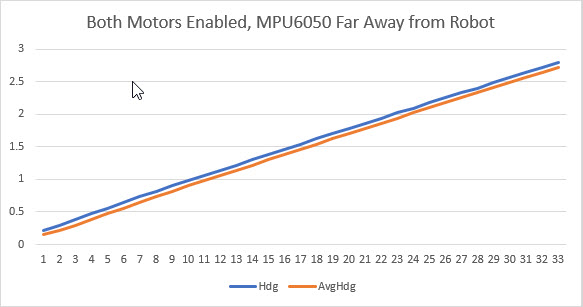
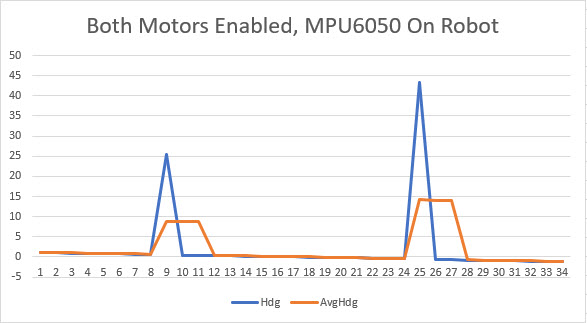
So it was clear that the interference is RFI, not conducted through any wiring.
RFI created by the motors was getting into the MPU6050 interrupt line to the Arduino Mega and causing interrupt processing to overwhelm the Mega
This one seemed very possible. The MPU6050 generates interrupts at a 20Hz rate, but I only use measurements at a 5Hz (200mSec) rate. Each interrupt causes the Interrupt Service Routine (ISR) to fire, but the actual heading measurement only occurs every 200 mSec. I reasoned that if motor-generated RFI was causing the issue, I should see many more activations of the ISR than could be explained by the 20Hz MPU6050 interrupt generation rate. To test this theory, I placed code in the ISR that pulsed a digital output pin, and then monitored this pin with my O’scope. When I did this, I saw many extra ISR activations, and was convinced I had found the problem. In the following short video clip, the top trace is the normal interrupt line pulse frequency, and the bottom trace is the ISR-generated pulse train. In normal operation, these two traces would be identical, but as can be seen, many extra ISR activations are occurring when the motors are running.
So now I had to figure out what to do with this information. After Googling around for a while, I ran across some posts that described using the MPU6050/DMP setup without using the interrupt output line from the module; instead, the MPU6050 was polled whenever a new reading was required. As long as this polling takes place at a rate greater than the normal DMP measurement frequency, the DMP’s internal FIFO shouldn’t overflow. If the polling rate is less than the normal rate, then FIFO management is required. After thinking about this for a while, I realized I could easily poll the MPU/DMP at a higher rate than the configured 20Hz rate by simply polling it each time through the main loop – not waiting for the 200mSec/5Hz motor speed adjustment interval. I would simply poll the MPU/DMP as fast as possible, and whenever new data was ready I would pull it off the FIFO and put it into a global variable. The next time the motor adjustment function ran, it would use the latest relative heading value and everyone would be happy.
So, I implemented this change and tested it off the robot, and everything worked OK, as shown in the following Excel plot.
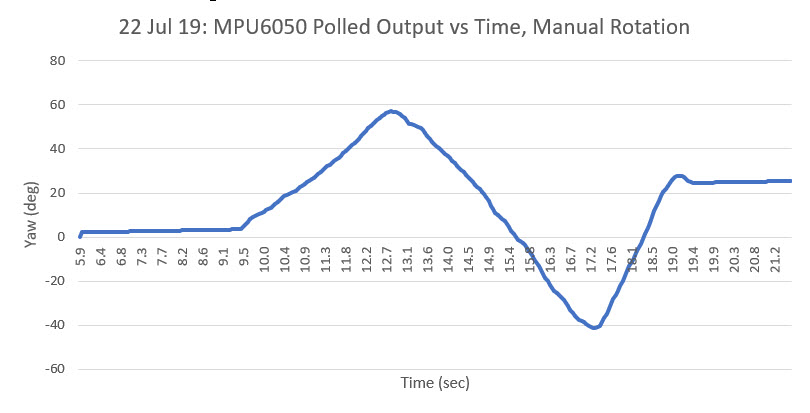
And then I put it on the robot and ran the motors
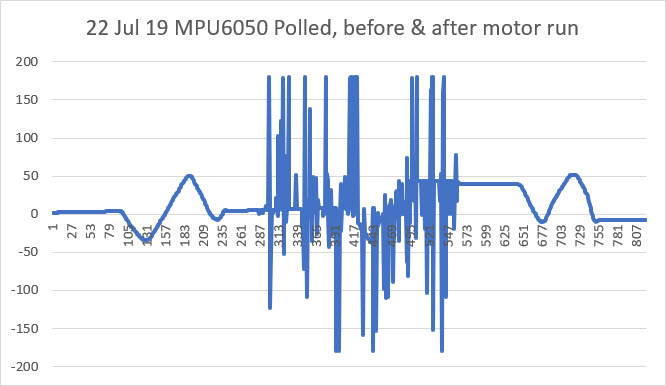
Crap! I was back to the same problem! So, although I had found evidence that the motor RFI was causing additional ISP activations, that clearly wasn’t the entire problem, as the polling method completely eliminates the ISP.
RFI created by the motors was interfering with I2C communications between the Mega and the MPU6050
I knew that the I2C control channel could experience corruption due to noise, especially with ‘weak’ pullup resistor values and long wire runs. However, I was using short (15cm) runs and 2.2K pullups on the MPU6050 end of the run, so I didn’t think that was an issue. However, since I now knew that the problem wasn’t related to wiring issues or ISR overload, this was the next item on the list. So, I shortened the I2C runs from 15cm to about 3cm, and found that this did indeed suppress (but not eliminate) the interference. However, even with this modification and with the MPU6050 module located as far away from the motors as possible, the interference was still present.
Something else
So, now I was down to the ‘something else’ item on my list, having run out of ideas for suppressing the interference. After letting this sit for a few days, I realized that I didn’t have this problem (or at least didn’t notice it) on my 4-motor Wall-E2 robot, so I started wondering about the differences between the two robot configurations.
- Wall-E2 uses plastic-geared 120:1 ‘red cap’ motors, while the 2-motor robot uses pololu 125:1 metal-geared motors
- Wall-E2 uses L298N linear drivers while the 2-motor version uses the Adafruit DRV8871 switching drivers.
So, I decided to see if I could isolate these two factors and see if it was the motors, or the drivers (or both/neither?) responsible for the interference. To do this, I used my new DPS5005 power supply to generate a 6V DC source, and connected the power supply directly to the motors, bypassing the drivers entirely. When I did this, all the interference went away! The motors aren’t causing the interference – it’s the drivers!
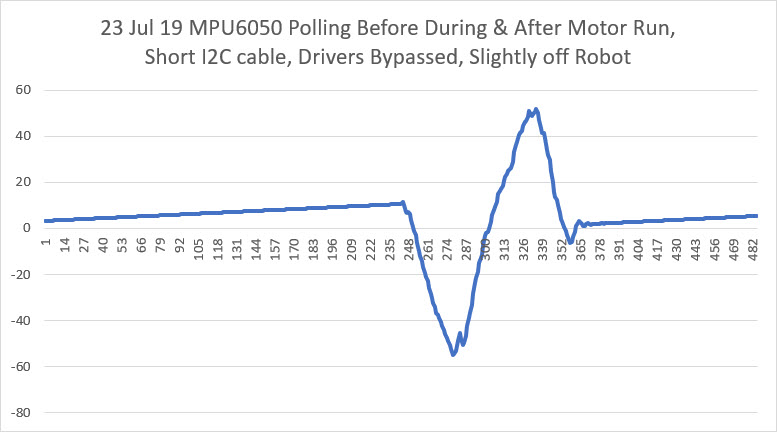
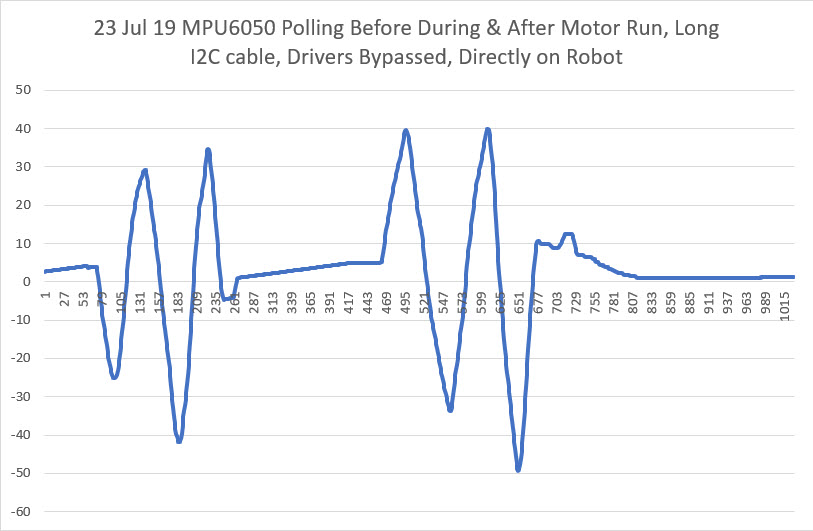
In the first plot above, I used a short (3cm) I2C wire pair and the module was located near, but not on, the robot. As can be seen, no interference occurred when the motors were run. In the second plot I used a long (15cm) I2C wire pair and mounted the module directly on the robot in its original position. Again, no interference when the motors were run.
So, at this point it was pretty definite that the main culprit in the MPU6050 interference issue is the Adafruit DRV8871 switch-mode driver. Switch-mode drivers are much more efficient than L298N linear-mode drivers, but the cost is high switching transients and debilitating interference to any I2C peripherals.
As an experiment, I tried reducing the cable length from the drivers to the motors, reasoning that the cables must be acting like antennae, and reducing their length should reduce the strength of the RFI. I re-positioned the drivers from the top surface of the robot to the bottom right next to the motors, thereby reducing the drive cable length from about 15cm to about 3 (a 5:1 reduction). Unfortunately, this did not significantly reduce the interference.
So, at this point I’m running out of ideas for eliminating the MPU6050 interference due to switch-mode driver use.
- I read at least one post where the poster had eliminated motor interference by eliminating the I2C wiring entirely – he used a MPU6050 ‘shield’ where the I2C pins on the MPU6050 were connected directly to the I2C pins on the Arduino microcontroller. The poster didn’t mention what type of motor driver (L298N linear-mode style or DRV8871 switch-mode style), but apparently a (near) zero I2C cable length worked for him. Unfortunately this solution won’t work for me as Wall-E2 uses three different I2C-based sensors, all located well away from the microcontroller.
- It’s also possible that the motors and drivers could be isolated from the rest of the robot by placing them in some sort of metal box that would shield the rest of the robot from the switching transients caused by the drivers. That seems a bit impractical, as it would require metal fabricating unavailable to me. OTOH, I might be able to print a plastic enclosure, and then cover it with metal foil of some sort. If I go this route, I might want to consider the use of optical isolators on the motor control lines, in order to break any conduction path back to the microcontroller, and capacitive feed-throughs for the power lines.
27 July 19 Update:
I received a new batch of GY-521 MPU6050 breakout boards, so I decided to try a few more experiments. With one of the GY-521 modules, I soldered the SCL/SDA header pins to the ‘bottom’ (non-label side) and the PWR/GND pins to the ‘top’. With this setup I was able to plug the module directly into the Mega’s SCL/SDA pins, thereby reducing the I2C cable length to zero. The idea was that if the I2C cable length was contributing significantly to RFI susceptibility, then a zero length cable should reduce this to the minimum possible, as shown below:
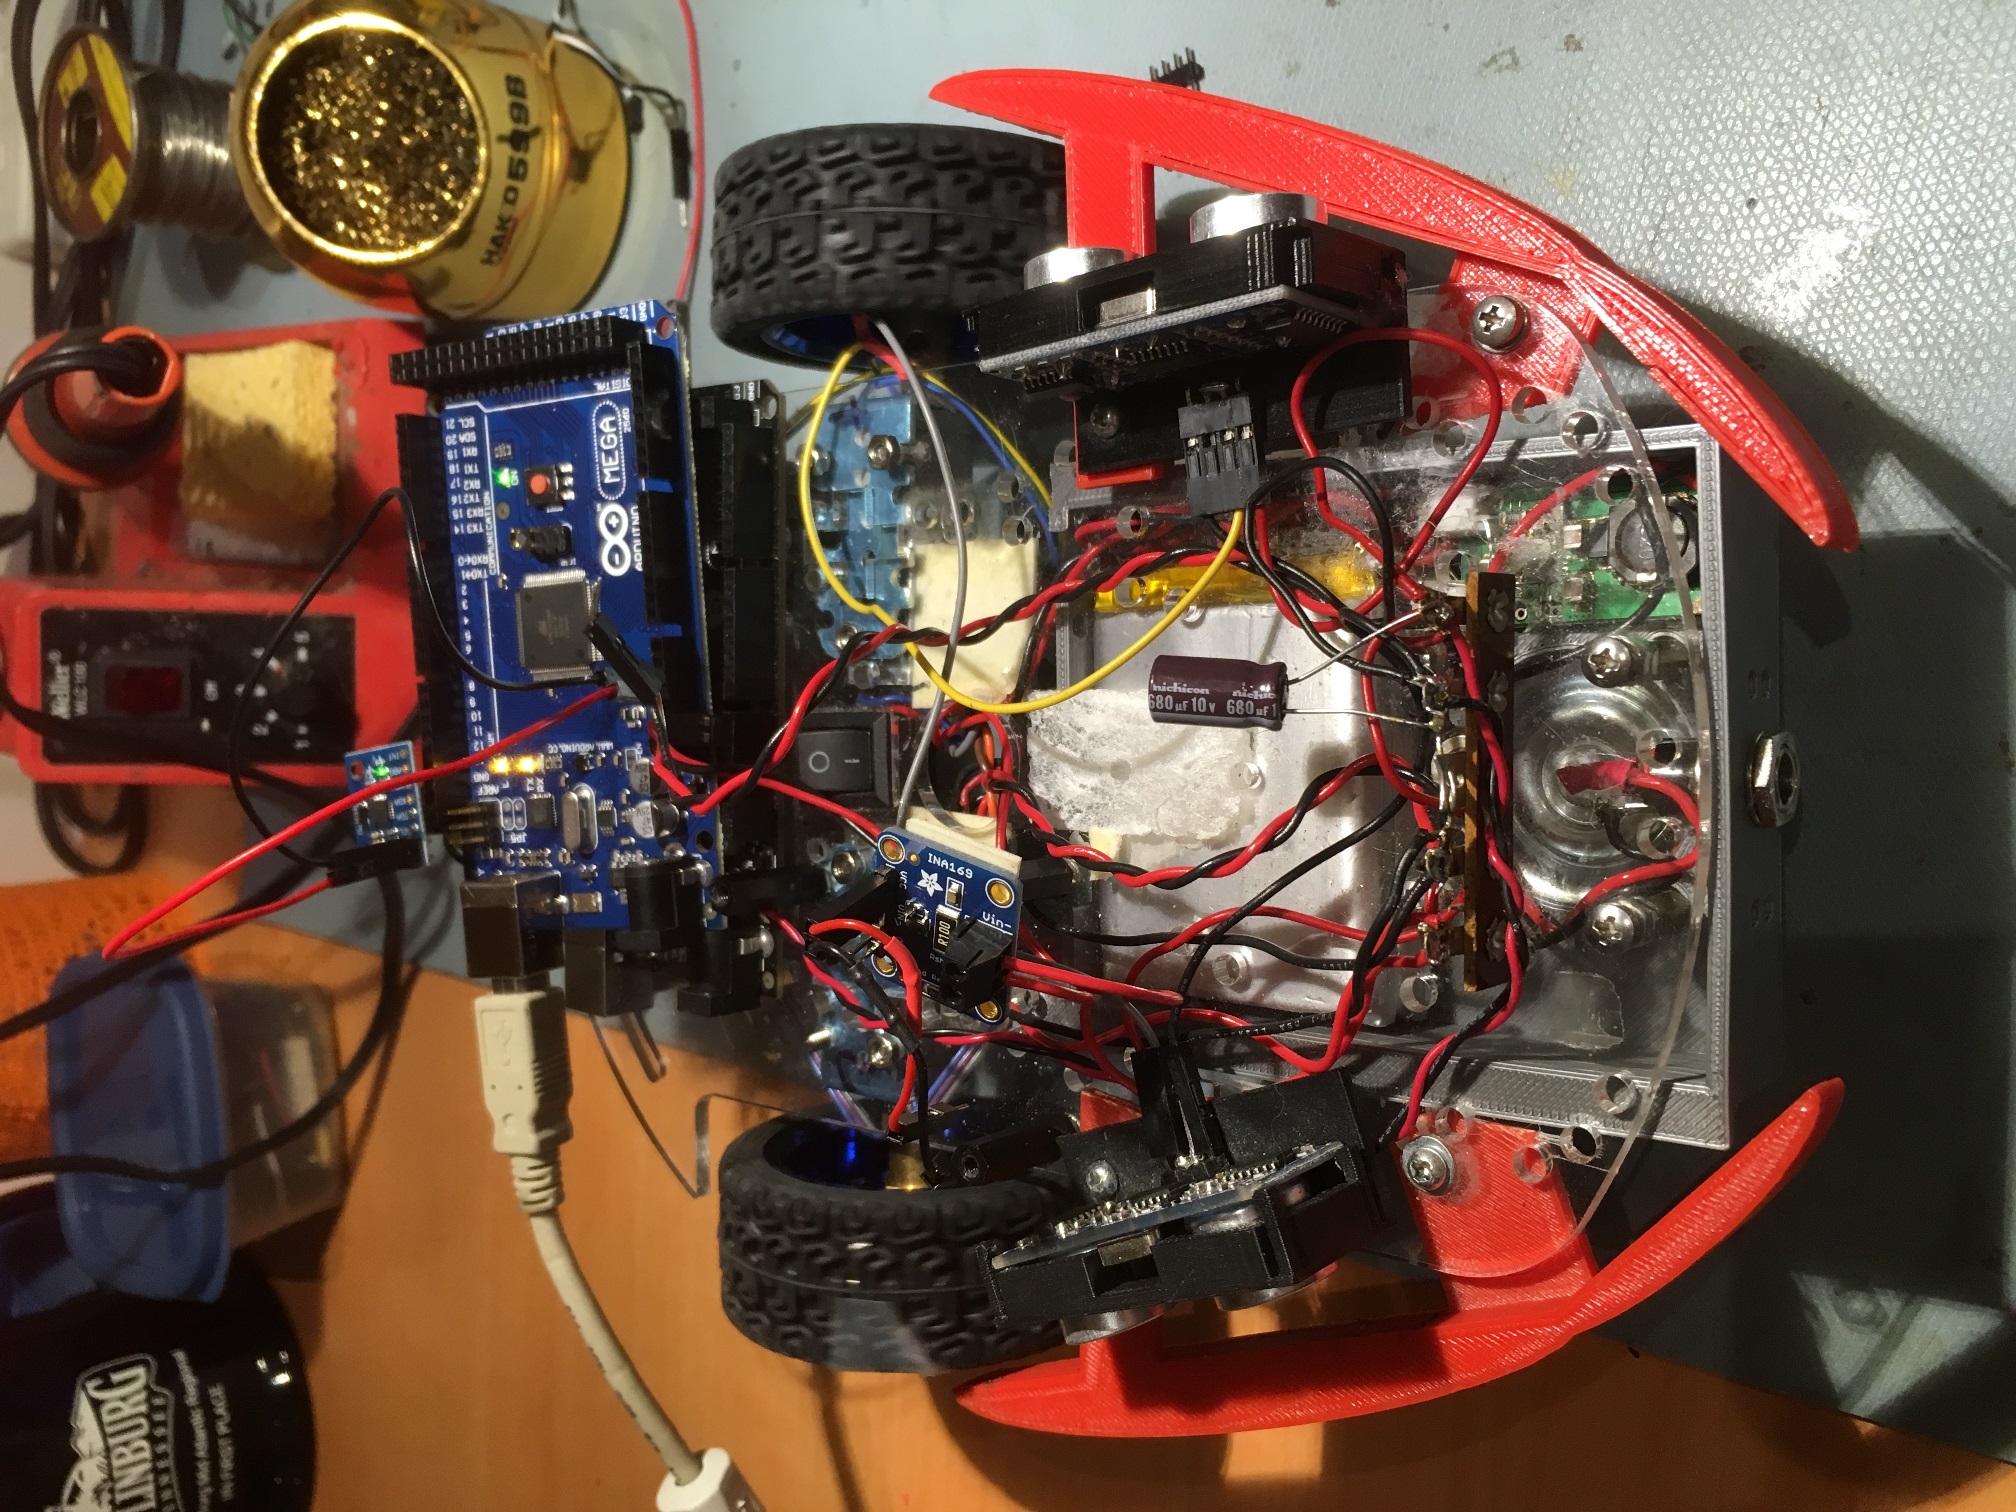
MPU6050 directly on Mega pins, normal length power wiring
In the photo above, the Mega with the MPU6050 connected is sitting atop the Mega that is running the motors. The GND and +5V leads are normal 15cm jumper wires. As shown in the plots below, this configuration did reduce the RFI susceptibility some, but not enough to allow normal operation when lying atop the robot’s Mega.
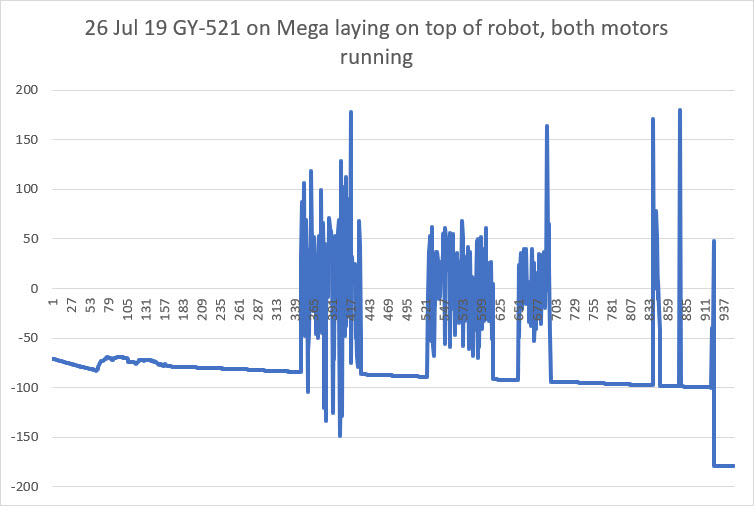
GY-521 MPU6050 module mounted directly onto Mega, normal length power leads
I was at least a little encouraged by this plot, as it showed that the MPU6050 (and/or the Mega) was recovering from the RFI ‘flooding’ more readily than before. In previous experiments, once the MPU6050/Mega lost sync, it never recovered.
Next I tried looping the power wiring around an ‘RF choke’ magnetic core to see if raising the effective impedance of the power wiring to high-frequency transients had any effect, as shown in the following photo.

GND & +5V leads looped through an RF Choke.
Unfortunately, as far as I could tell this had very little positive effect on RFI susceptibility.
Next I tried shortening the GND & +5V leads as much as possible. After looking at the Mega pinout diagram, I realized there was GND & +5V very close to the SCL/SDA pins, so I fabricated the shortest possible twisted-pair cable and installed it, as shown in the following photo.

MPU6050 directly on Mega pins, shortest possible length power wiring
With this configuration, I was actually able to get consistent readings from the MPU6050, whether or not the motors were running – yay!!
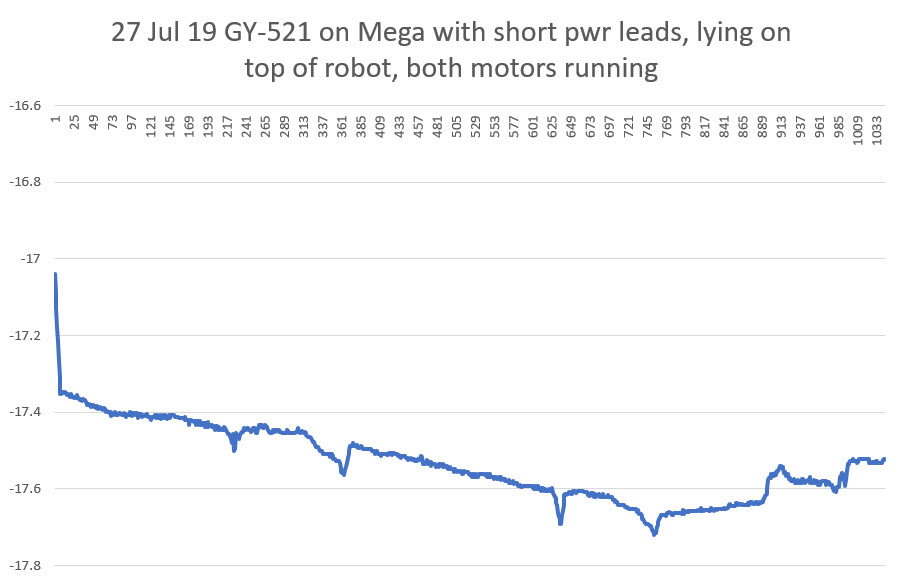
In the plot above, the vertical scale is only from -17 deg to -17.8 deg, so all the variation is due to the MPU6050, and there is no apparent deleterious effects due to motor RFI – yay!
So, at this point it’s pretty clear that a significant culprit in the MPU6050’s RFI susceptibility is the GND/+5V and I2C cabling acting as antennae and conducting the RFI into the MPU6050 module. Reducing the effective length of the antennas was effective in reducing the amount of RFI present on the module.
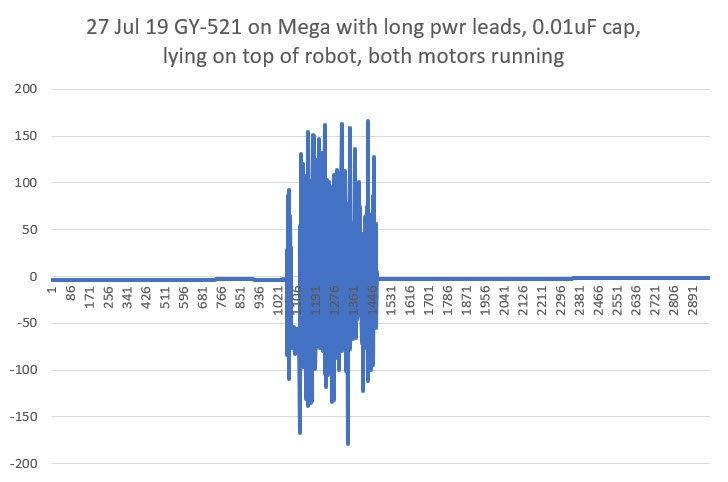
With the above in mind, I also tried adding a 0.01uF ‘chip’ capacitor directly at the power input leads, thinking this might be just as effective (if not more so) than shortening the power cabling. Unfortunately, this experiment was inconclusive. The normal length power cabling with the capacitor seemed to cause just as much trouble as the setup without the cap, as shown in the following plot.
Having determined that the best configuration so far was the zero-length I2C cable and the shortest possible GND/+5V cable, I decided to try moving the MPU6U6050 module from the separate test Mega to the robot’s Mega. This required moving the motor drive lines to different pins, but this was easily accomplished. Unfortunately, when I got everything together, it was apparent that the steps taken so far were not yet effective enough to prevent RFI problems due the switch-mode motor drivers
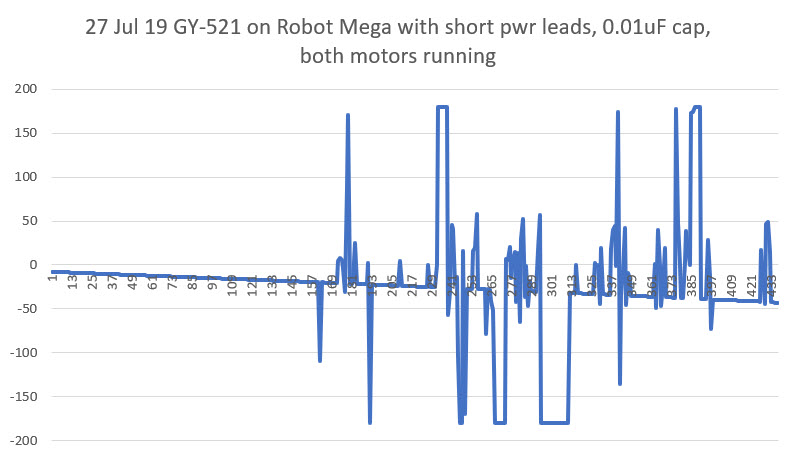
The good news, such as it is, is that the MPU6050/Mega seems to recover fairly quickly after each ‘bad data’ excursion, so maybe we are most of the way there!
As a next step, I plan to replace the current DRV8871 switch-mode motor drivers with a single L298N dual-motor linear driver, to see if my theory about the RFI problem being mostly due to the high-frequency transients generated by the drivers and not the motors themselves. If my theory holds water, replacing the drivers should eliminate (or at least significantly suppress) the RFI problems.
28 July 2019 Update:
So today I got the L298N driver version of the robot running, and I was happy (but not too surprised) to see that the MPU6050 can operate properly with the motors ON or OFF when mounted on the robot’s Mega controller, as shown in the following photo and Excel plots
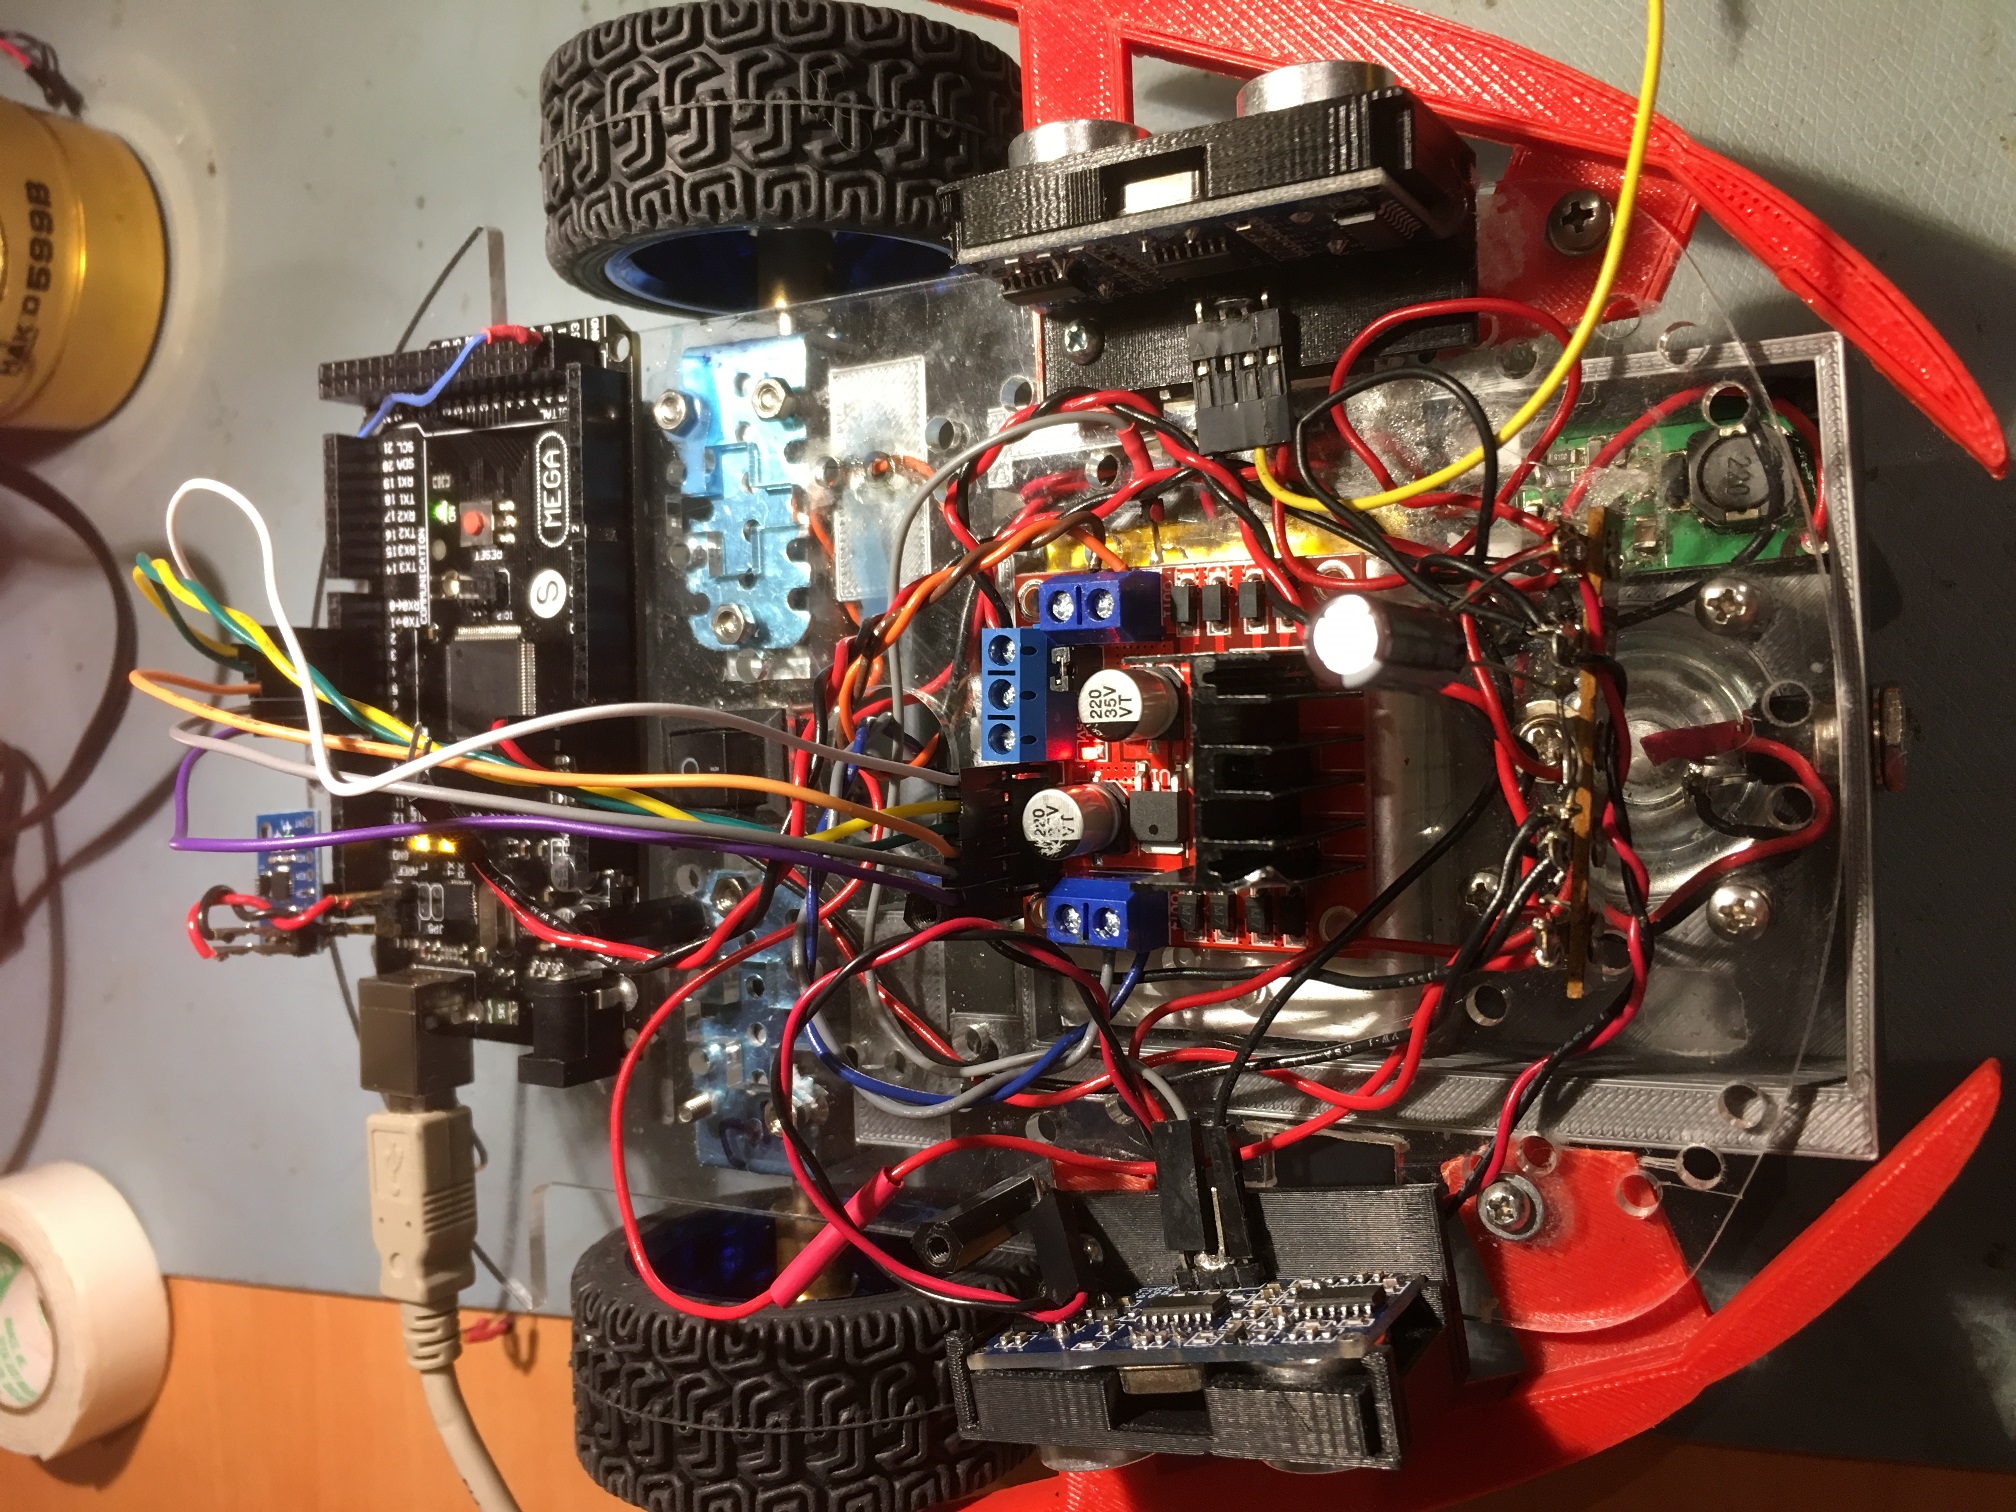
2-motor robot with L298N motor driver installed.
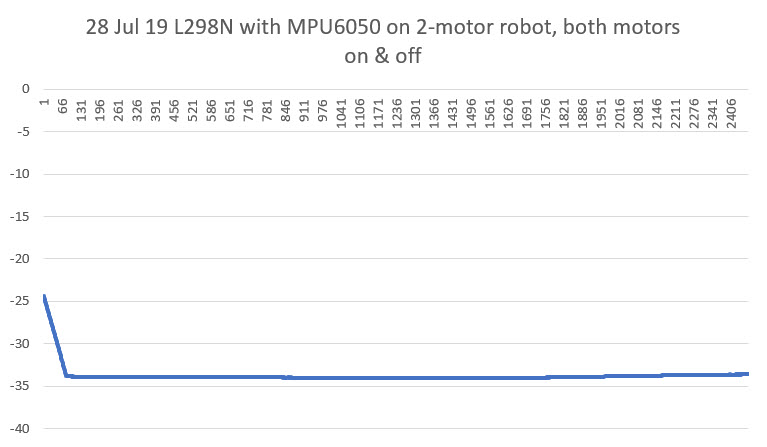
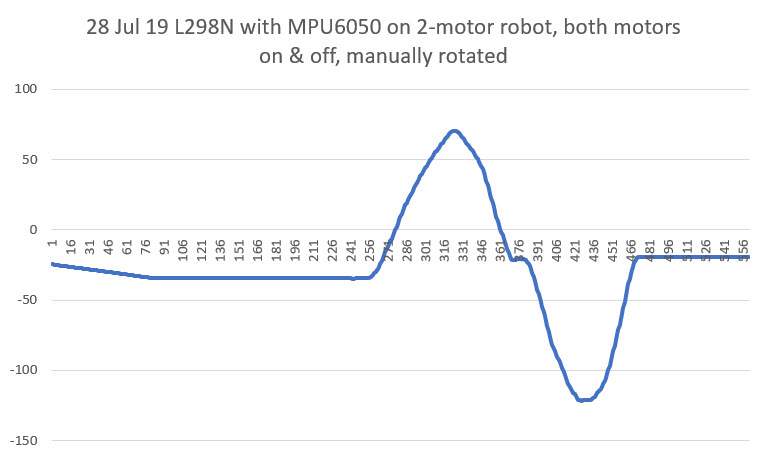
However, there does still seem to be one ‘fly in the ointment’ left to consider. When I re-installed the wireless link to allow me to reprogram the 2-motor robot remotely and to receive wireless telemetry, I found that the MPU6050 exhibited an abnormally high yaw drift rate unless I allowed it to stabilize for about 10 sec after applying power and before the motors started running, as shown in the following plots.

2-motor robot with HC-05 wireless link re-installed.
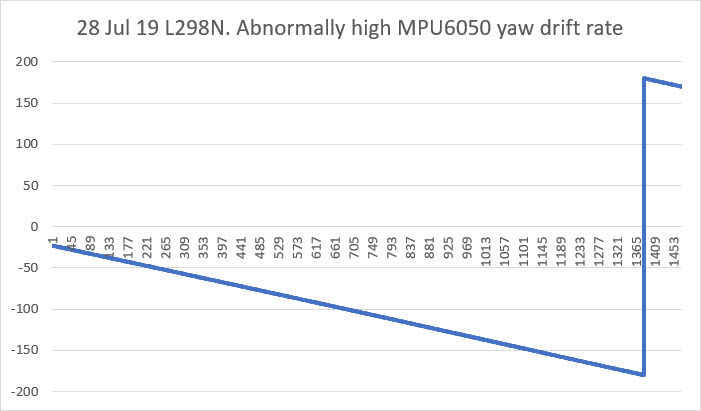
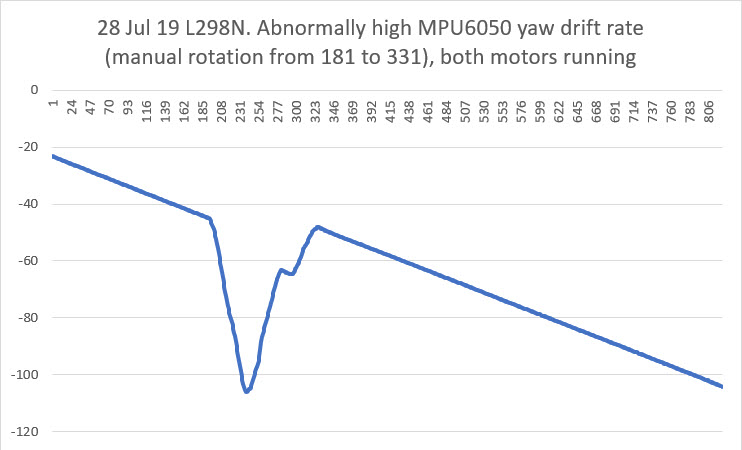
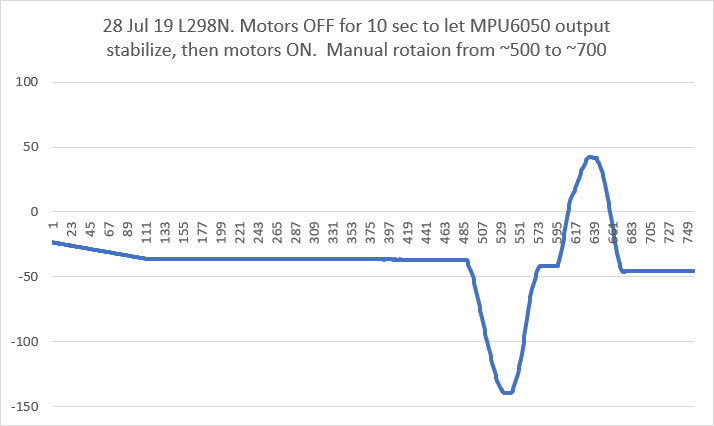
I have no idea what is causing this behavior.
31 July 2019 Update
So, I found a couple of posts that refer to some sort of auto-calibration process that takes on the order of 10 seconds or so, and that sounds like what is happening with my project. I constructed the following routine that waited for the IMU yaw output values to settle
|
1 2 3 4 5 6 7 8 9 10 11 12 13 14 15 16 17 18 19 20 21 22 23 24 25 26 27 28 29 30 31 32 33 34 35 36 37 |
int numdots = 0; while (!bMPU6050Settled && numvals < MAX_MPU6050_SETTLING_VALUES) { uint8_t IntStat = mpu.getIntStatus(); if (IntStat & 0x10) { mpu.resetFIFO(); } else if (IntStat == 0x02) { mpu.getFIFOBytes(fifoBuffer, DMPpacketSize); GetIMUHeadingDeg(); //if necessary, initialize the yaw running average array if (numvals < HDG_RUNNING_AVG_ARRAY_SIZE) { aHeading[numvals] = global_yawval; //mySerial.printf("%lu: numvals = %d, yawval = %3.3f\n", millis(), numvals, global_yawval); mySerial.printf("."); numvals++; } else { UpdateHeadingArray(); bMPU6050Settled = IsMPU6050Settled(); //mySerial.printf("%2.2f\t%2.3f\t%2.3f\t%2.3f\n", millis() / 1000.f, global_yawval, delta_yaw, deg_per_sec); mySerial.printf("."); numdots++; if (numdots >= 3*numvals) { mySerial.printf("\n"); numdots = 0; } } } } |
This was very effective in determining when the MPU6050 output had settled, but it turned out to be unneeded for my application. I’m using the IMU output for relative yaw values only, and over a very short time frame (5-10 sec), so even high yaw drift rates aren’t deleterious. In addition, this condition only lasts for a 10-15 sec from startup, so not a big deal in any case.
At this point, the MPU6050 IMU on my little two-motor robot seems to be stable and robust, with the following adjustments (in no particular order of significance)
- Changed out the motor drivers from 2ea switched-mode DRV8871 motor drivers to a single dual-channel L298N linear mode motor driver. This is probably the most significant change, without which none of the other changes would have been effective. This is a shame, as the voltage drop across the L298N is significantly higher than with the switch-mode types.
- Shortened the I2C cable to zero length by plugging the GY-521 breakout board directly into the I2C pins on the Mega. This isn’t an issue on my 2-motor test bed, but will be on the bigger 4-motor robot
- Shortened the IMU power cable from 12-15cm to about 3cm, and installed a 10V 1uF capacitor right at the PWR & GND pins on the IMU breakout board. Again, this was practical on my test robot, but might not be on my 4-motor robot.
- Changed from an interrupt driven architecture to a polling architecture. This allowed me to remove the wire from the module to the Mega’s interrupt pin, thereby eliminating that possible RF path. In addition, I revised the code to be much stricter about using only valid packets from the IMU. Now the code first clears the FIFO, and then waits for a data ready signal from the IMU (available every 50 mSec at the rate I have it configured for). Once this signal is received, the code immediately reads a packet from the FIFO if and only if it contains exactly one packet (42 bytes in this configuration). The code shown below is the function that does all of this.
|
1 2 3 4 5 6 7 8 9 10 11 12 13 14 15 16 17 18 19 20 21 22 23 24 25 26 27 28 29 30 31 32 33 34 35 36 37 38 39 40 41 42 43 44 45 46 47 48 49 50 51 52 53 54 55 56 57 58 59 60 61 62 |
bool GetIMUHeadingDeg() { //Purpose: Retrieve a heading value from the IMU //Inputs: None //Outputs: // returns true if successful, false otherwise // if successful, updates global_yawval //Plan: // Step1: reset the FIFO to clean out any garbage // Step2: get valid DMP packet from FIFO if it contains exactly DMPpacketSize bytes // Step3: compute yaw value from FIFO contents //Notes: // 07/31/19 rewritten to incorporate FIFO wait feature //Step1: reset the FIFO to clean out any garbage mpu.resetFIFO(); //Step2: get valid DMP packet from FIFO if it contains exactly DMPpacketSize bytes int FIFOWaitLoops = 0; //loop termination counter bool bGotDmpPacket = false; while (!bGotDmpPacket && FIFOWaitLoops < MAX_FIFO_WAIT_LOOP_COUNT) { uint8_t IntStat = mpu.getIntStatus(); if (IntStat & 0x10) //FIFO overflow { mpu.resetFIFO(); //mySerial.printf("xxx %d\n",fifoCount); } else if (IntStat == 0x02) //data ready { fifoCount = mpu.getFIFOCount(); if (fifoCount == DMPpacketSize) { //success... I hope! mpu.getFIFOBytes(fifoBuffer, DMPpacketSize); bGotDmpPacket = true; //terminate the loop } else //try again { mpu.resetFIFO(); } } FIFOWaitLoops++; //backup termination counter } //check for error exit if (FIFOWaitLoops >= MAX_FIFO_WAIT_LOOP_COUNT) { mySerial.printf("Init Hdg Loop timed out! %lu\t%d\t%3.2f\t%d\n", millis(), fifoCount, global_yawval, FIFOWaitLoops); return false; //report the error back to calling pgm } //Step3: compute yaw value from FIFO contents mpu.dmpGetQuaternion(&q, fifoBuffer); mpu.dmpGetGravity(&gravity, &q); mpu.dmpGetYawPitchRoll(ypr, &q, &gravity); global_yprzero = ypr[0]; global_yawval = ypr[0] * 180 / M_PI; return true; //success! } |
Here’s a short video of the robot making some planned turns using the MPU6050 for turn management. In the video, the robot executes the following set of maneuvers:
- Straight for 2 seconds
- CW for 20 deg, starting an offset maneuver to the right
- CCW for 20 deg, finishing the maneuver
- CCW for 20 deg, starting an offset maneuver to the left
- CW for 20 deg, finishing the maneuver
- 180 deg turn CW
- Straight for 3 sec
- 20 deg turn CCW, finishing at the original start point
So, I think it’s pretty safe to say at this point that although both the DFRobots and GY-521 MPU6050 modules have some serious RFI/EMI problems, they can be made to be reasonably robust and reliable, at least with the L298N linear mode motor drivers. Maybe now that I have killed off this particular ‘alligator’, I can go back to ‘draining the swamp’ – i.e. using relative heading information to make better decisions during wall-following operations.
Stay tuned!
Frank