Monthly Archives: February 2018

TP5100 2-cell LiPo Charger Module Study

Posted 24 February 2018

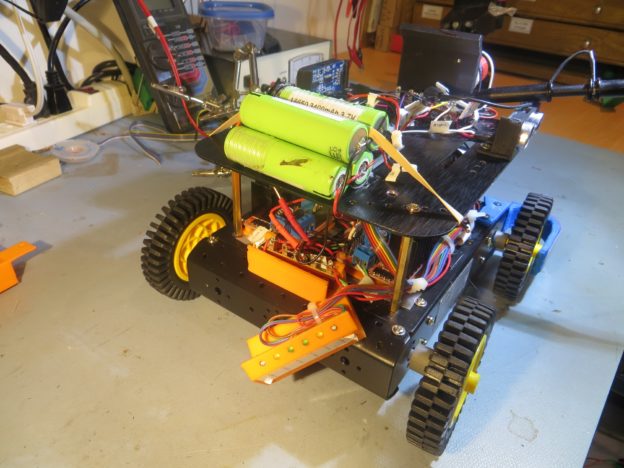
I have been working on Wall-E2, my autonomous wall-following robot, for almost three years now, and it seems like I have been struggling with the battery and charger arrangement for that entire time.   I started out with 4 AA batteries, but quickly moved on to a pair of Sparkfun 2000mAh ‘flat-pack’ cells with Sparkfun chargers, with a relay to switch the batteries from series (RUN) to parallel (CHG) wiring.   This worked, but not very well.   The flat-pack batteries weren’t a good match for motor control, and I kept burning up charger modules as well.   After struggling with this through several iterations, I finally abandoned it entirely in favor of a 7.4V 20C LiPo RC battery and an external charger. This worked much better, but forced me to manually disconnect the battery from the robot and charge it externally – not at all what I wanted.   Later on I made another run at the 2-cell series/parallel switching strategy for charging, this time using Adafruit Powerboost 1000C charge modules, each capable of 1A charge rates. Again this worked (actually quite well), but I recently discovered that it has a fatal flaw – this design imposes significant IR drops on the way from the battery terminals to the motors.

So, I have once again been searching for a solution to the battery/charger problem.   While wandering through the Googleverse the other day, I ran across a mention of the 1/2-cell TP5100-based charger module (about 9:50 from start), available for next to nothing on eBay.

Unfortunately, the available technical information on this module is also next to nothing, and what does exist is all in Chinese.   Still, this module has the potential for vastly simplifying my charger setup, so I thought it was worth the effort to perform a thorough study.

In a previous post, I described an Arduino controlled charge/discharge test setup for testing operation of my 2-cell parallel/series switched setup, so I decided to modify it for evaluating the TP5100 module, as shown below

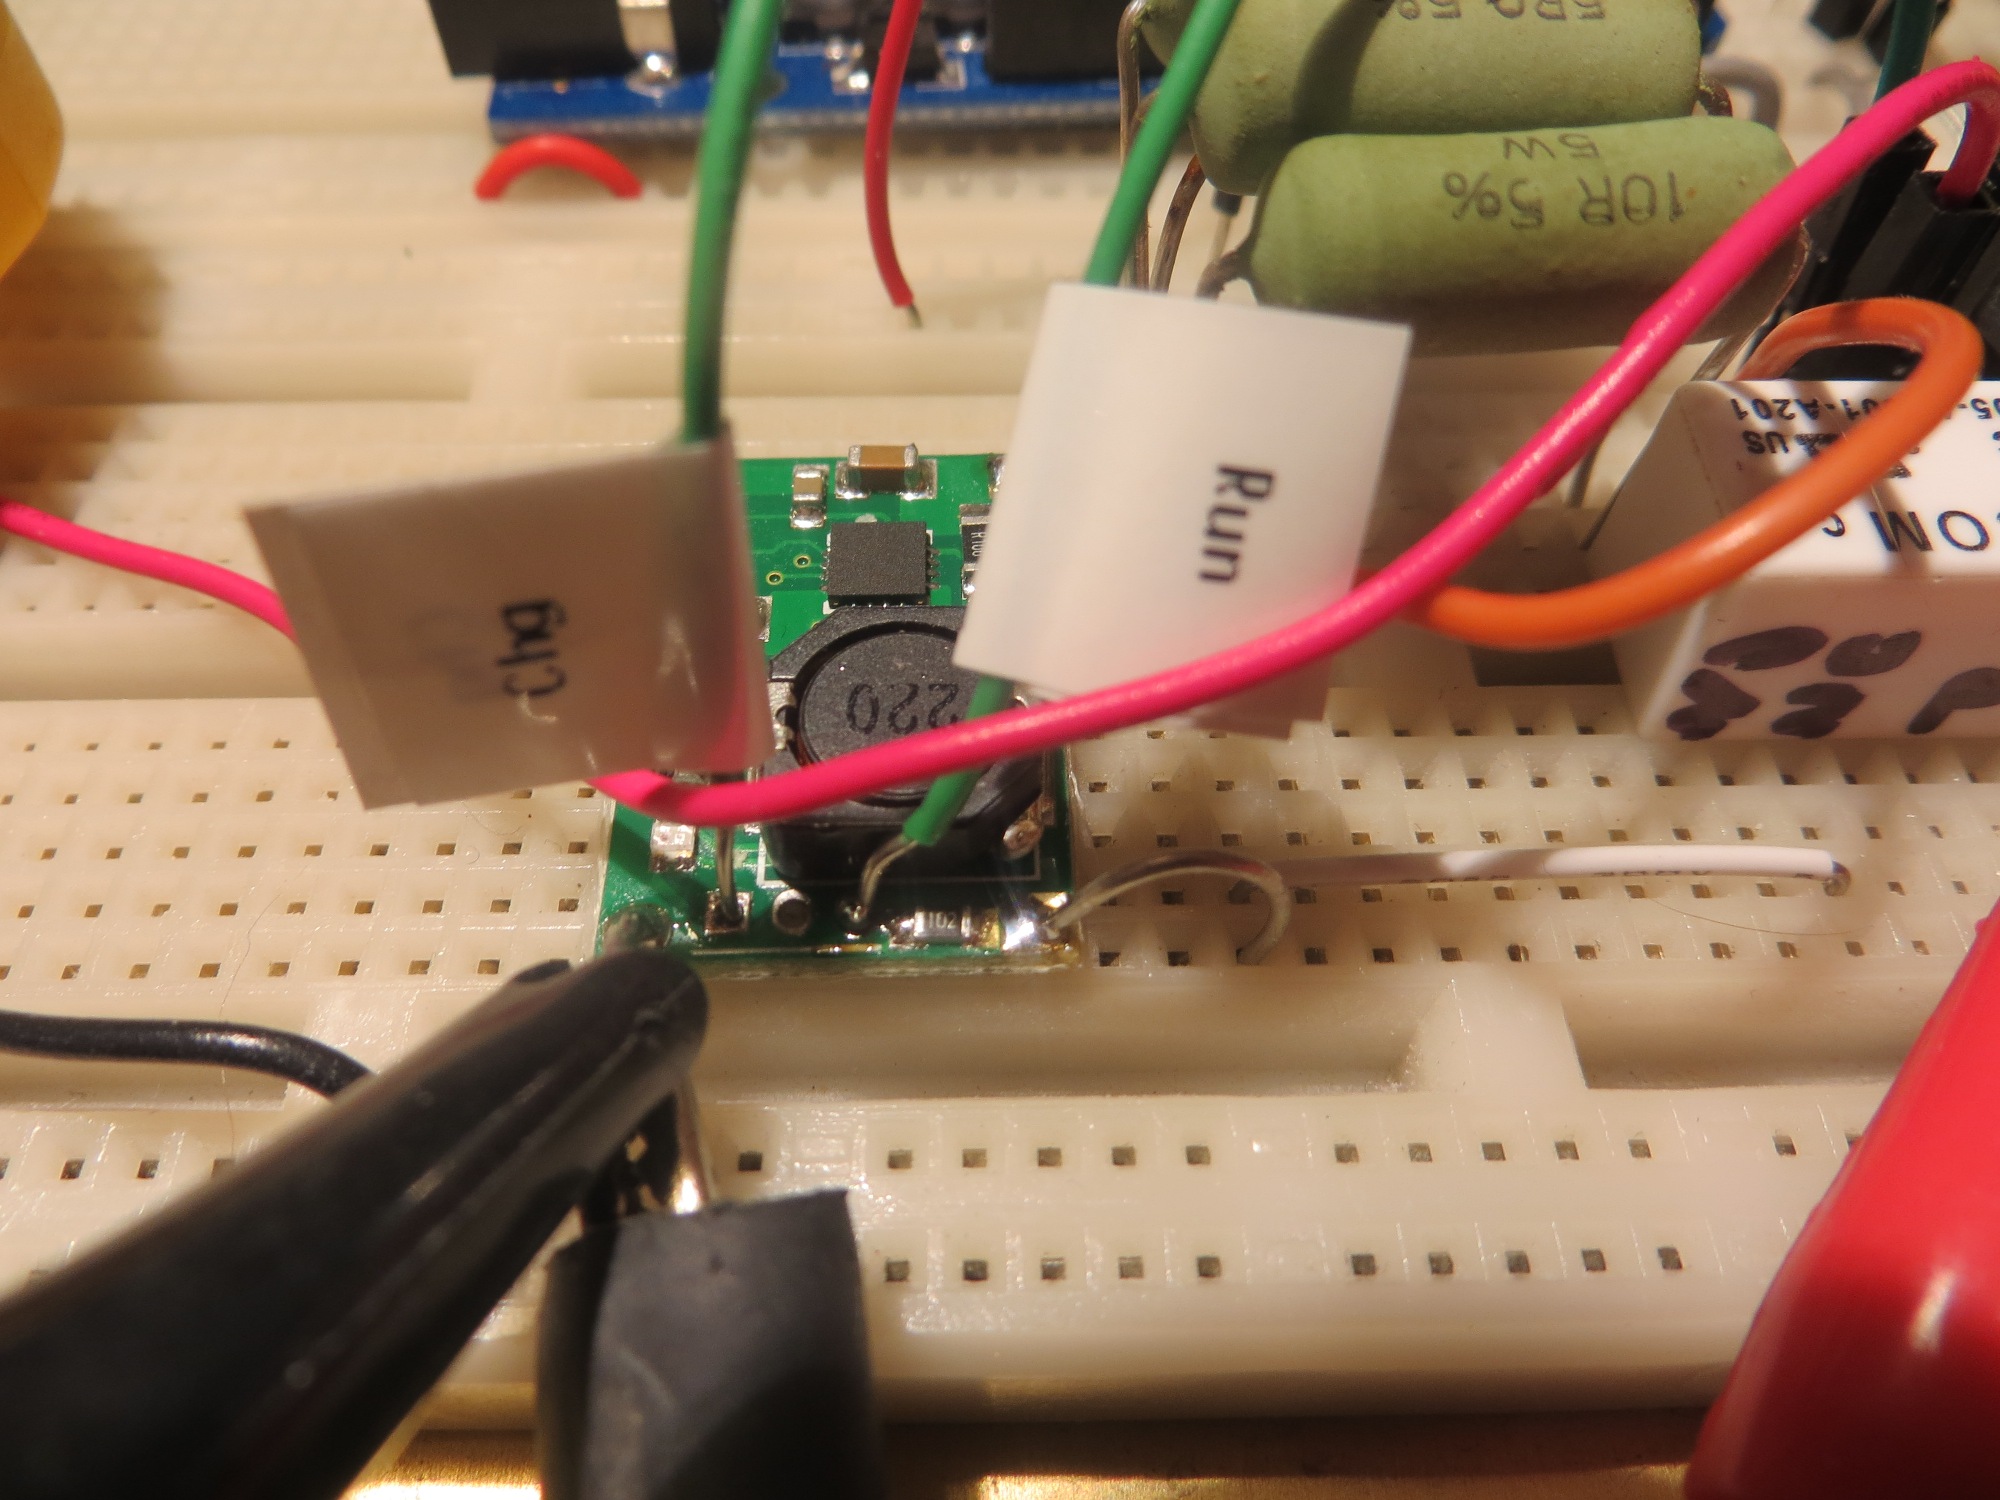
View of TP5100 module showing RUN & CHG indicator connections

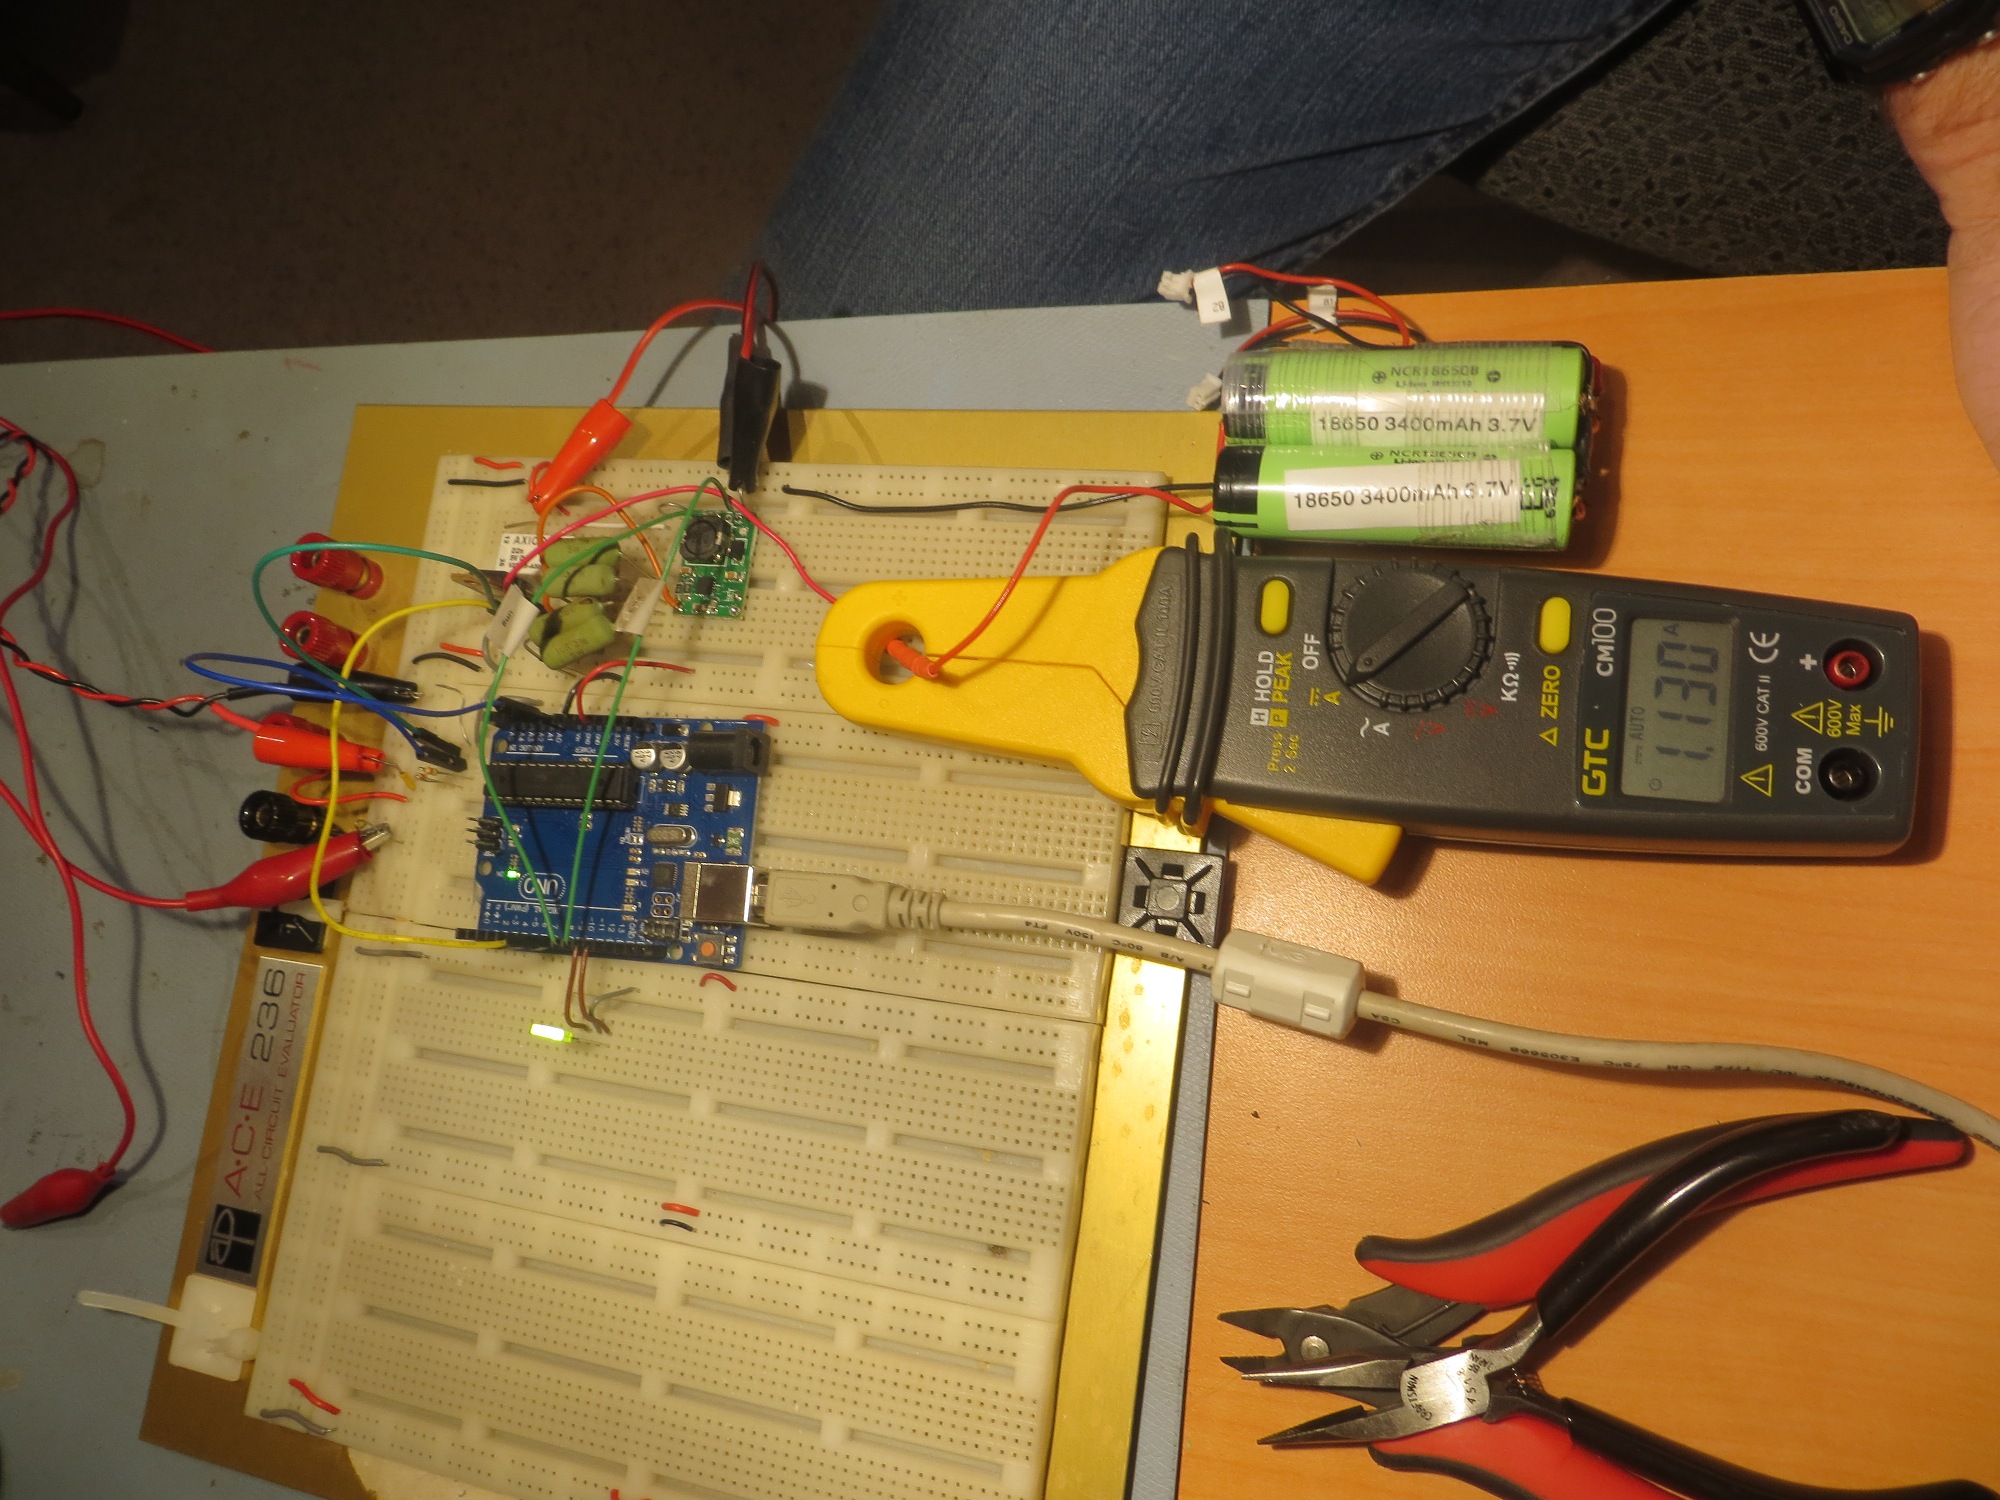
Charger test setup, in discharge mode (note 1.1A discharge current)

Charger test setup, in charge mode (note 1.8A charge current)

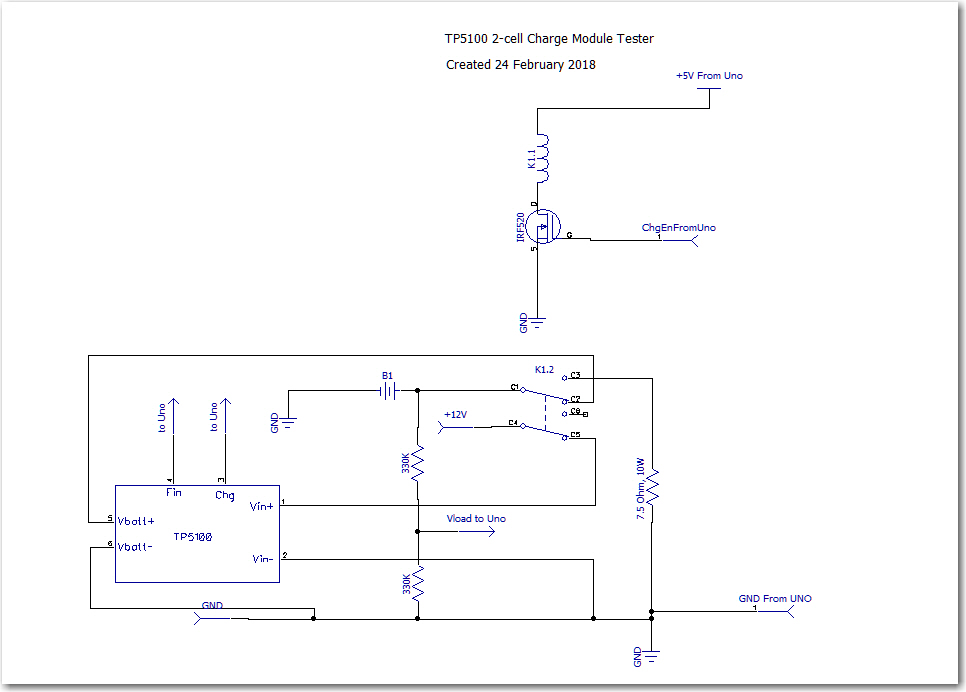
TP5100 Module Test Circuit

Using this setup, I was able to cycle the battery between a 7.5V load and the TP5100 charge module.   In order to keep the cycle times down to a dull roar, I set the software to switch to charge when the battery voltage dropped below 7.5V, resulting in the plots shown below.

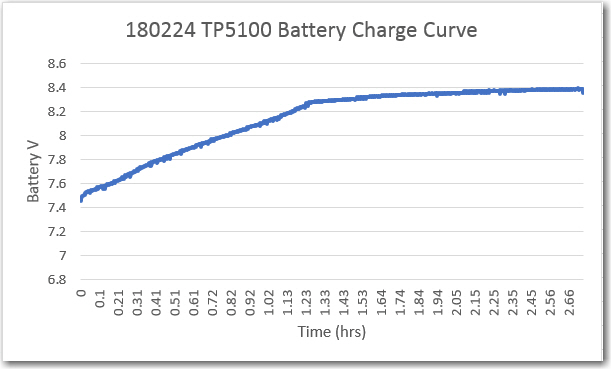
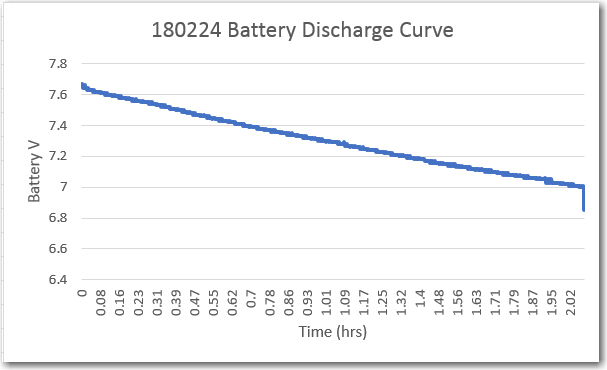
In this case, the discharge current was about 1.1A, and the observed charge current was about 1.8A.  The TP5100 modules seems to work as advertised – with a 12V 5A power supply and a partially charged battery, it successfully charged my 2-cell LiPo pack terminated the charge at about 8.4V (I’m not sure if it is terminating based on current or voltage).

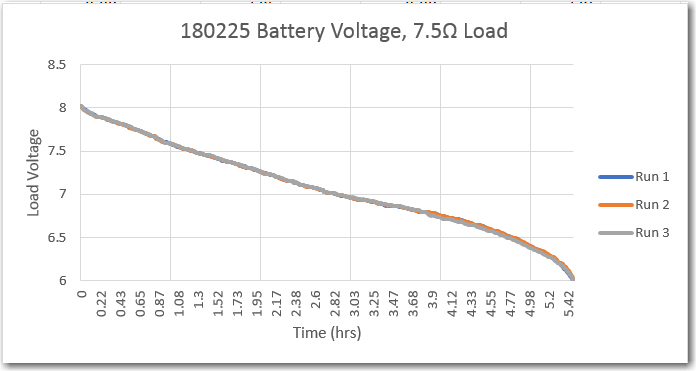
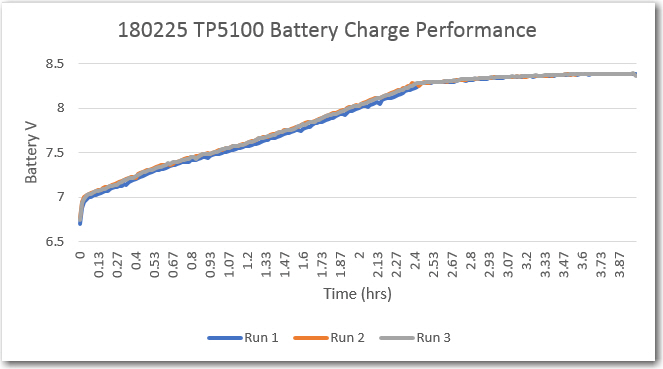
Over the next couple of days, I performed three complete charge/discharge cycles using this same setup.   Discharge was terminated at 6V, and charge was terminated when the TP5100 ‘complete’ output changed from open-circuit to active-low. As can be seen in these charts, performance was very consistent – almost 6 hours run time  into a 7.5V load, and about 4 hours for a complete recharge.


So here’s what I know now about the TP5100 module

  • When the ‘1-cell/2-cell’ jumper selector is shorted to select 2-cell, the output voltage stabilized at 8.4 with a 10-15V DC input (I used a 12V 5A supply for the tests).   Below about 10V, the output voltage falls below 8.4V
  • with a partially charged battery stack, output current was about 1.8A at the start, tapering to below 200mA at termination
  • There is an onboard Red/Blue LED and solder holes for an external bi-color LED.   The onboard LED states are:
    • RED = Charging
    • Blue = Finished
  • Both the onboard and external LED connections are tied to +V via the same 1K current limiting resistor.   This resistor is routed to the center hole of the 3-hole external LED breakout.   The rightmost hole is tied to an open-collector gate that goes LOW upon charge termination, and the leftmost hole is  tied to an open-collector gate that goes LOW upon charge initiation.   In my testing circuit above, these lines are labelled ‘Fin’ and ‘Chg’ respectively and were routed to digital inputs with 20K pullups on the Arduino UNO.
  • This is  NOT a balance charger – so there may be differences in cell voltages over time.   If this is a potential issue, then separate cell protection modules like these should be installed.

Here’s an annotated photo showing the pertinent features:

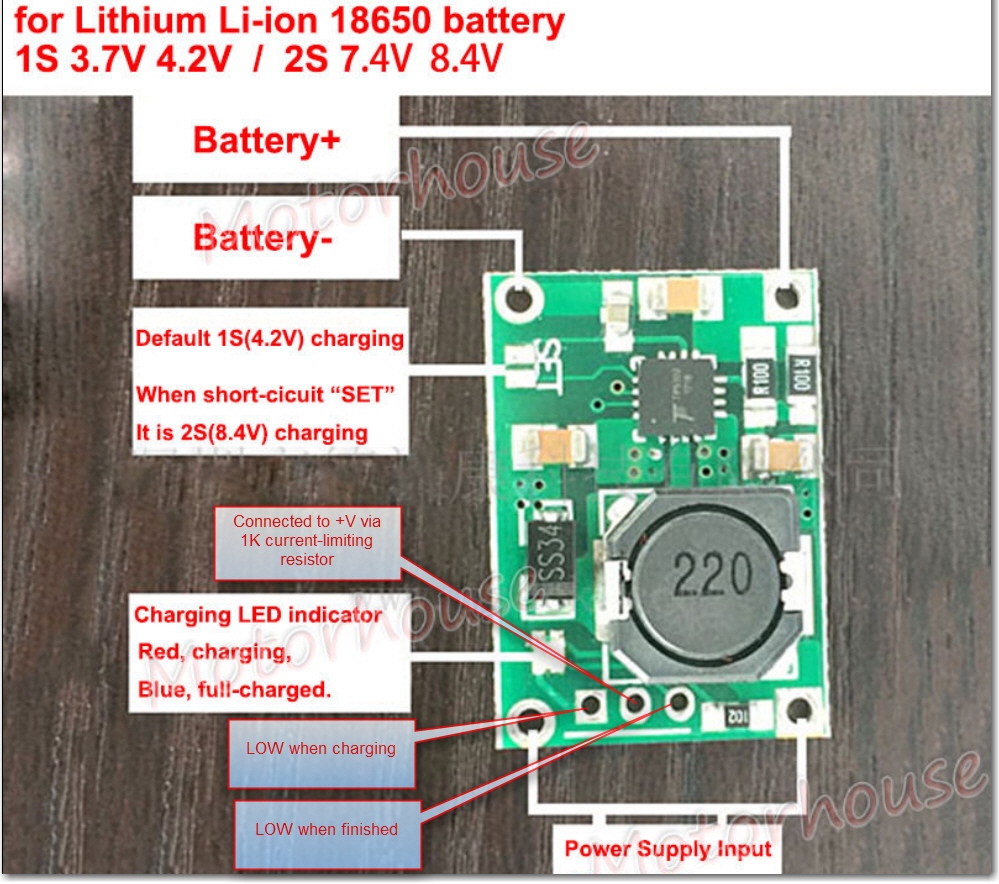
So, it looks like this TP5100 module will work fine for my 2-cell LiPo application, with the addition of an external 2-cell protection module like the one noted above.   Not only will this solve my original IR drop problem, but it is  much smaller and simpler too, as shown in the following size comparison shot.   Oh well, at least I had a lot of fun building up and testing the original charger module ;-).

charger module and TP5100 size comparison

Stay tuned!

Frank


The operation was a success, but …

Posted 21 February 2018

In early January of this year I posted about finishing the integration of my new-improved battery charger & battery pack into my new-improved robot chassis.   Between then and now I have been working on getting the new robot chassis mated up with the charging station (the new robot chassis is wider, and I also changed to larger diameter wheels) in preparation for renewed field testing.

Unfortunately, just as I was getting ready to move into field testing, my robot started acting funny.   About half the time, it wouldn’t disengage from the charging station and instead would reboot.   At first I thought the added weight of the new battery pack and robot chassis was causing the motors to stall, so I changed the code to have the robot disconnect at full motor speed rather than 1/2 as before.   This made the problem even worse; now not only wouldn’t Wall-E2 disengage from the charger, it wouldn’t even move forward or backward under it’s own power!   Clearly something was badly wrong, but I had no clue what it was.

Applying my time-honored troubleshooting – I simply put Wall-E2 aside for a few days and let my subconscious work backwards through all the changes since Wall-E2 had last worked properly.   After enough time had elapsed, my subconscious reported back and said:

“You are an idiot.   All of the complexity you added in your quest for an on-board charging system has placed that wonderful high-capacity battery pack at the far end of a long series of (relatively) high resistance circuitry, and the IR drop caused by full-speed motor currents is killing you!”   “Oh, and by the way, you’re ugly too!”

Well, my subconscious is almost never wrong, and it only took me a little bit of testing to confirm it’s theory.   I set the code up to go forward and backward at full speed, and monitored the CPU’s 5V regulated output line with my trusty oscilloscope.   As soon as the motor command was executed, the 5V line drooped to less than 3V, and the CPU rebooted – oops!

So now I knew  what was happening, and I (or my subconscious anyway) had a good idea  why.   To confirm the why, I bypassed all the charge-management circuitry and wired my 7.4V 7200mAh battery pack directly into the main robot power line, as shown in the photo below

7.4V 7200mAh battery pack wired directly into robot power

With this setup, the robot not only was able to move forward and backward at full speed, the thing damn near took my arm off when I tried to stop it – whoa!

So, the bottom line is that all the work I put in designing and implementing a really cool on-board dual-cell charge management system had the ultimate effect of making the battery unusable.   The operation was a success, but the patient died! ;-).

So, where to go from here?   It appears that I have to completely revise my thinking about battery charging and maintenance for Wall-E2.   Instead of being in series with the battery, any charging/maintenance system must operate in parallel, and be completely out of the path between the battery pack and the load when the robot is running.   Now I realize this is the reason most RC/Hobbyist multi-cell battery packs have a balance charging cable in addition to the main power cable; charging is done completely independently of the output path.

When I first started the charger project, my original goal was to avoid having to remove the battery from the robot to charge it; I wanted Wall-E2 to   connect to power and charge itself without human intervention.   At the time, I felt the only way to do this was to have the charging circuitry on board, so that only a single DC connection from the charging station was required.   I thought the only way to make this happen was to use two of the Adafruit SBC1000 charger modules to charge each of the two cells independently.   Unfortunately, the SBC1000’s grounds aren’t isolated, so this meant that I had to disconnect the two battery pack cells from each other to charge them independently and then switch them back together again to run the robot after charging.   This worked (rather elegantly if I do say so myself), but had the unintended side-effect of putting too much high-loss circuitry and wiring between the battery pack and the motors.

Now that it is clear that I can’t interfere with the current path to the motors, I know I have to abandon the current charging module design, but what are the alternatives?

  • The TP5100 is a little module that can balance charge a 2-cell LiPo stack at 2A.   It has a dual-color LED output that I might be able to use for charge termination.   Unfortunately, the specs are all in Chinese, so it may take some experimentation to figure out.
  • I can use an external balance charger like the EV Peak e4 ‘cube’ automatic balance charger, and feed the three required wires (ground, B1+, B2+) out through the front of the robot to the charging station. This solves the problem of carrying the charger around, but significantly complicates the interface to the charging station.

Stay tuned!