Posted 22 December 2017
After having worked out (hopefully) all the bugs in the Arduino Uno program and associated test hardware, I have moved on from testing just one of the Adafruit PowerBoost 1000C charging module in isolation to testing the entire 2-cell battery pack system, albeit with the smaller 2500mAh LiPo’s rather than the full-up 18650 stacks.
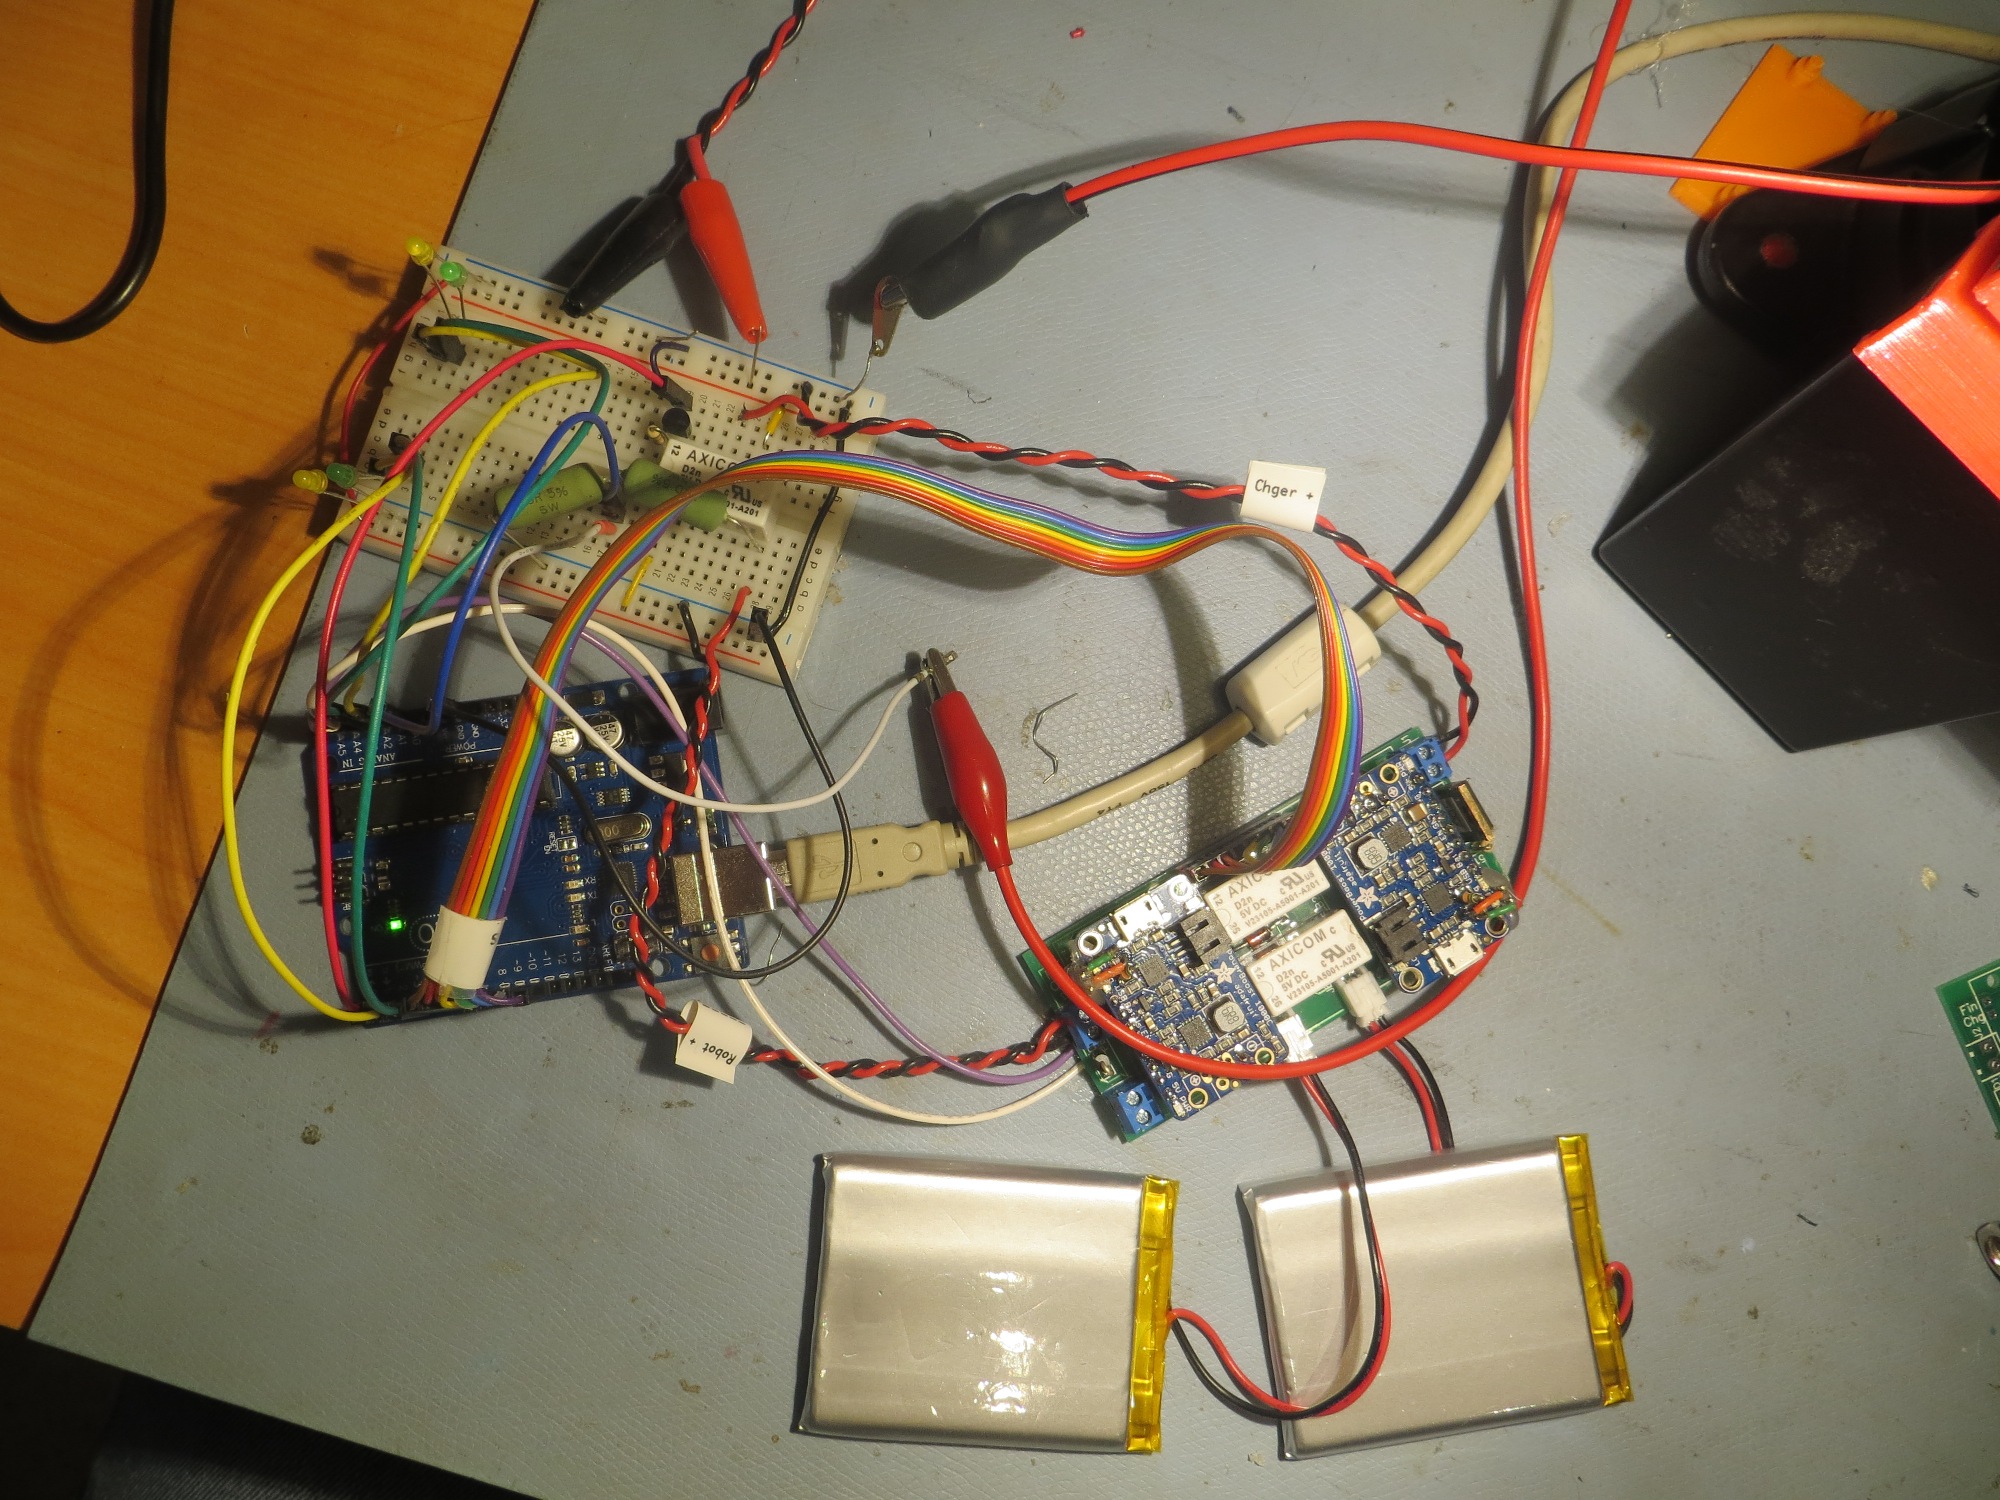
Full-up test of the 2-cell charging system using 2500mAh LiPo cells
Full charge of 2500mAh cells
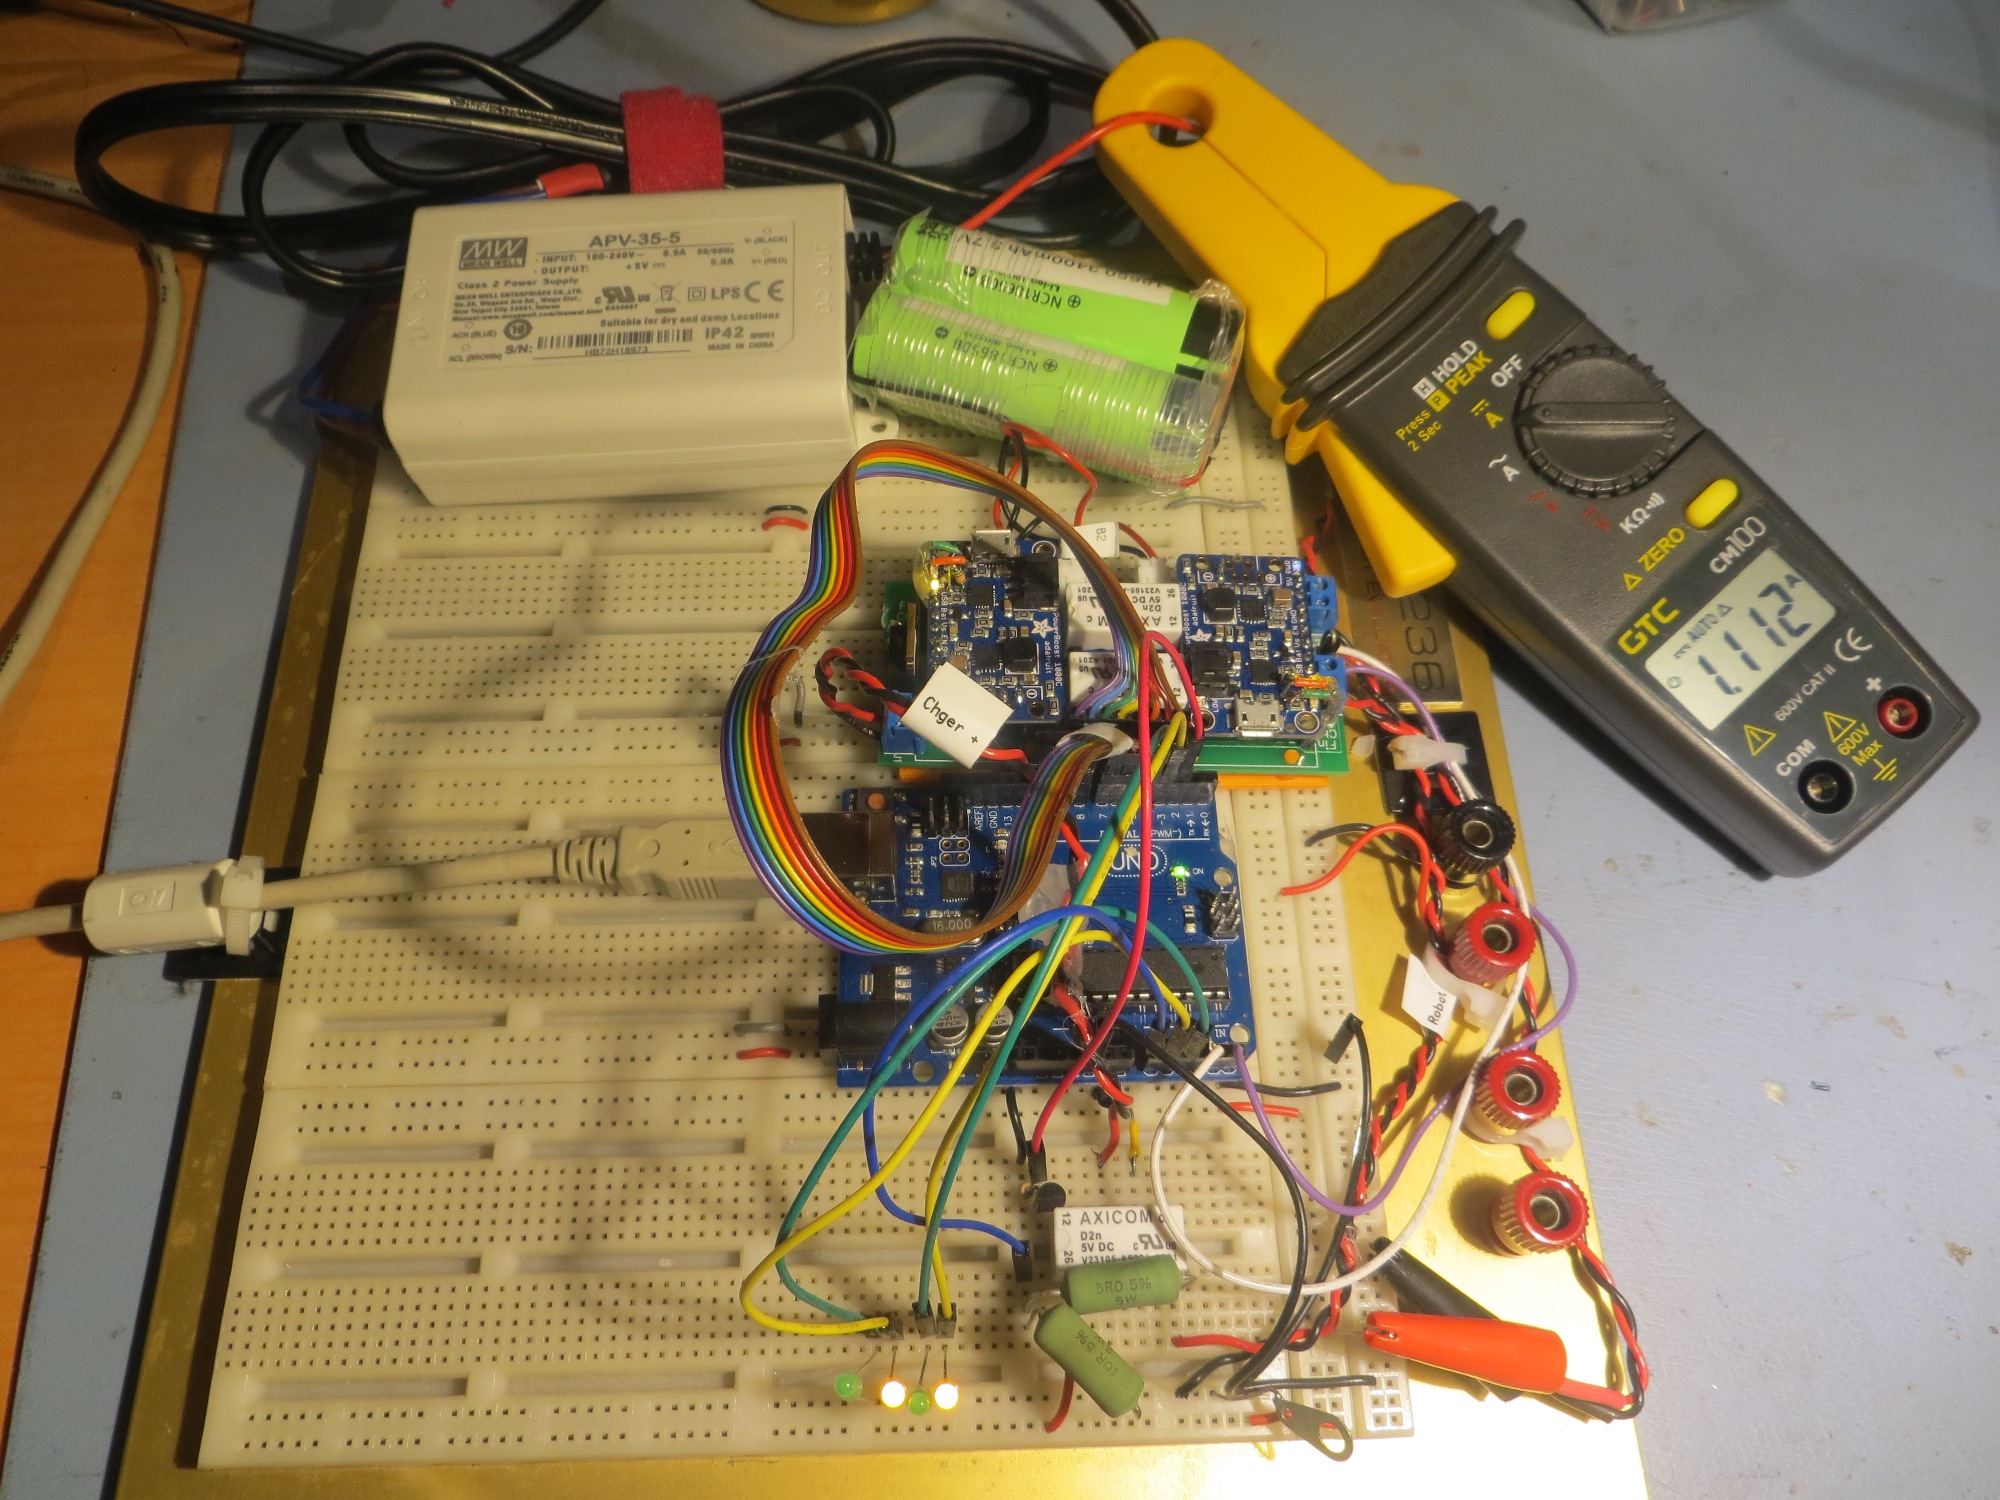
After several days of testing, I never really got consistent results with this setup – I seemed to be always chasing intermittent problems of one sort or another. Then I finally figured it out (I think) – the problem wasn’t my setup, it was the proto plug-board I was using. This board was a cheap no-name plugboard I got off eBay, and apparently I got exactly what I paid for! ;-(. So, I reverted to my tried-and-true (but HUGE!) AP Products A.C.E. 236 plugboard that I have had around the lab for a couple of decades, at least. When I transferred the setup to this plugboard, everything started working better. In particular, the battery charging current went from about 0.5A to about 1.5A – a much more believable (and practical) figure than before. Here’s the new test setup.

New test setup with my trusty AP ACE 236 plugboard. Note charging current shown on current meter
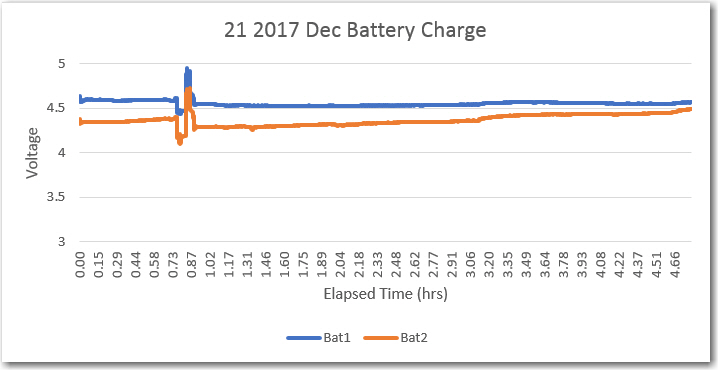
After getting the hardware problems squared away, I started getting reliable charge/discharge cycle data, as shown in the curves below
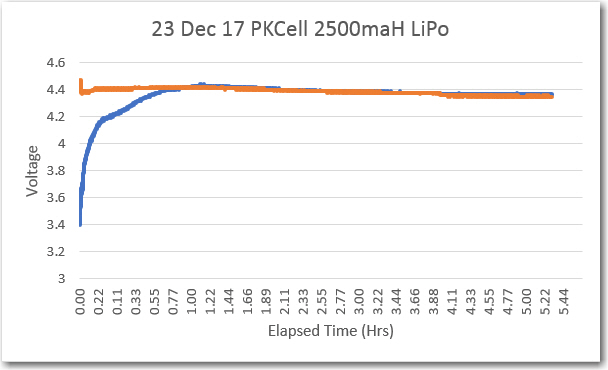
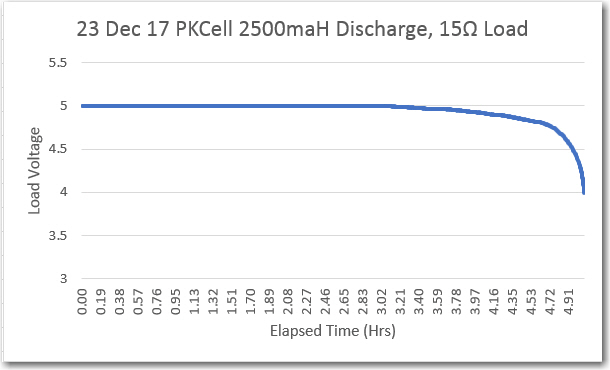

Two complete charge/discharge cycles. Note the time axis is in minutes here
The next step in the process will be to replace the PKCell 2500mAh flat-pack LiPo cells with the 6800mAh pack (two series banks of 2ea Panasonic 18650 3400mAh cells in parallel) to be used in the robot.
26 December Update:
Chg/Dischg testing with the Panasonic 18650 packs from the robot.
As shown above, I switched out the 2500 mAh flatpacks for the Panasonic 3400 mAh cells from the Wall-E2 robot. Initially I was somewhat disappointed with charging performance, as I was only seeing about 1 – 1.5A initial charge current for both 6800 mAh cells, instead of the 2+ A I expected to see. Eventually I narrowed the problem down to stray resistance in the testing circuit itself, through the plugboard, the plugboard wiring, and the relay being used to switch charging power to the battery module. When I bypassed these elements and connected the external MeanWell 5V power supply to the battery module terminals, the max current increased to slightly over 2A, as expected. This is actually very good news, as it means that the resistance of the PCB traces supplying power to the PowerBoost 1000C modules is low enough to not materially affect the max charging current – yay!
Still, even with the max charging current up at 1A/cell and with the PB 1000C’s PROG3 charge termination resistor reduced from 100K to 33K, it takes every bit of 10 hours to charge the battery pack from 3V to 4.2V, as shown below.
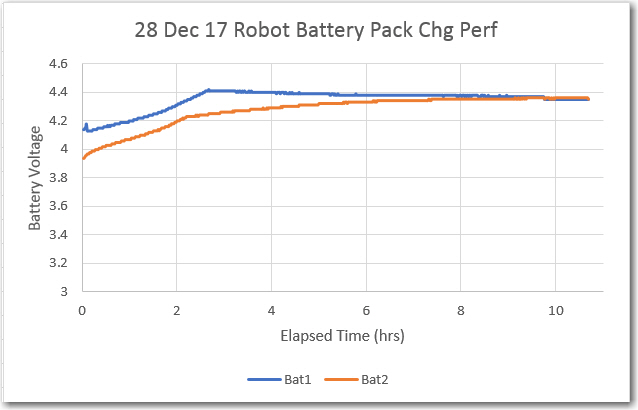
Panasonic 18650 6.8AH robot battery pack. Initial charge rate approx 1A per 2-cell parallel stack
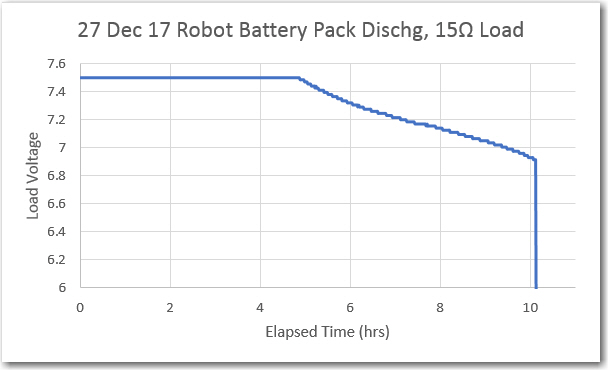
Panasonic 18650 6.8AH robot battery pack discharge, 15 ohm load
28 December 2017 Update:
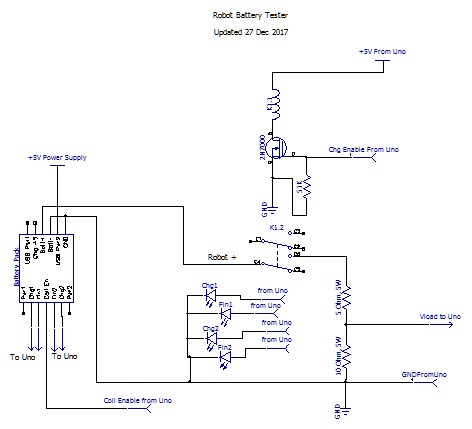
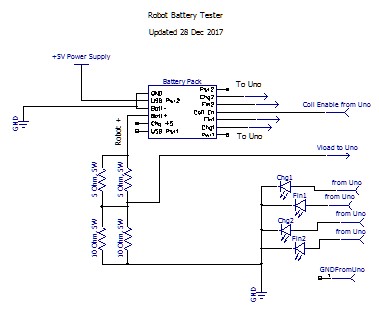
While testing these battery packs for charge and discharge performance, I came to realize that I had over-complicated the test circuit. The original test circuit is shown below:

This circuit uses a relay to switch +5V power to the charger modules in the battery pack module, and also to switch the load in and out. As I gained more experience, I realized the relay contact resistance was substantially reducing the charge current, so I wired +5V directly to the battery pack; this worked because the Arduino running the test circuit keeps the battery pack parallel/series relay disengaged (meaning the battery cells are arranged in series) until the load voltage drops below a set threshold. So, this realization resulted in the following updated circuit schematic.
As shown above, I added the connections to the battery charger module, and the LED displays.
However, I have now come to realize that the other half of the relay isn’t necessary either, as the ‘Robot +’ line isn’t connected to anything until the test manager computer (Arduino Uno) recognizes the end-of-charge condition and changes the Coil Enable signal from HIGH to LOW, disabling the battery pack’s internal relay and changing the battery configuration from parallel (CHARGE) to series (RUN). So, now the test circuit can be reduced to just the LEDs and the load resistors, as shown below.
While I was making the other changes, I also cut the load resistance in half, from 15Ω to 7.5Ω to more accurately simulate the actual robot motor loads, and (finally!) managed to capture a complete discharge cycle, as shown below.
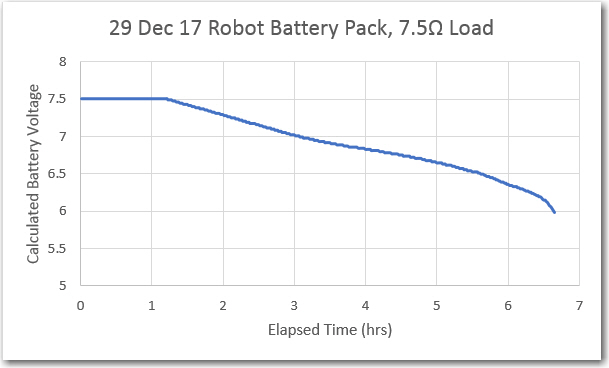
Complete Robot Battery Pack Discharge Curve, 7.5-ohm load.
The 7.5Ω load for this run provides a good approximation for the maximum current drain experienced by the robot under most operating conditions, so it is now safe to say that the robot should be able to run at least 6 hours on a charge, and that a full charge will take about 10 hours. So, the robot will spend more time on the charger than on the road, but that’s life in the robot lane.
Stay tuned!
Frank