22 September, 2015
In my last post I described the results of some ‘field’ (long hallway) testing with Wall-E, with an eye toward validating my idea of using the ‘min distance angle’ as the primary input to my wall-following robot navigation algorithm. While the initial results of static testing were encouraging, the results of a more realistic simulated wall following run where I manually pushed the robot along the hallway were even more discouraging. I became convinced that the ‘min distance angle’ just didn’t have sufficient resolution for good steering, and getting better resolution would require a significant re-design of the tach sensor setup (in progress, but…).
So, I started thinking about using a PID (Proportional Integral Differential) controller using just the min distance as the input. PID controllers can be quite effective dealing with complex electromechanical processes, but they can be tricky to ‘tune’ correctly. After reading up on PID controllers in the Arduino world for a while, I ran across a nifty blog site managed by Brette Beauregard (http://brettbeauregard.com/). Brette is apparently a PID god, and he has graciously shared his knowledge with us mere mortals in the form of a number of introductory articles on PID design, a new Arduino PID library, a nifty PID Autotune library, and an active PID Google Group. Thanks Brett! I’d nominate you for sainthood, but I think you went past that a while ago ;-).
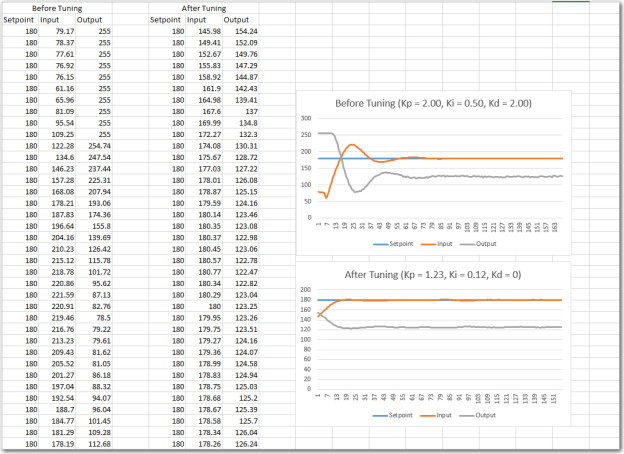
Anyway, after reading through a lot of the introductory material and even understanding some of it, I decided to give the PID Autotune library and the associated example sketch a try. I downloaded the library, and fired up the example sketch using a spare Arduino Uno I had laying around. After the requisite amount of fumbling around, I started getting some recognizable output on the serial monitor, and after a while I even figured out how to enable the auto-tuning feature. The following printout and associated Excel plots show the results before and after tweaking the PID tuning constants.
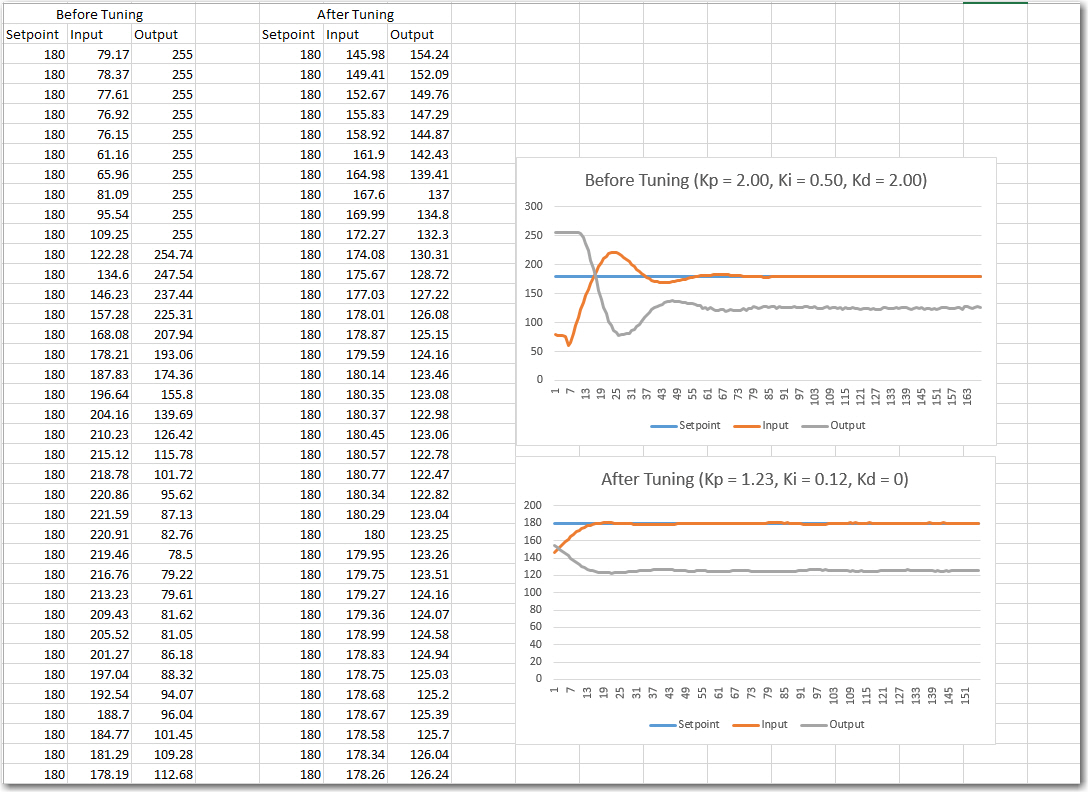
PID Autotune library example. Data and Excel plot of before and after auto-tuning, with simulated input/output.
From the plots it is pretty obvious that the auto-tuned PID parameters do a much better job of acquiring and tracking the setpoint.
This is pretty awesome stuff, and I definitely plan to try a PID controller for Wall-E my wall-following robot. However, here in the real world there are a few flies in the PID ointment, especially with respect to auto-tuning. Most significantly, the auto-tuning process takes about 9 cycles of input/output swings to come up with suggested tuning constants, and acquiring those 9 cycles without Wall-E wandering off into the middle of the living room or crashing into a wall (or even worse, being snagged by the dreaded ‘stealth slippers from hell’ (aka the wife’s fuzzy slippers). I may just have to suck it up on this one and tune the PID constants manually, we’ll see.
Stay tuned!
Frank